Building a Scalable and Secure API Gateway with Azure API Management and Bicep
Learn how to design and deploy a scalable, secure API gateway using Azure API Management and Bicep. This guide covers step-by-step implementation, best practices, and future-ready enhancements for modern cloud architectures.
1. Introduction
Infrastructure as Code (IaC) is revolutionizing cloud resource management by enabling developers and engineers to define infrastructure in code. This approach brings consistency, efficiency, and scalability to cloud deployments, eliminating the risks and inefficiencies of manual provisioning.
Azure Bicep, Microsoft’s declarative domain-specific language (DSL) for IaC, simplifies this process by providing a user-friendly and modular way to define Azure resources. In this blog, we’ll walk through a project that leverages Bicep to deploy a robust API Management gateway for an e-commerce application. The project showcases best practices in IaC, modular architecture, and API Management.
Why Azure Bicep?
Azure Bicep was designed to address the complexities of JSON-based ARM templates by providing a concise, human-readable syntax. Here’s why Bicep is an excellent choice for this project:
- Simplified Syntax: Bicep significantly reduces code complexity, making it easier to write and maintain.
- Modularity: You can break deployments into reusable modules for improved organization and scalability.
- Native Integration: Bicep compiles seamlessly into ARM templates and is fully supported by Azure.
- Enhanced Tooling: Visual Studio Code offers rich support for Bicep, including IntelliSense, error detection, and resource schema validation.
Workflow of IaC with Bicep
To understand how Bicep fits into the cloud provisioning lifecycle, consider the workflow below:
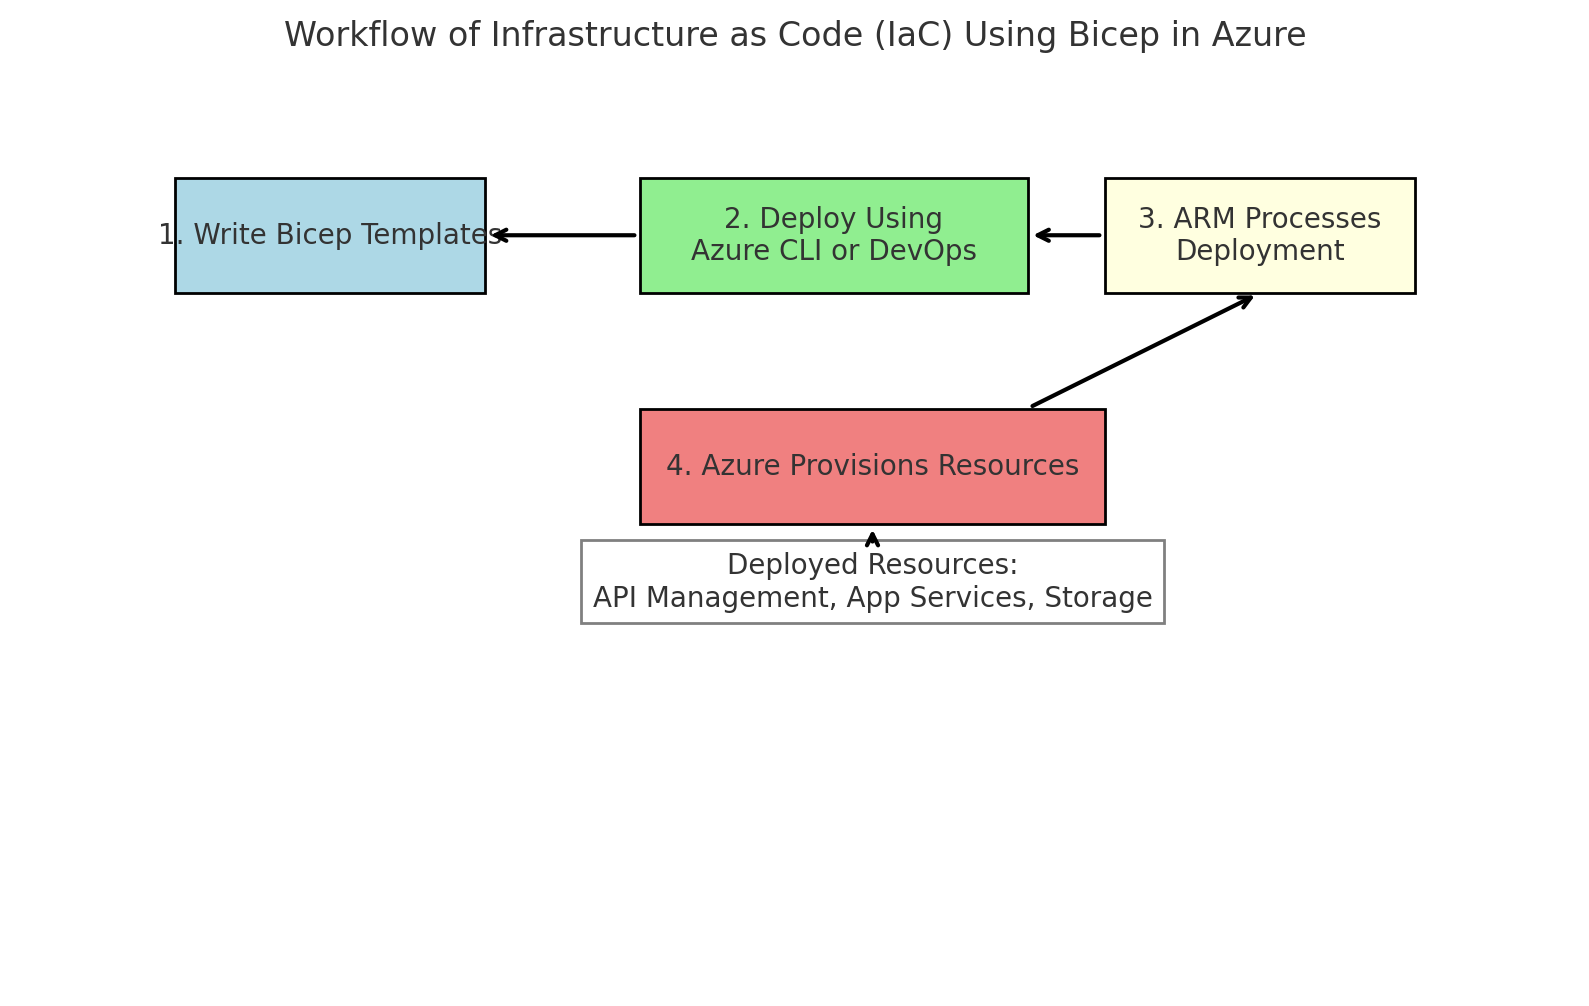
This flow demonstrates how Bicep templates are written, deployed using Azure CLI or DevOps pipelines, processed by Azure Resource Manager (ARM), and finally provisioned into Azure resources.
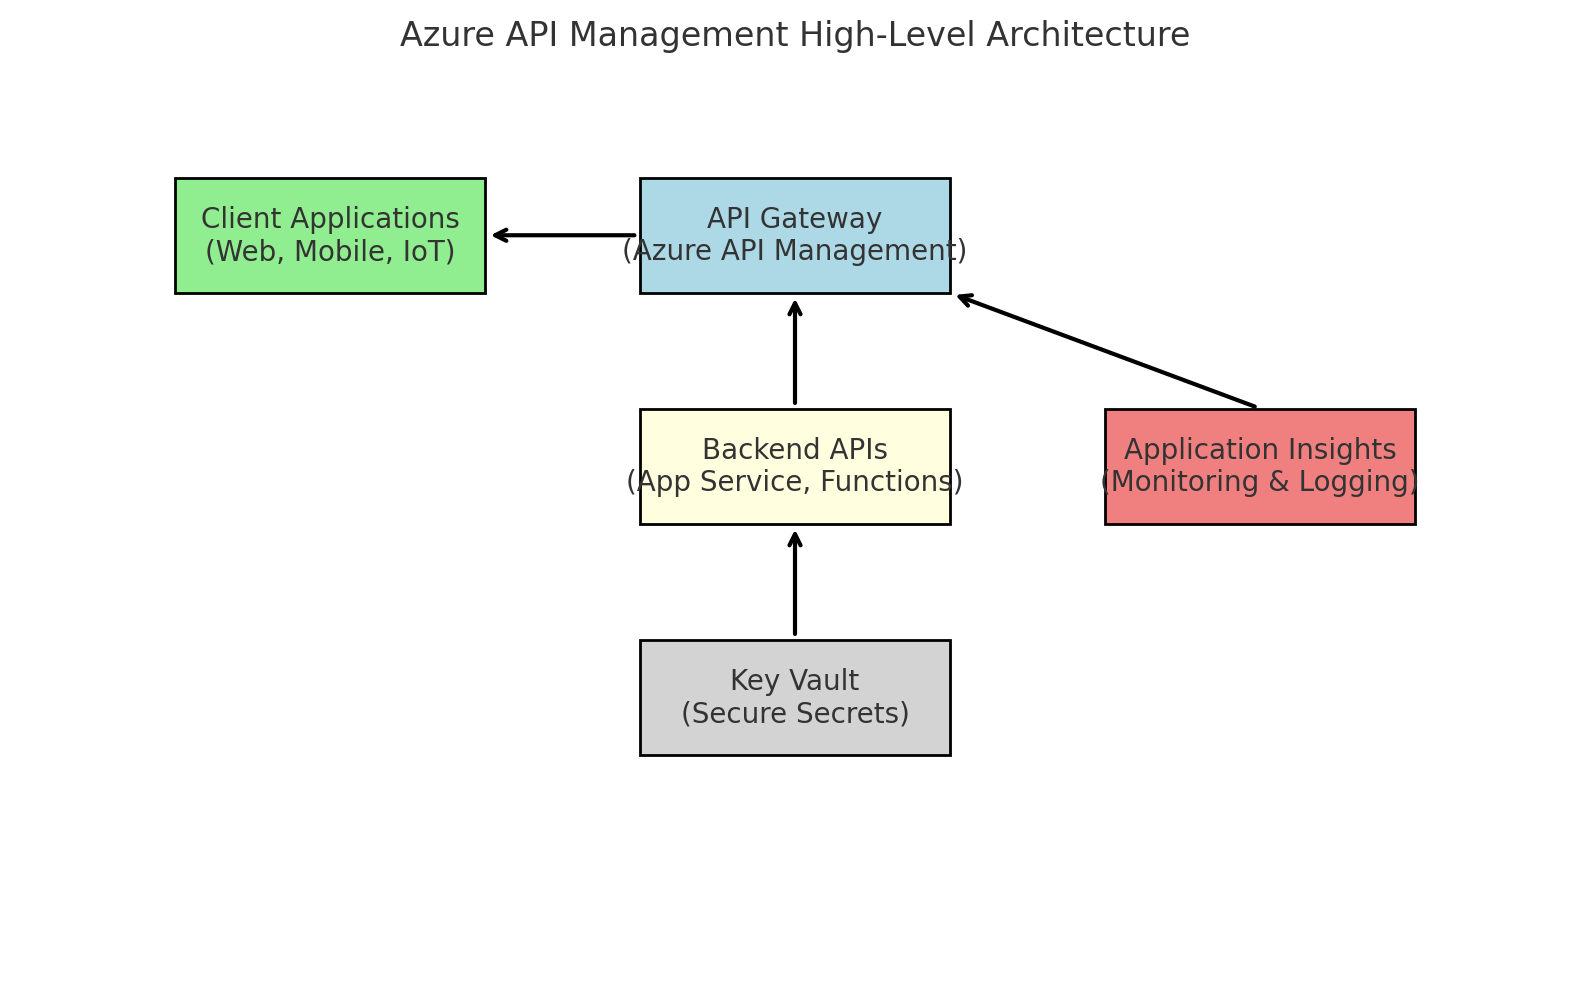
What is Azure API Management?
Azure API Management (APIM) is a fully managed service that simplifies API publication, security, monitoring, and transformation. In this project, APIM will:
- Act as a single entry point for client applications accessing backend APIs.
- Enforce security policies such as rate-limiting and authentication.
- Monitor and log API usage and performance with Application Insights.
The diagram below illustrates the high-level architecture of Azure API Management:
Why This Project?
This project demonstrates critical skills for cloud engineers and developers, including:
- IaC Expertise: Learn how to define, deploy, and manage Azure resources with Bicep.
- API Management Proficiency: Gain practical experience configuring an API gateway with policies and monitoring.
- Real-World Applicability: Build a reusable and scalable solution for modern cloud applications.
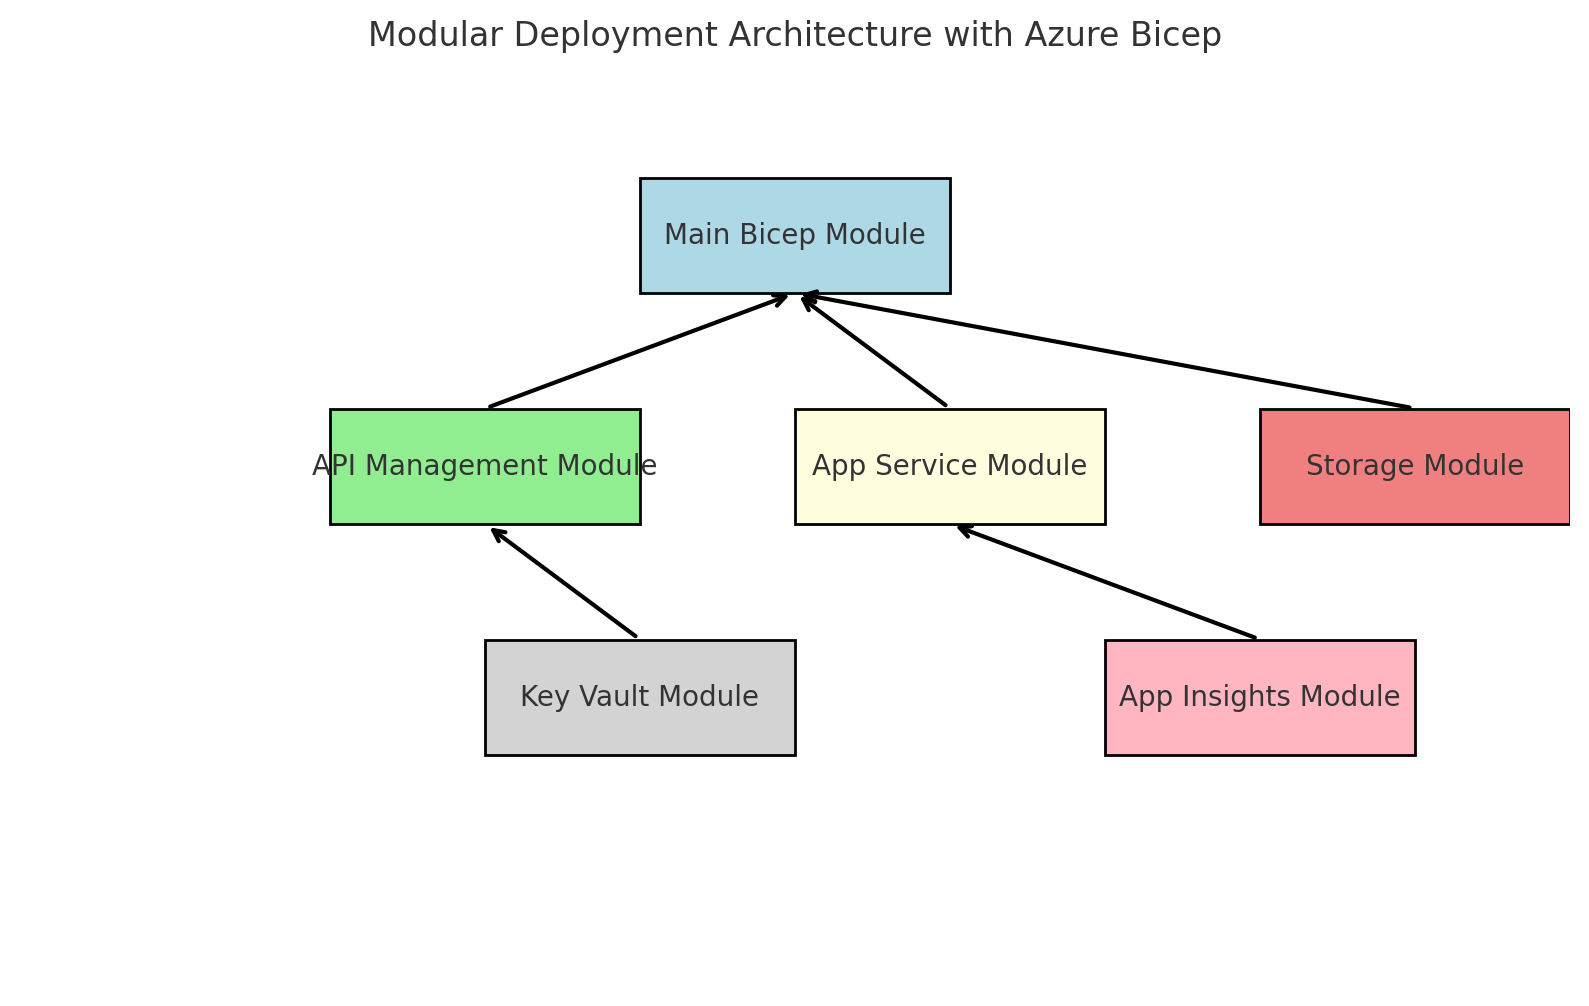
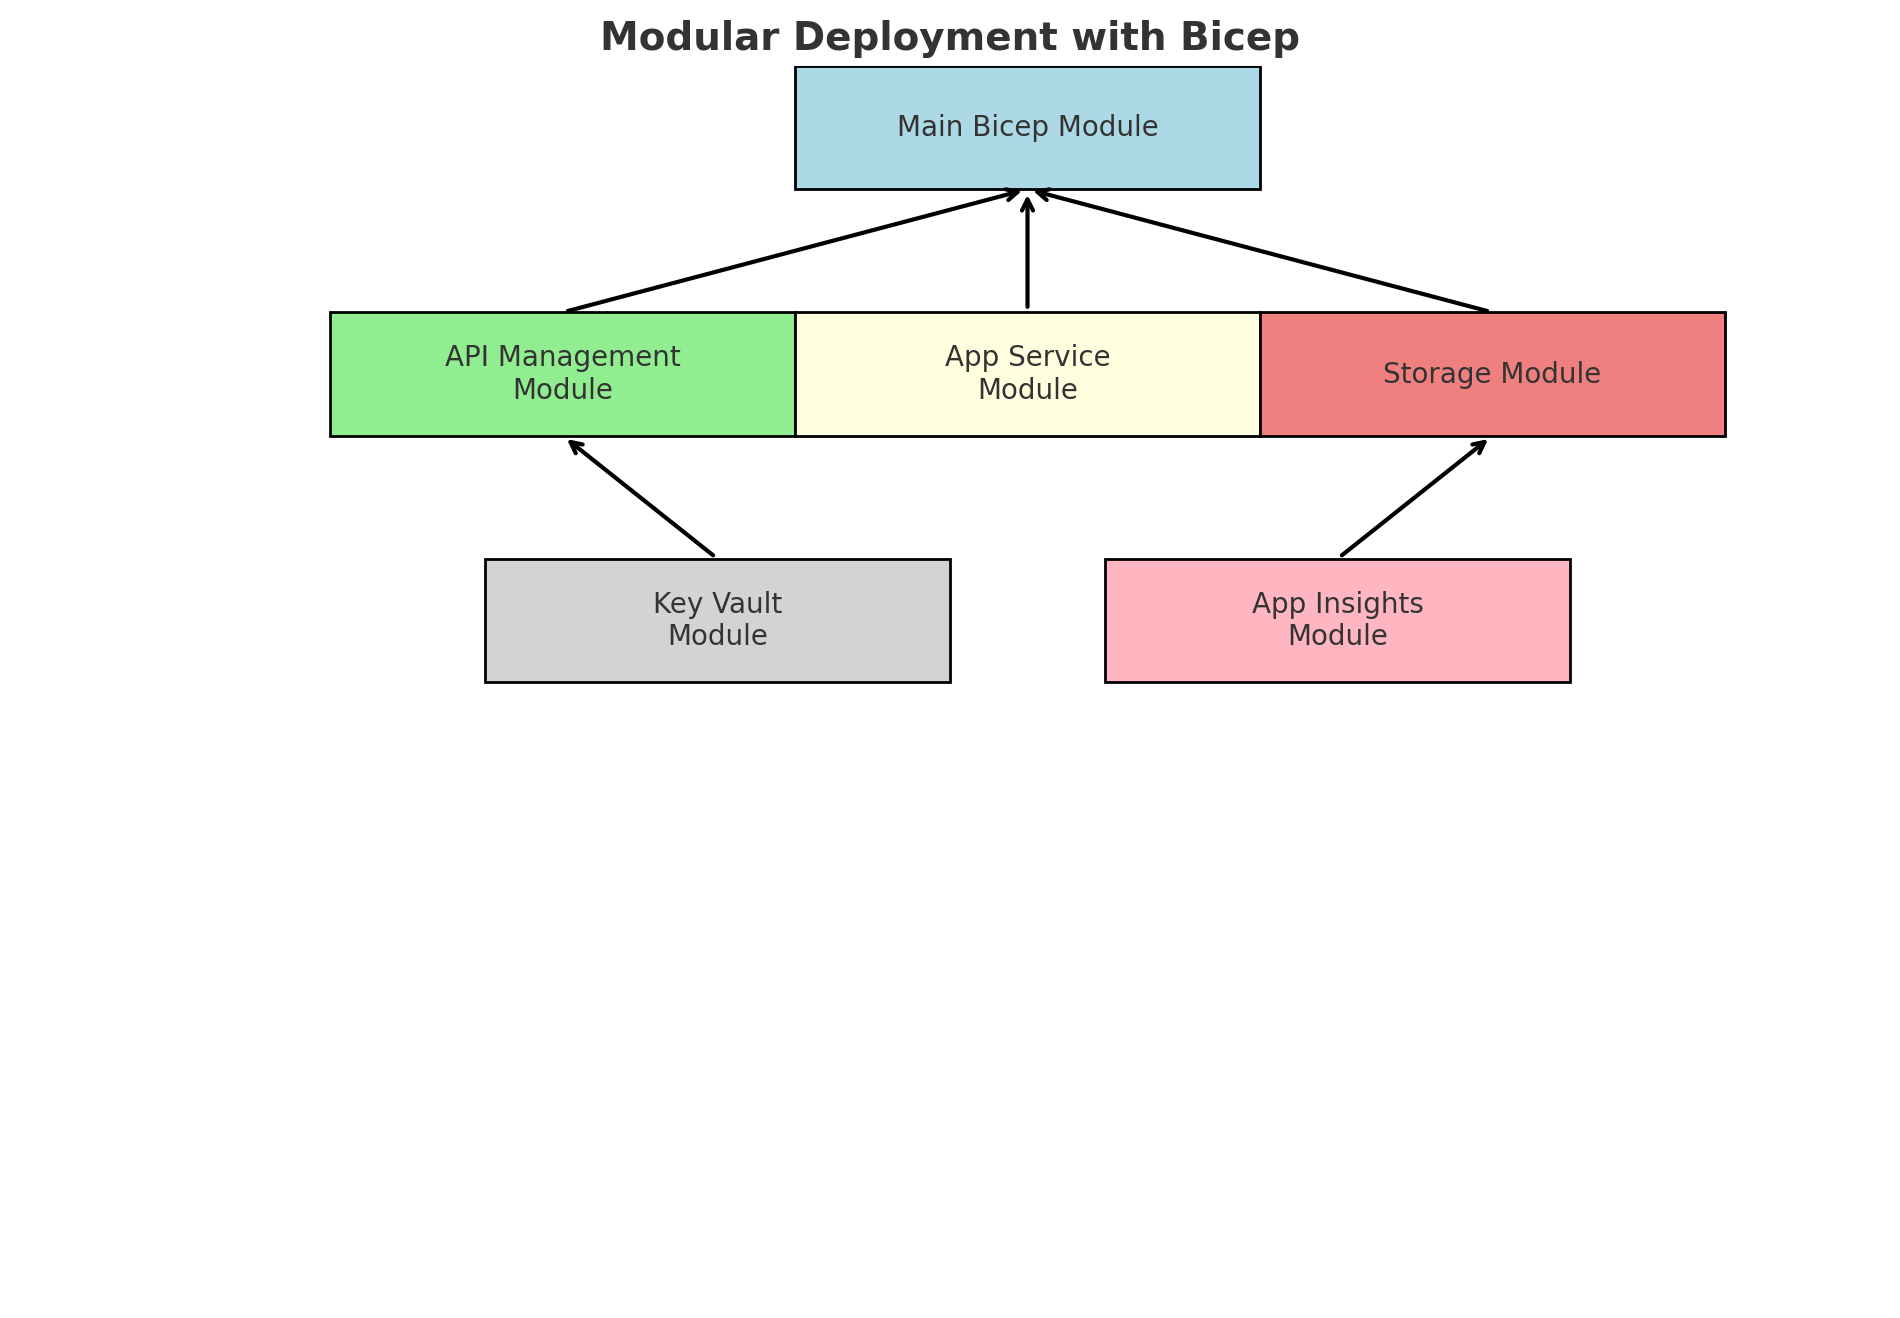
Modular Deployment with Bicep
The modular architecture allows us to break down deployments into smaller, reusable templates. Here’s a high-level look at how the project will be structured:
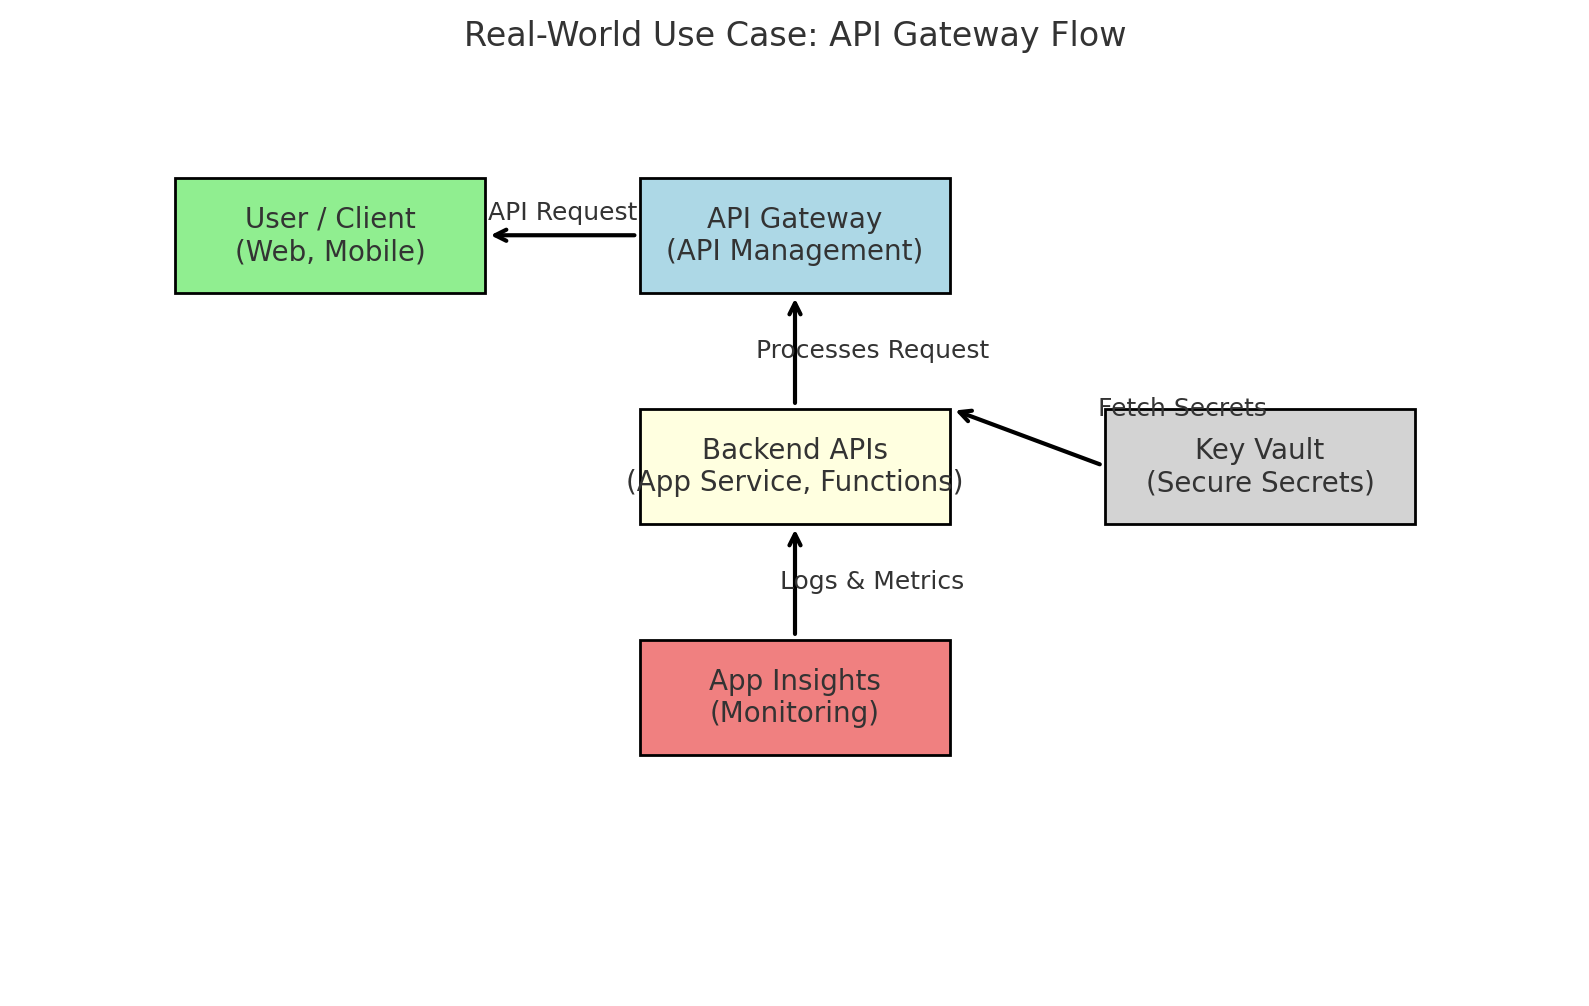
Real-World Use Case: API Gateway Flow
In a real-world scenario, users interact with an API gateway that manages and routes requests to backend services while handling security and monitoring. Here’s an example flow for the project:
Benefits of IaC with Bicep
Adopting IaC with Bicep over manual deployment methods offers several advantages:
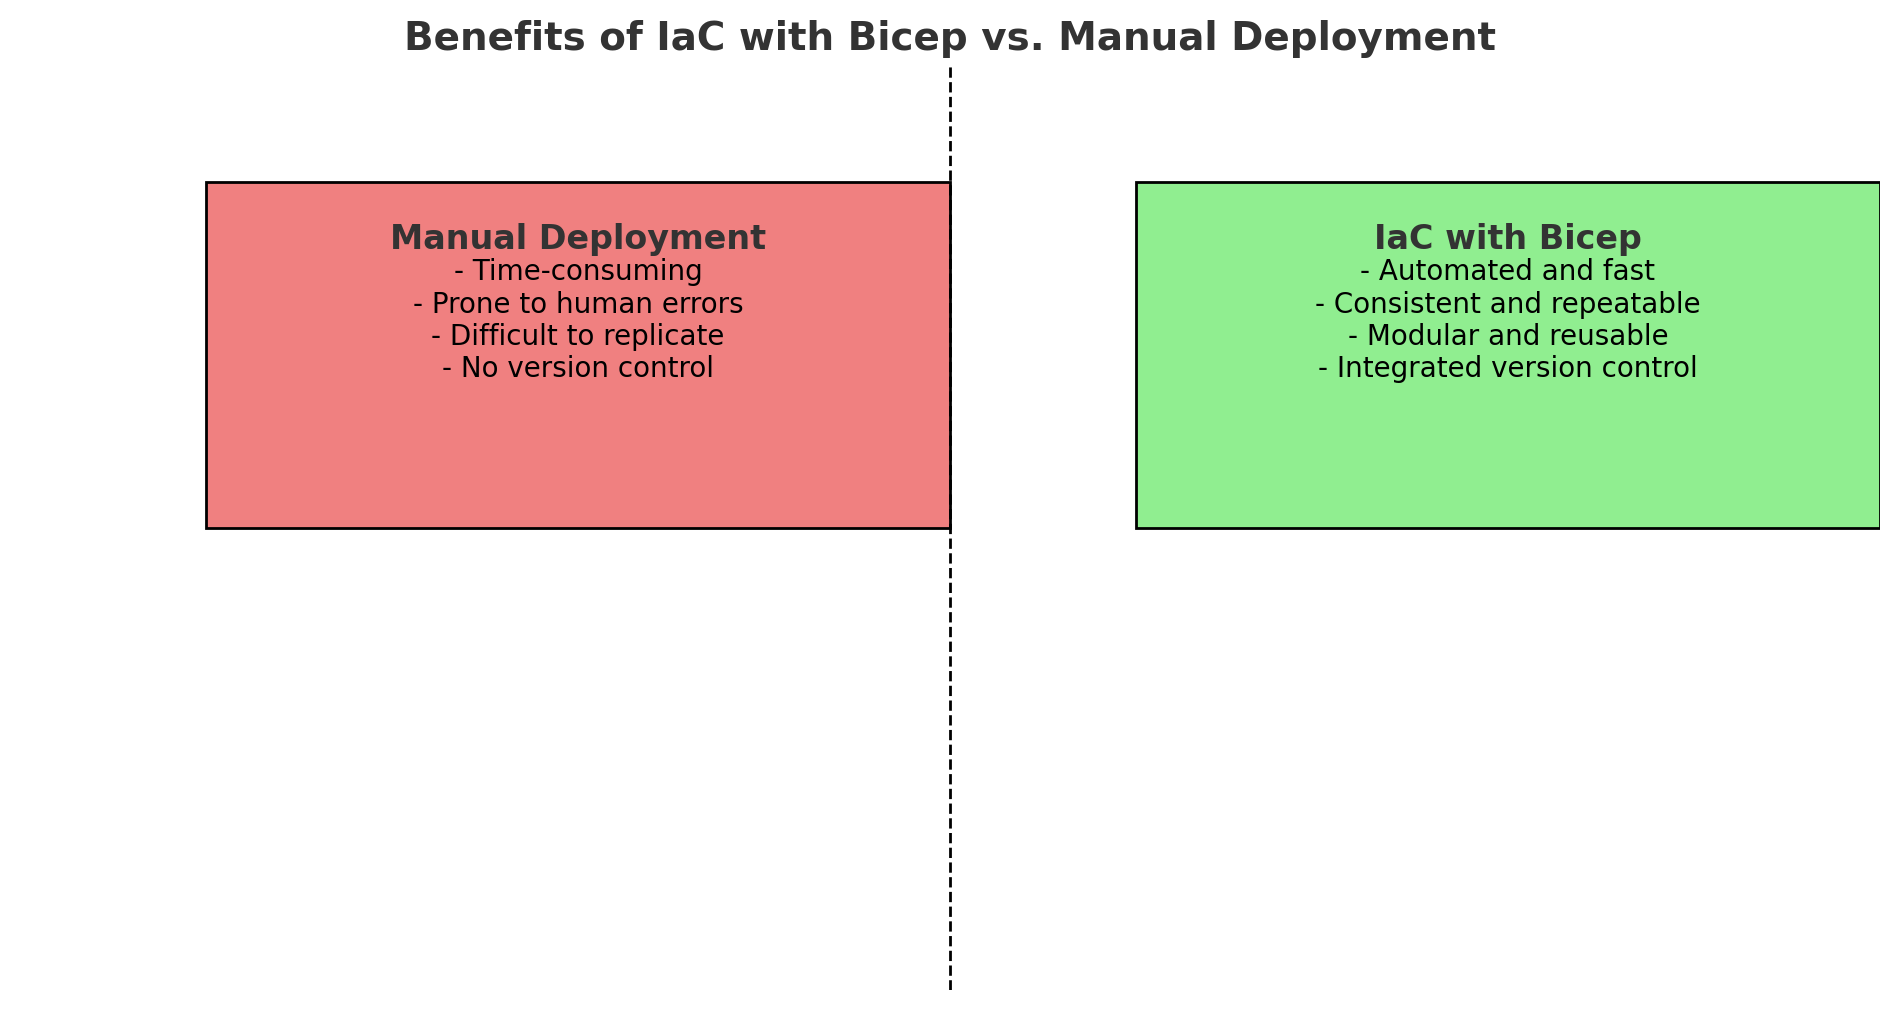
info: This project highlights these benefits by demonstrating how to automate, scale, and manage cloud infrastructure effectively.
Goals of This Blog
By the end of this blog, you will:
- Understand how Azure Bicep simplifies IaC.
- Gain hands-on experience deploying a scalable API gateway.
- Learn best practices in API Management and IaC design.
- Walk away with reusable templates and skills to adapt to your projects.
Let’s get started!
2. Project Overview
Objective
The objective of this project is to create a robust and scalable e-commerce API gateway using Azure API Management and Infrastructure as Code (IaC) with Bicep. By leveraging the capabilities of Azure API Management, the gateway will act as the central point for managing, securing, and monitoring all API interactions between client applications and backend services.
This project highlights several key cloud engineering skills:
- Automating resource deployment with modular and reusable Bicep templates.
- Configuring API Management policies to ensure security and efficient resource usage.
- Integrating Application Insights for real-time monitoring and diagnostics.
- Securing sensitive information like API keys using Azure Key Vault.
info: The goal is to deliver a reliable and scalable solution that can be extended for real-world applications, demonstrating both practical expertise and best practices in cloud architecture.
Architecture Overview
The architecture for this project is designed to ensure scalability, security, and observability. It consists of five key components:
Client Applications: These can be web applications, mobile apps, or IoT devices that interact with the API gateway to access backend services.
Azure API Management (APIM): Acting as the API gateway, APIM manages all API requests, applies policies for security and rate limiting, and routes the requests to appropriate backend services.
Backend APIs: These are hosted on Azure App Service or Azure Functions and handle the business logic for the application. For example, they can provide endpoints for fetching product details, managing orders, or processing payments.
Azure Key Vault: Key Vault securely stores sensitive information such as API keys, connection strings, and certificates, which can be accessed by authorized services.
Azure Application Insights: This service provides monitoring and diagnostic capabilities, capturing metrics, logs, and performance data for APIs.
Below is a visual representation of the architecture:
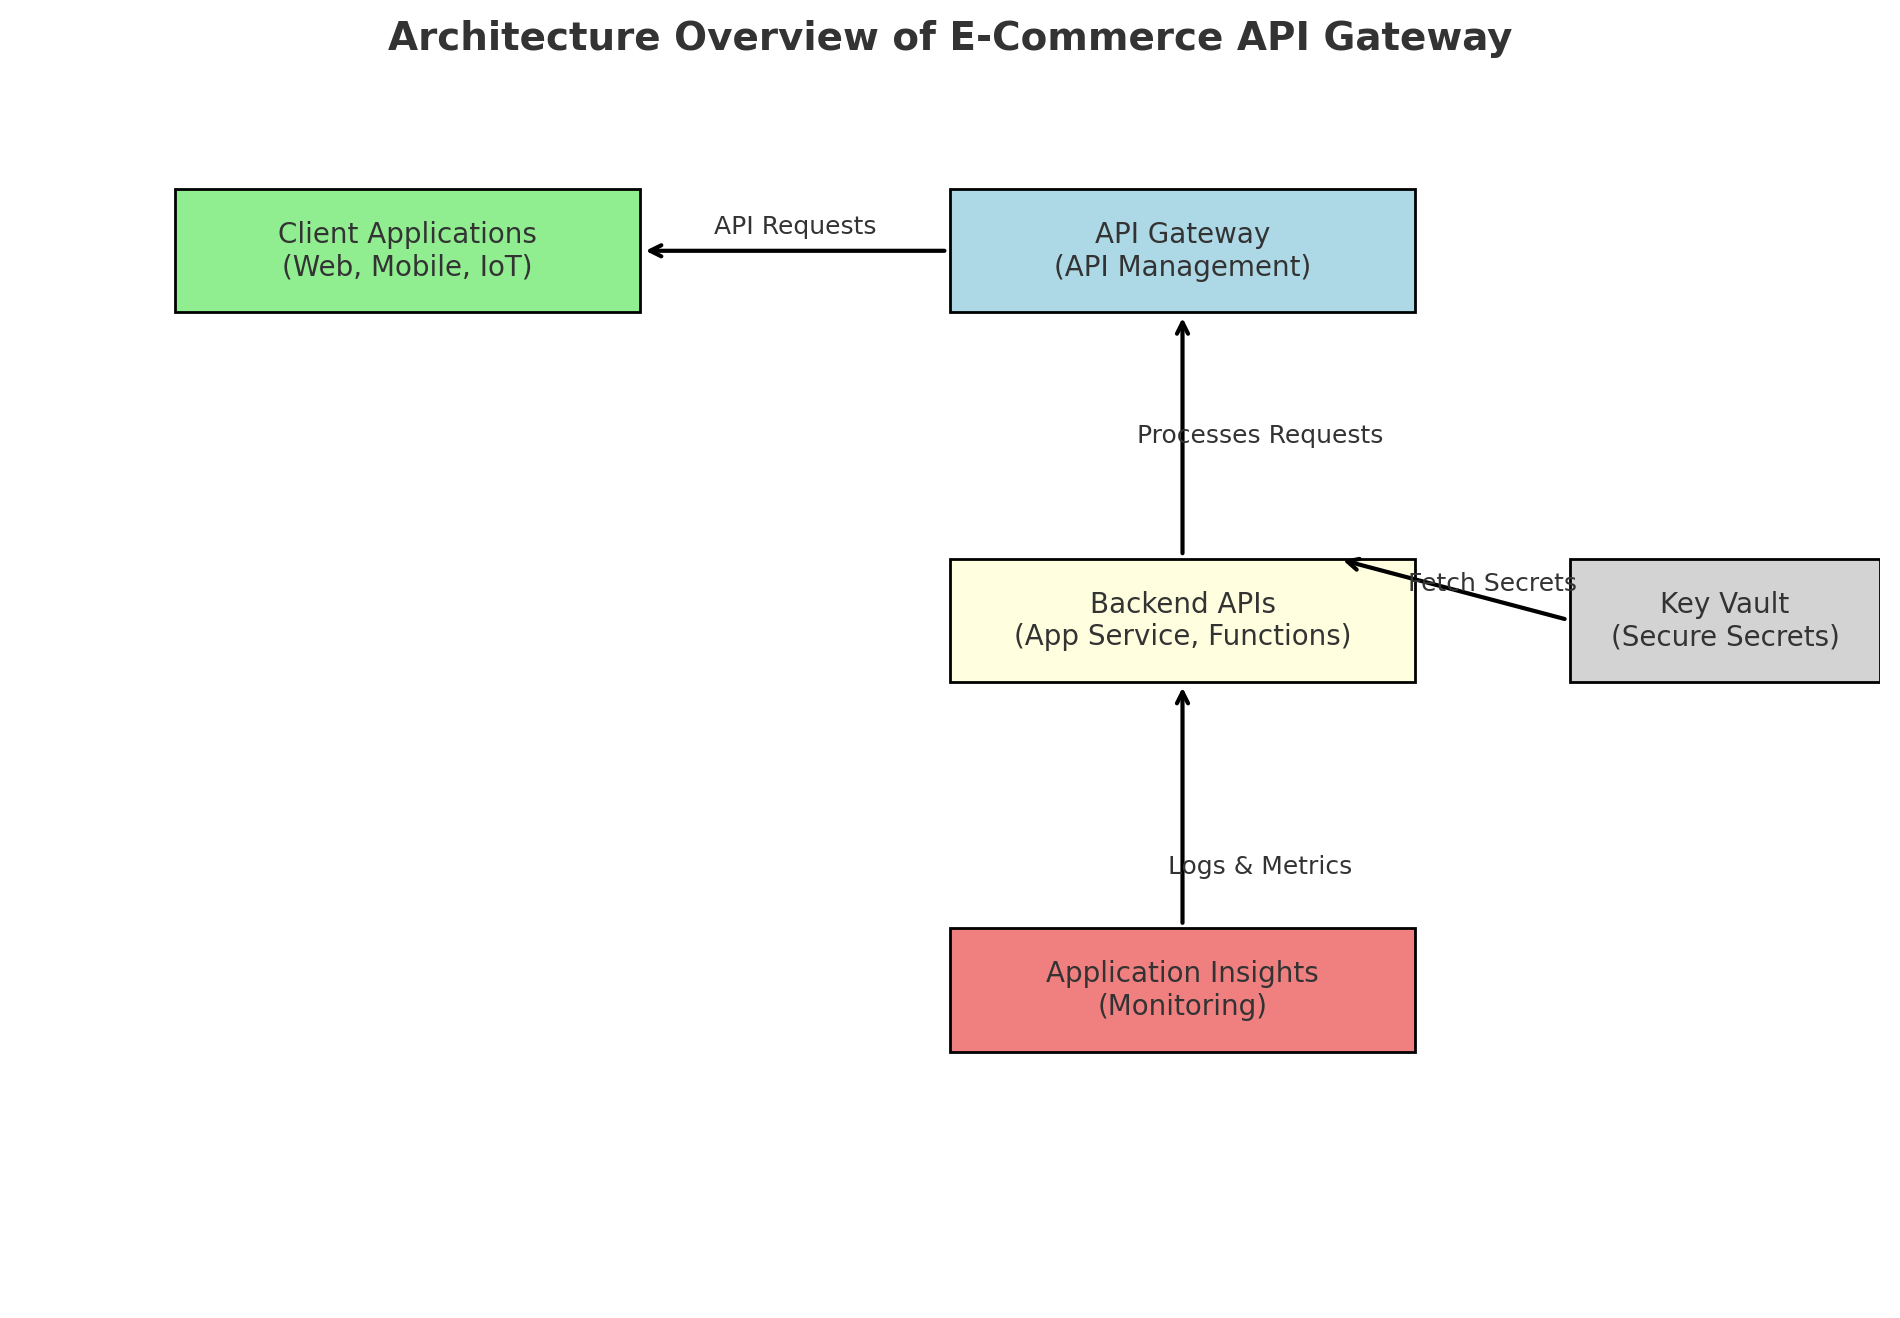
info: This architecture ensures all components work seamlessly together to deliver a reliable API management solution.
Key Features
Infrastructure as Code with Bicep
By using Bicep, we automate the deployment of Azure resources, ensuring consistent and repeatable environments. Bicep’s modular approach allows us to create templates for specific components like API Management, App Service, and Key Vault, making the code reusable and easier to maintain.
Secure API Gateway
The API gateway applies several policies to enhance security and usability:
- Rate Limiting: Prevents abuse by limiting the number of requests a client can make within a specific time period.
- CORS Policies: Ensures secure cross-domain communication for web applications.
- Authentication: Enforces access control using Azure AD or subscription keys.
Monitoring and Observability
With Application Insights integrated, the API gateway and backend services are monitored for performance and errors. Real-time diagnostics provide insights into API usage and help identify bottlenecks or potential issues.
Modular Deployment
The project employs a modular architecture where each Azure resource is defined in a separate Bicep module. This approach promotes reusability and simplifies resource management. Below is a diagram of the modular deployment structure:

Real-World Scenario
Let’s consider a real-world scenario for an e-commerce platform. Customers browse products, place orders, and check the status of their orders. Each action involves interactions with multiple APIs managed by the API gateway.
Example Flow:
- A customer uses a mobile app to search for a product.
- The request is sent to the API gateway.
- The API gateway applies rate-limiting policies and routes the request to the appropriate backend API.
- If sensitive information is required (e.g., database connection strings), the backend API securely retrieves it from Azure Key Vault.
- The API processes the request, and the response is sent back to the customer.
- Performance metrics and logs for this request are sent to Application Insights for monitoring.
Here’s a visual representation of this flow:
info: This scenario illustrates how the components work together to provide a secure and efficient user experience.
Benefits of This Architecture
This architecture brings several advantages:
- Scalability: The API gateway and backend services can scale independently to handle traffic spikes.
- Security: Policies in API Management and secure storage in Key Vault ensure the system is protected against unauthorized access and data breaches.
- Efficiency: Application Insights enables proactive monitoring, allowing engineers to quickly detect and resolve issues.
In the next section, we’ll cover the prerequisites needed to set up this project and start building the API gateway.
3. Prerequisites
Before diving into the project, it’s essential to ensure you have the necessary tools, configurations, and a solid understanding of the project structure. This section outlines the prerequisites and sets up the foundation for deploying the API gateway.
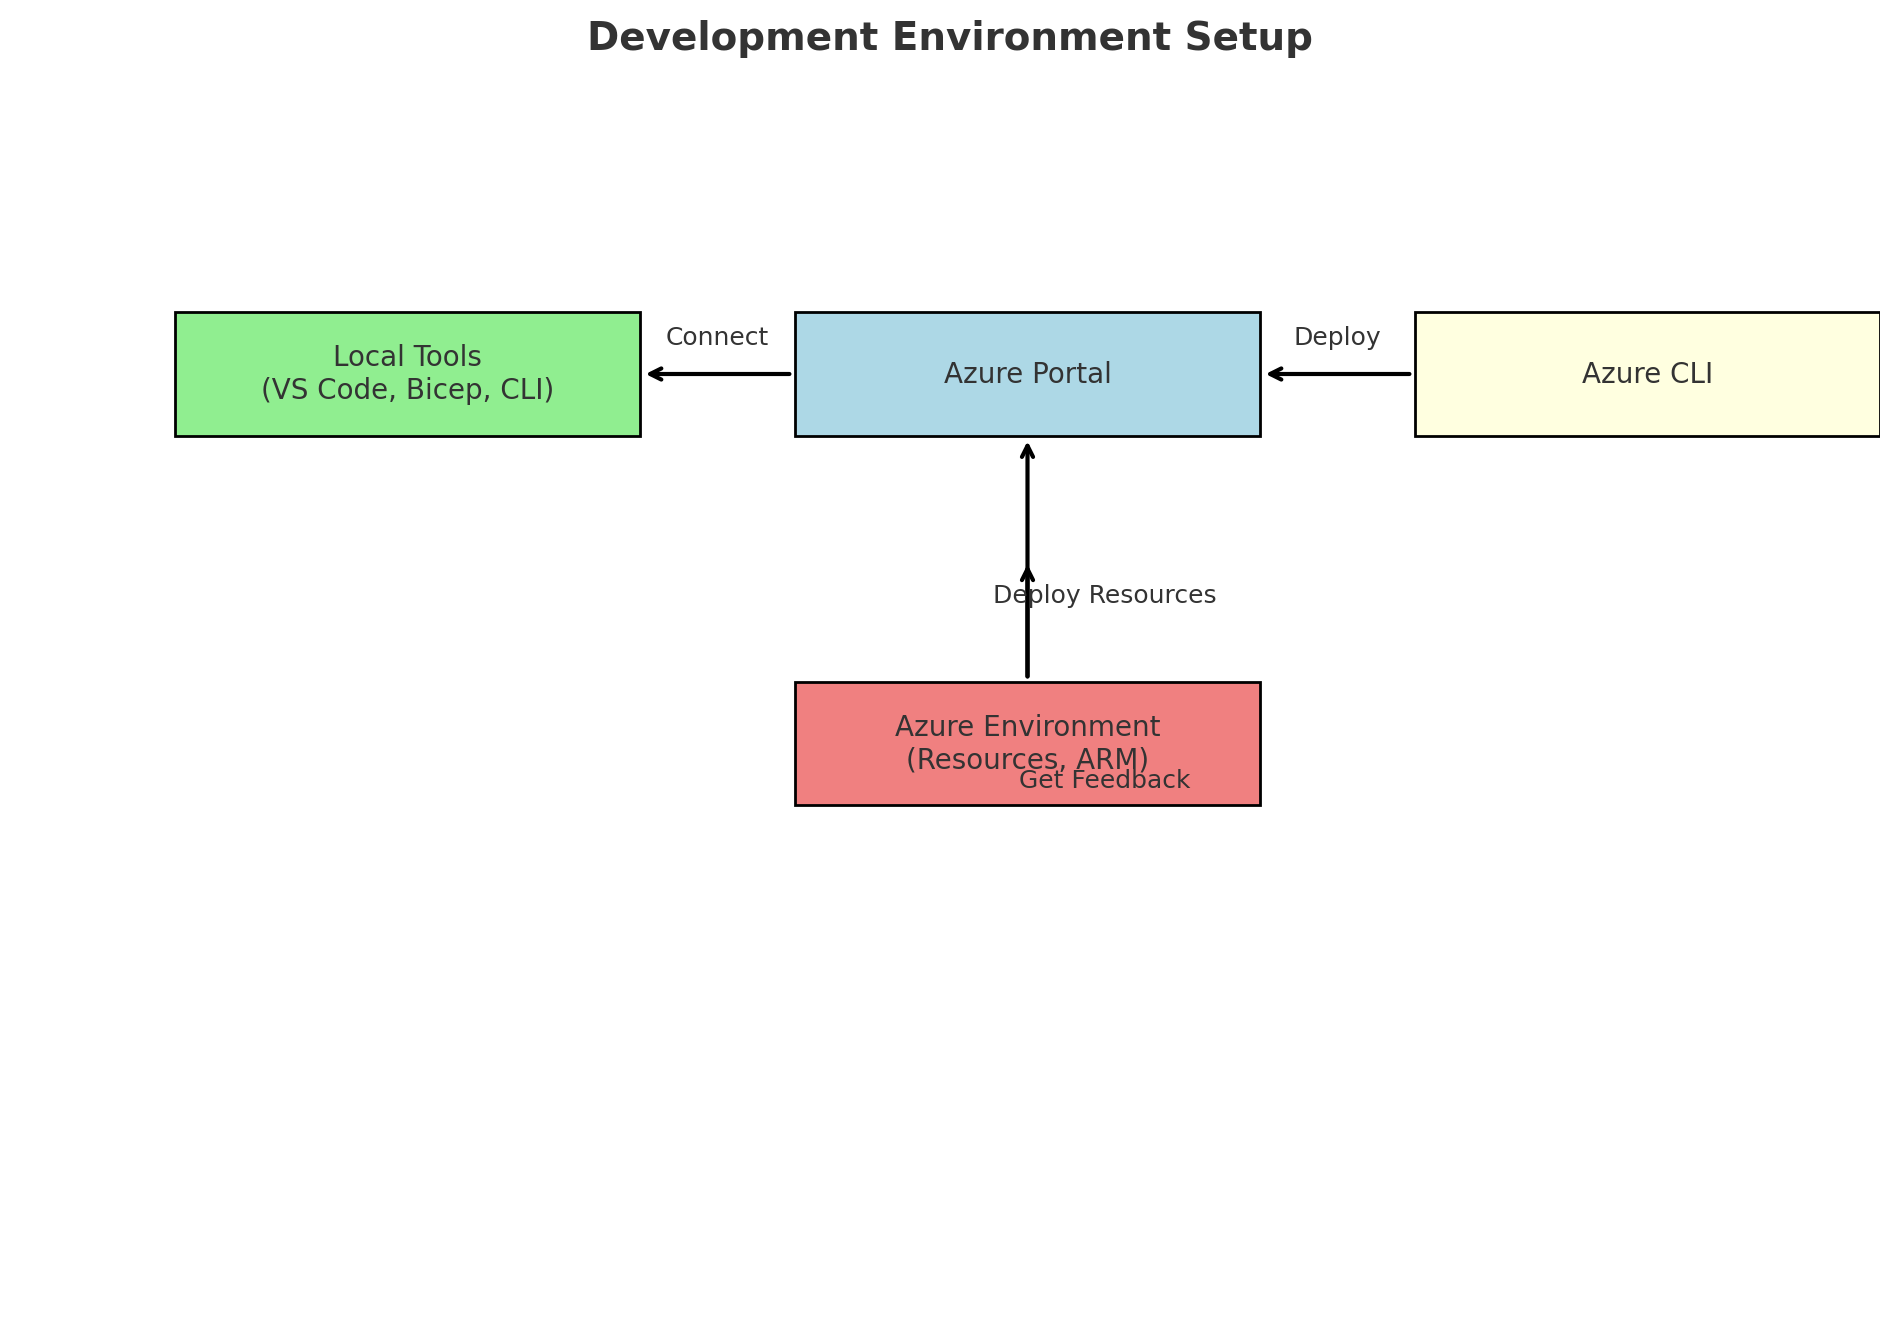
Development Environment Setup
To successfully deploy and manage Azure resources, you’ll need the following tools installed and configured on your local machine:
- Visual Studio Code:
- Install the Bicep extension to write and validate Bicep templates.
- Azure CLI:
- Used to interact with Azure services and deploy resources.
- Azure Subscription:
- Ensure you have an active Azure subscription to create and manage resources.
- Bicep CLI (optional):
- Installed via Azure CLI, the Bicep CLI simplifies template validation.
These tools work together to bridge your local development environment with Azure. The diagram below illustrates the connections between these components:
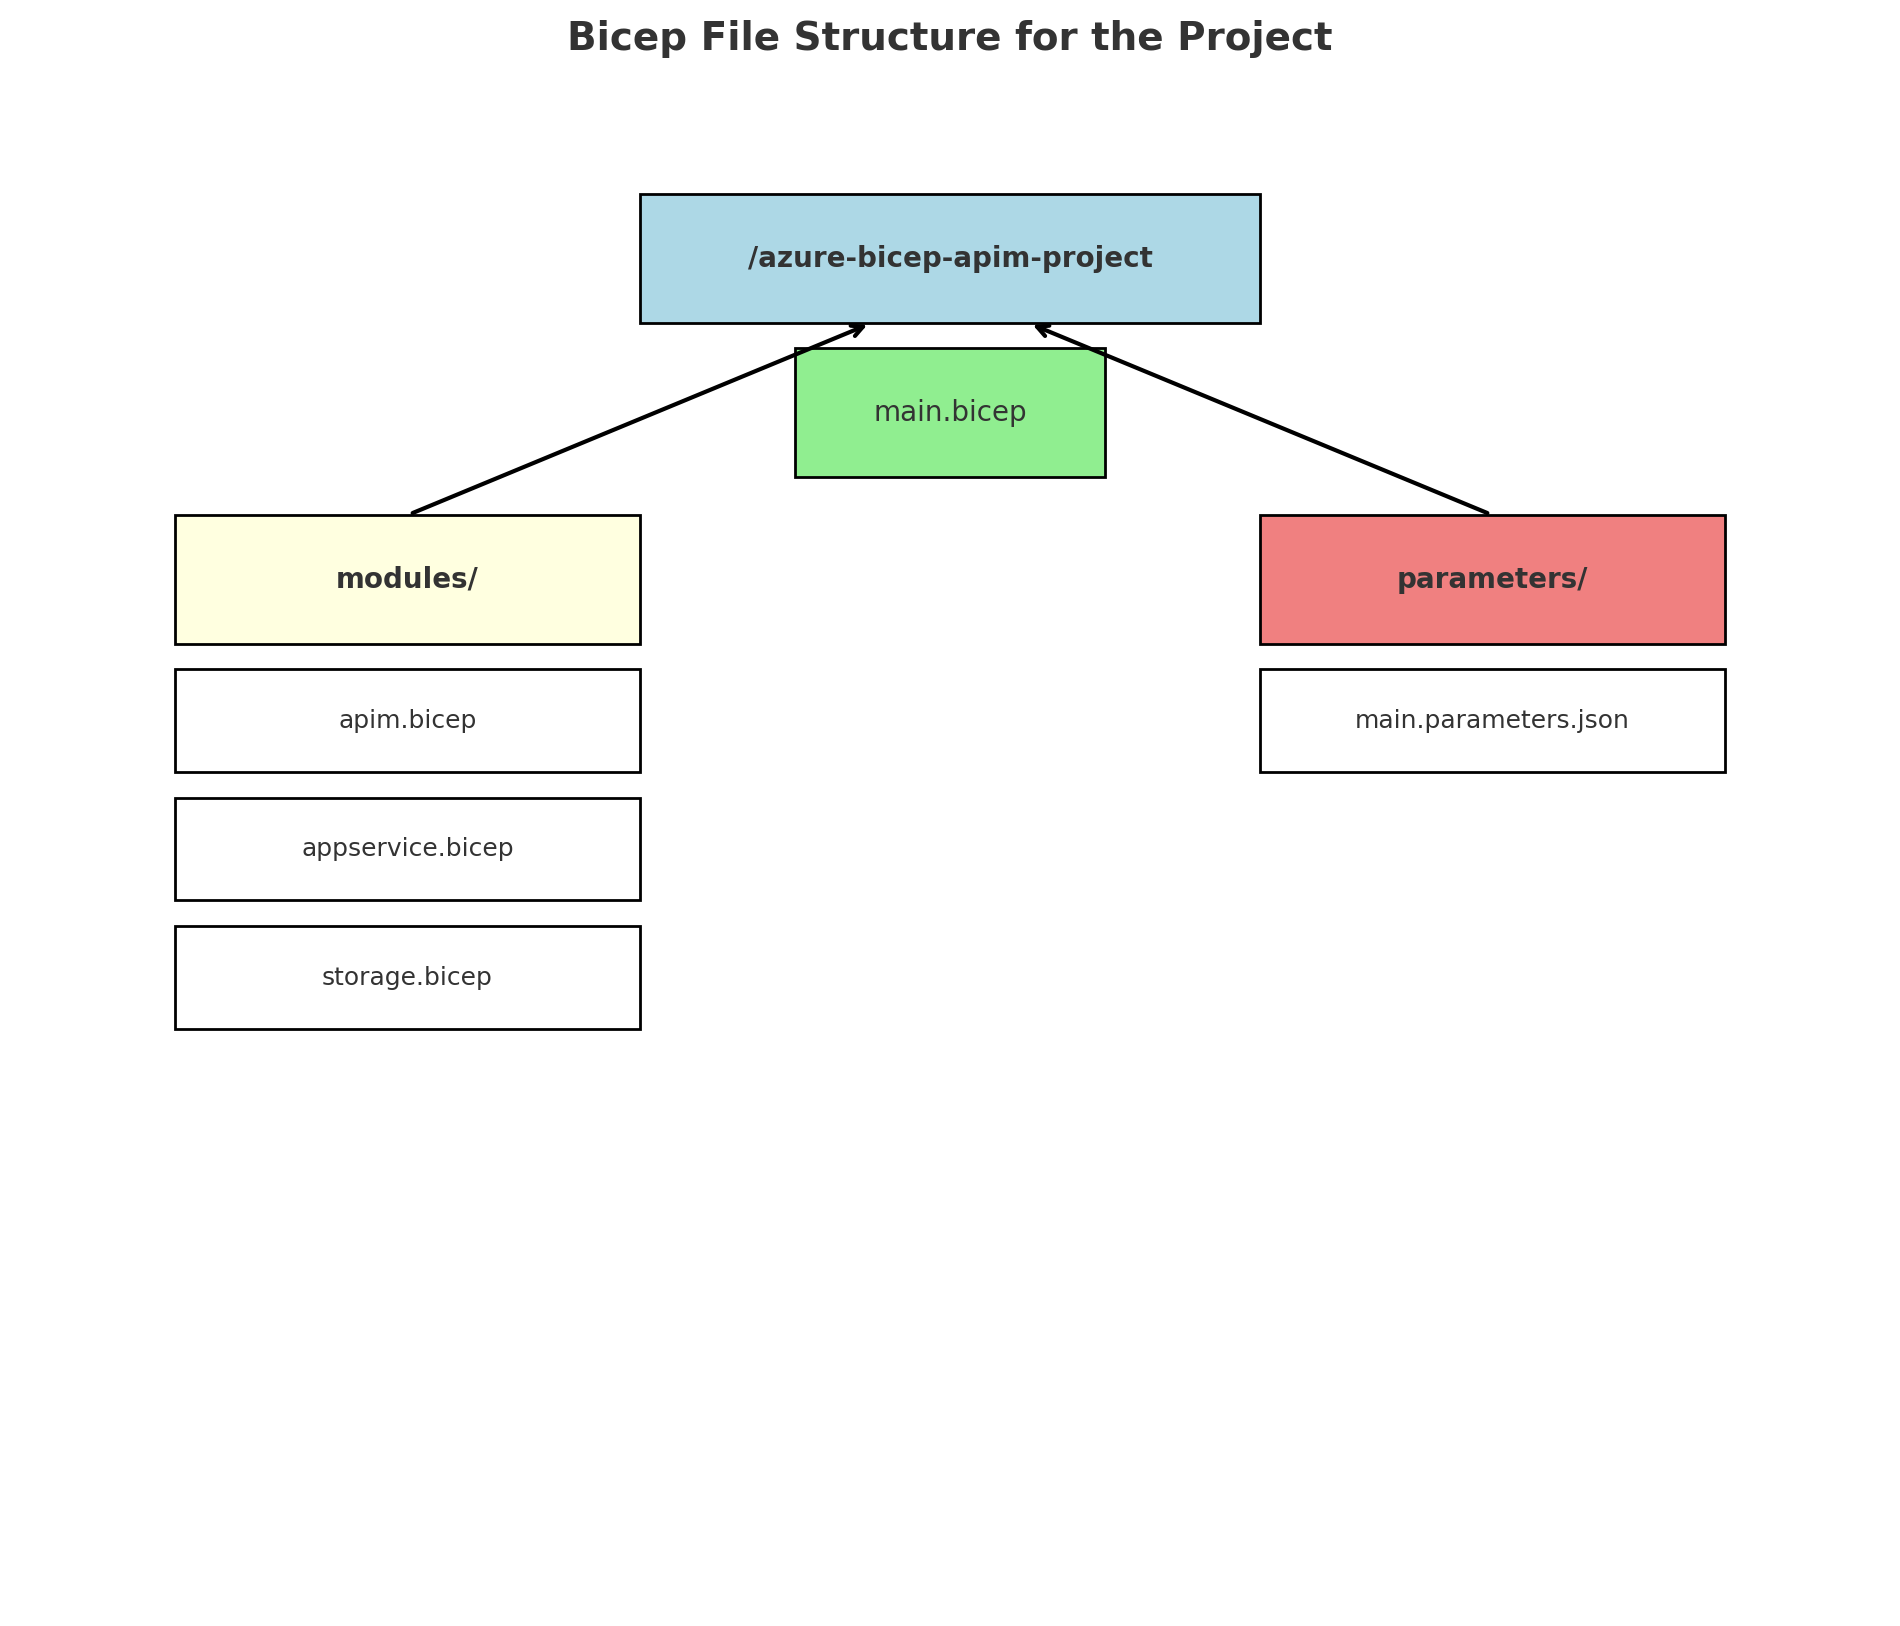
Bicep File Structure
To maintain a clean and modular project, we’ll organize the files into a well-structured hierarchy. Here’s the recommended directory structure:
1
2
3
4
5
6
7
8
/azure-bicep-apim-project
├── main.bicep
├── modules/
│   ├── apim.bicep
│   ├── appservice.bicep
│   ├── storage.bicep
└── parameters/
    └── main.parameters.json
main.bicep: The primary file orchestrating the deployment.- Modules folder: Contains modular Bicep files for each Azure resource (e.g., API Management, App Service).
- Parameters folder: Stores parameter files to customize deployments for different environments.
The structure allows easy scaling and customization of the project. Below is a visual representation of this structure:
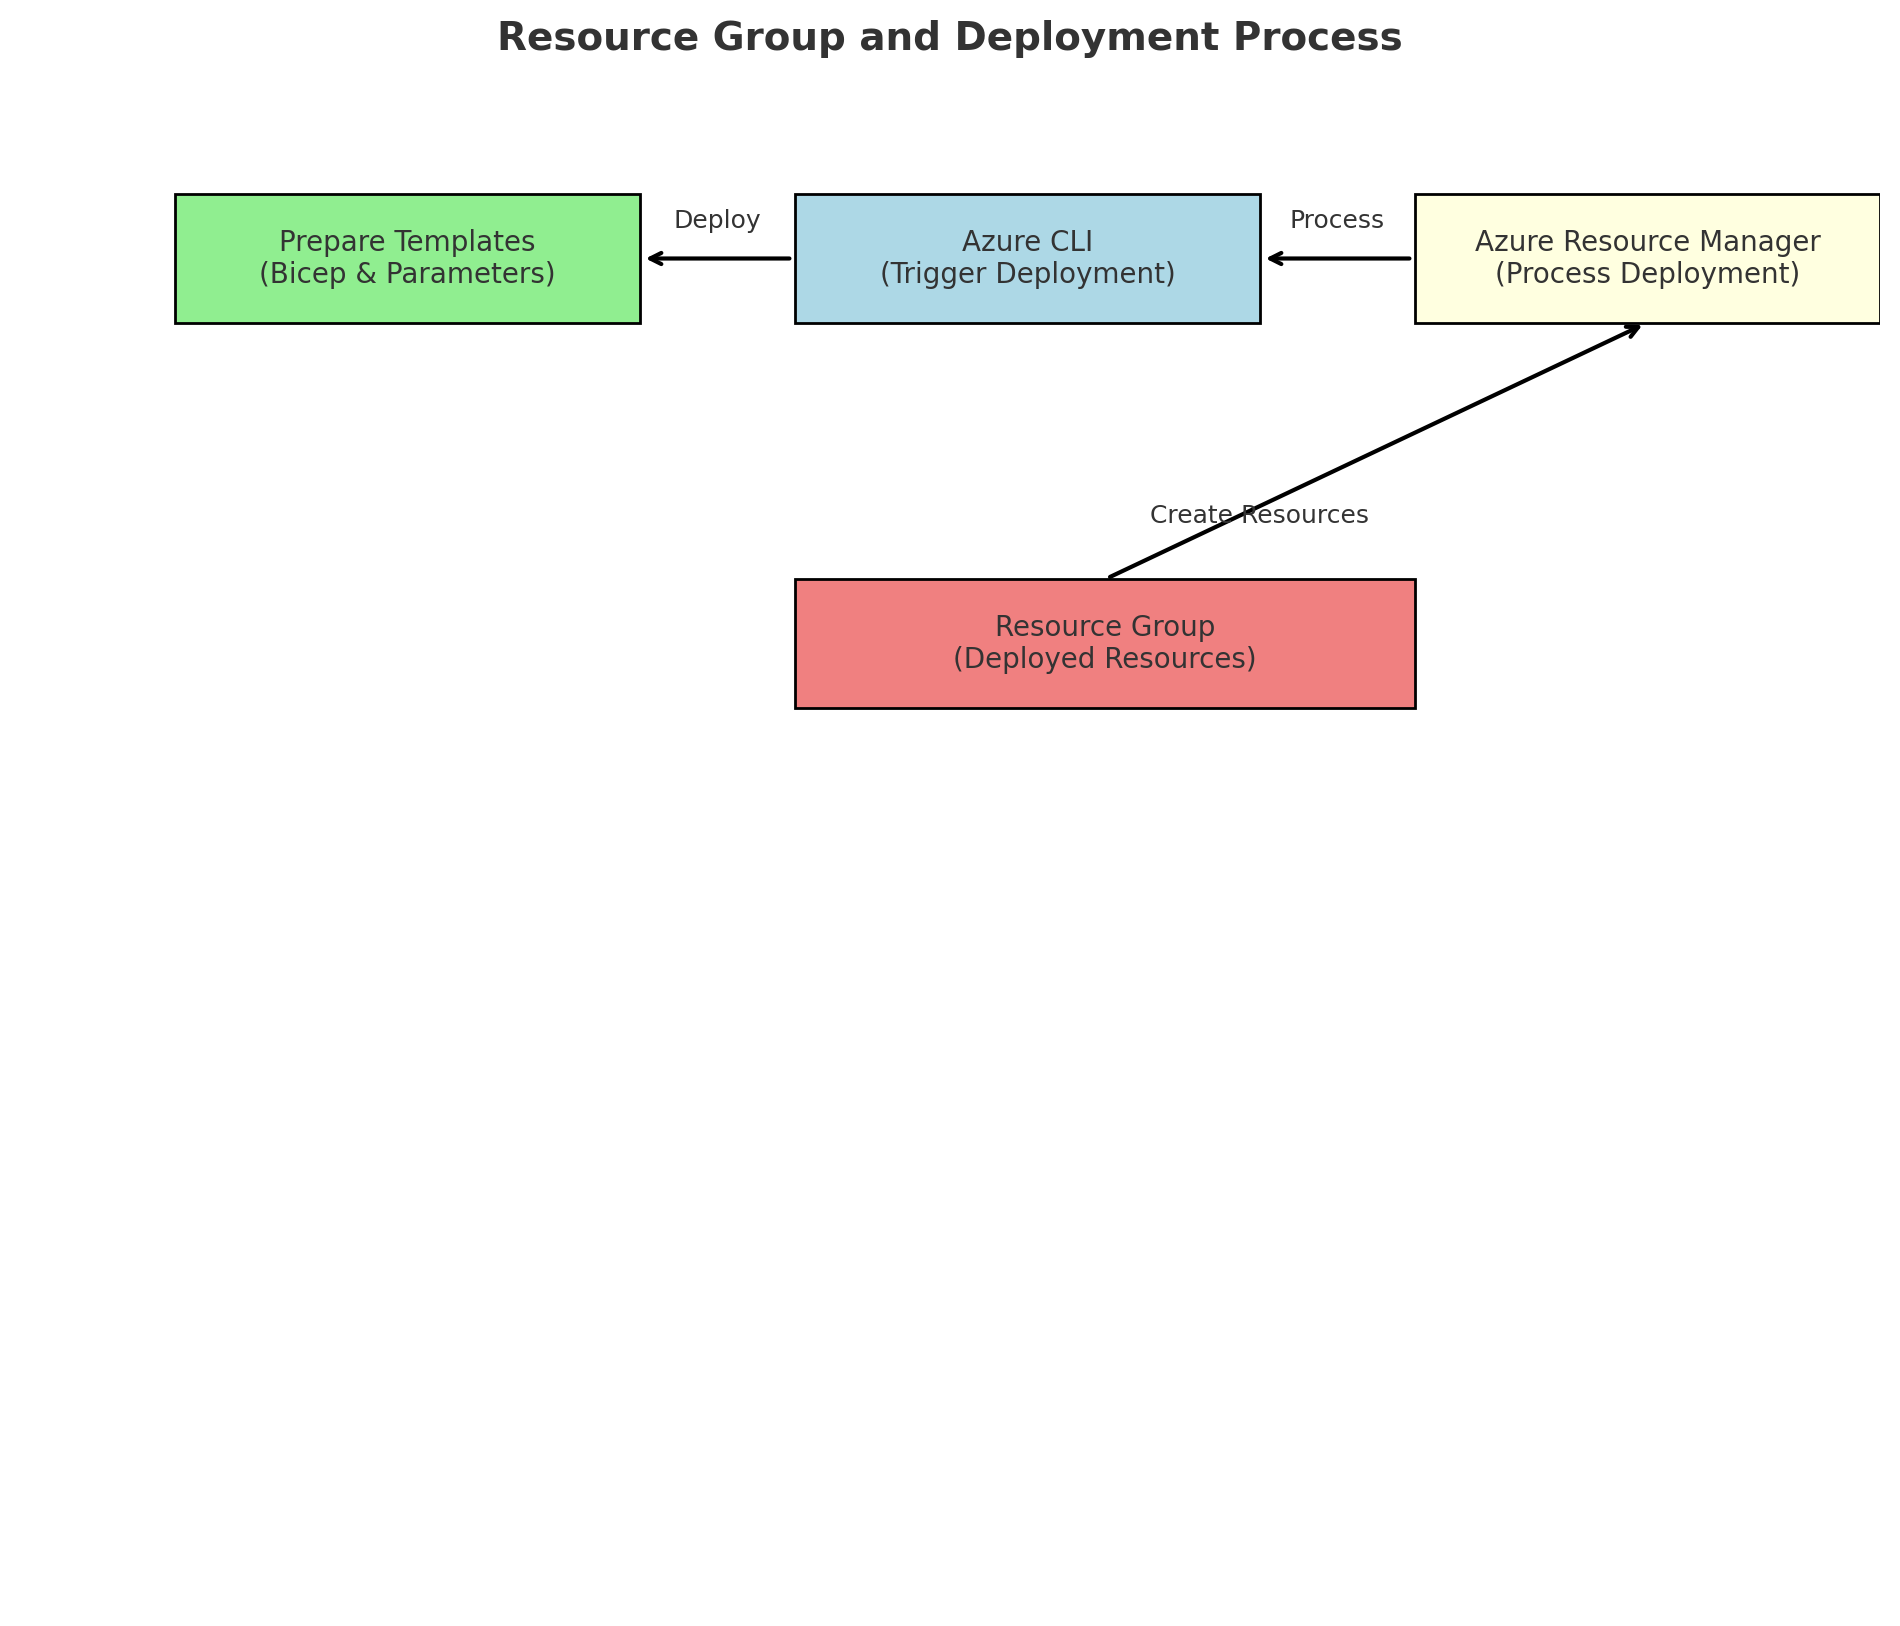
Resource Group and Deployment Process
Deploying resources involves several steps, from preparing templates to creating resources in Azure. Here’s an overview of the deployment process:
- Prepare Templates:
- Write Bicep templates (
main.bicepand modules) and corresponding parameter files.
- Write Bicep templates (
- Trigger Deployment:
- Use Azure CLI to deploy the resources by running the command:
1
az deployment group create --resource-group <resource-group-name> --template-file main.bicep --parameters @parameters/main.parameters.json
- Use Azure CLI to deploy the resources by running the command:
- Process Deployment:
- Azure Resource Manager (ARM) validates the templates and provisions resources in Azure.
- Create Resources:
- Resources are created in the specified resource group.
The following diagram shows this process in detail:
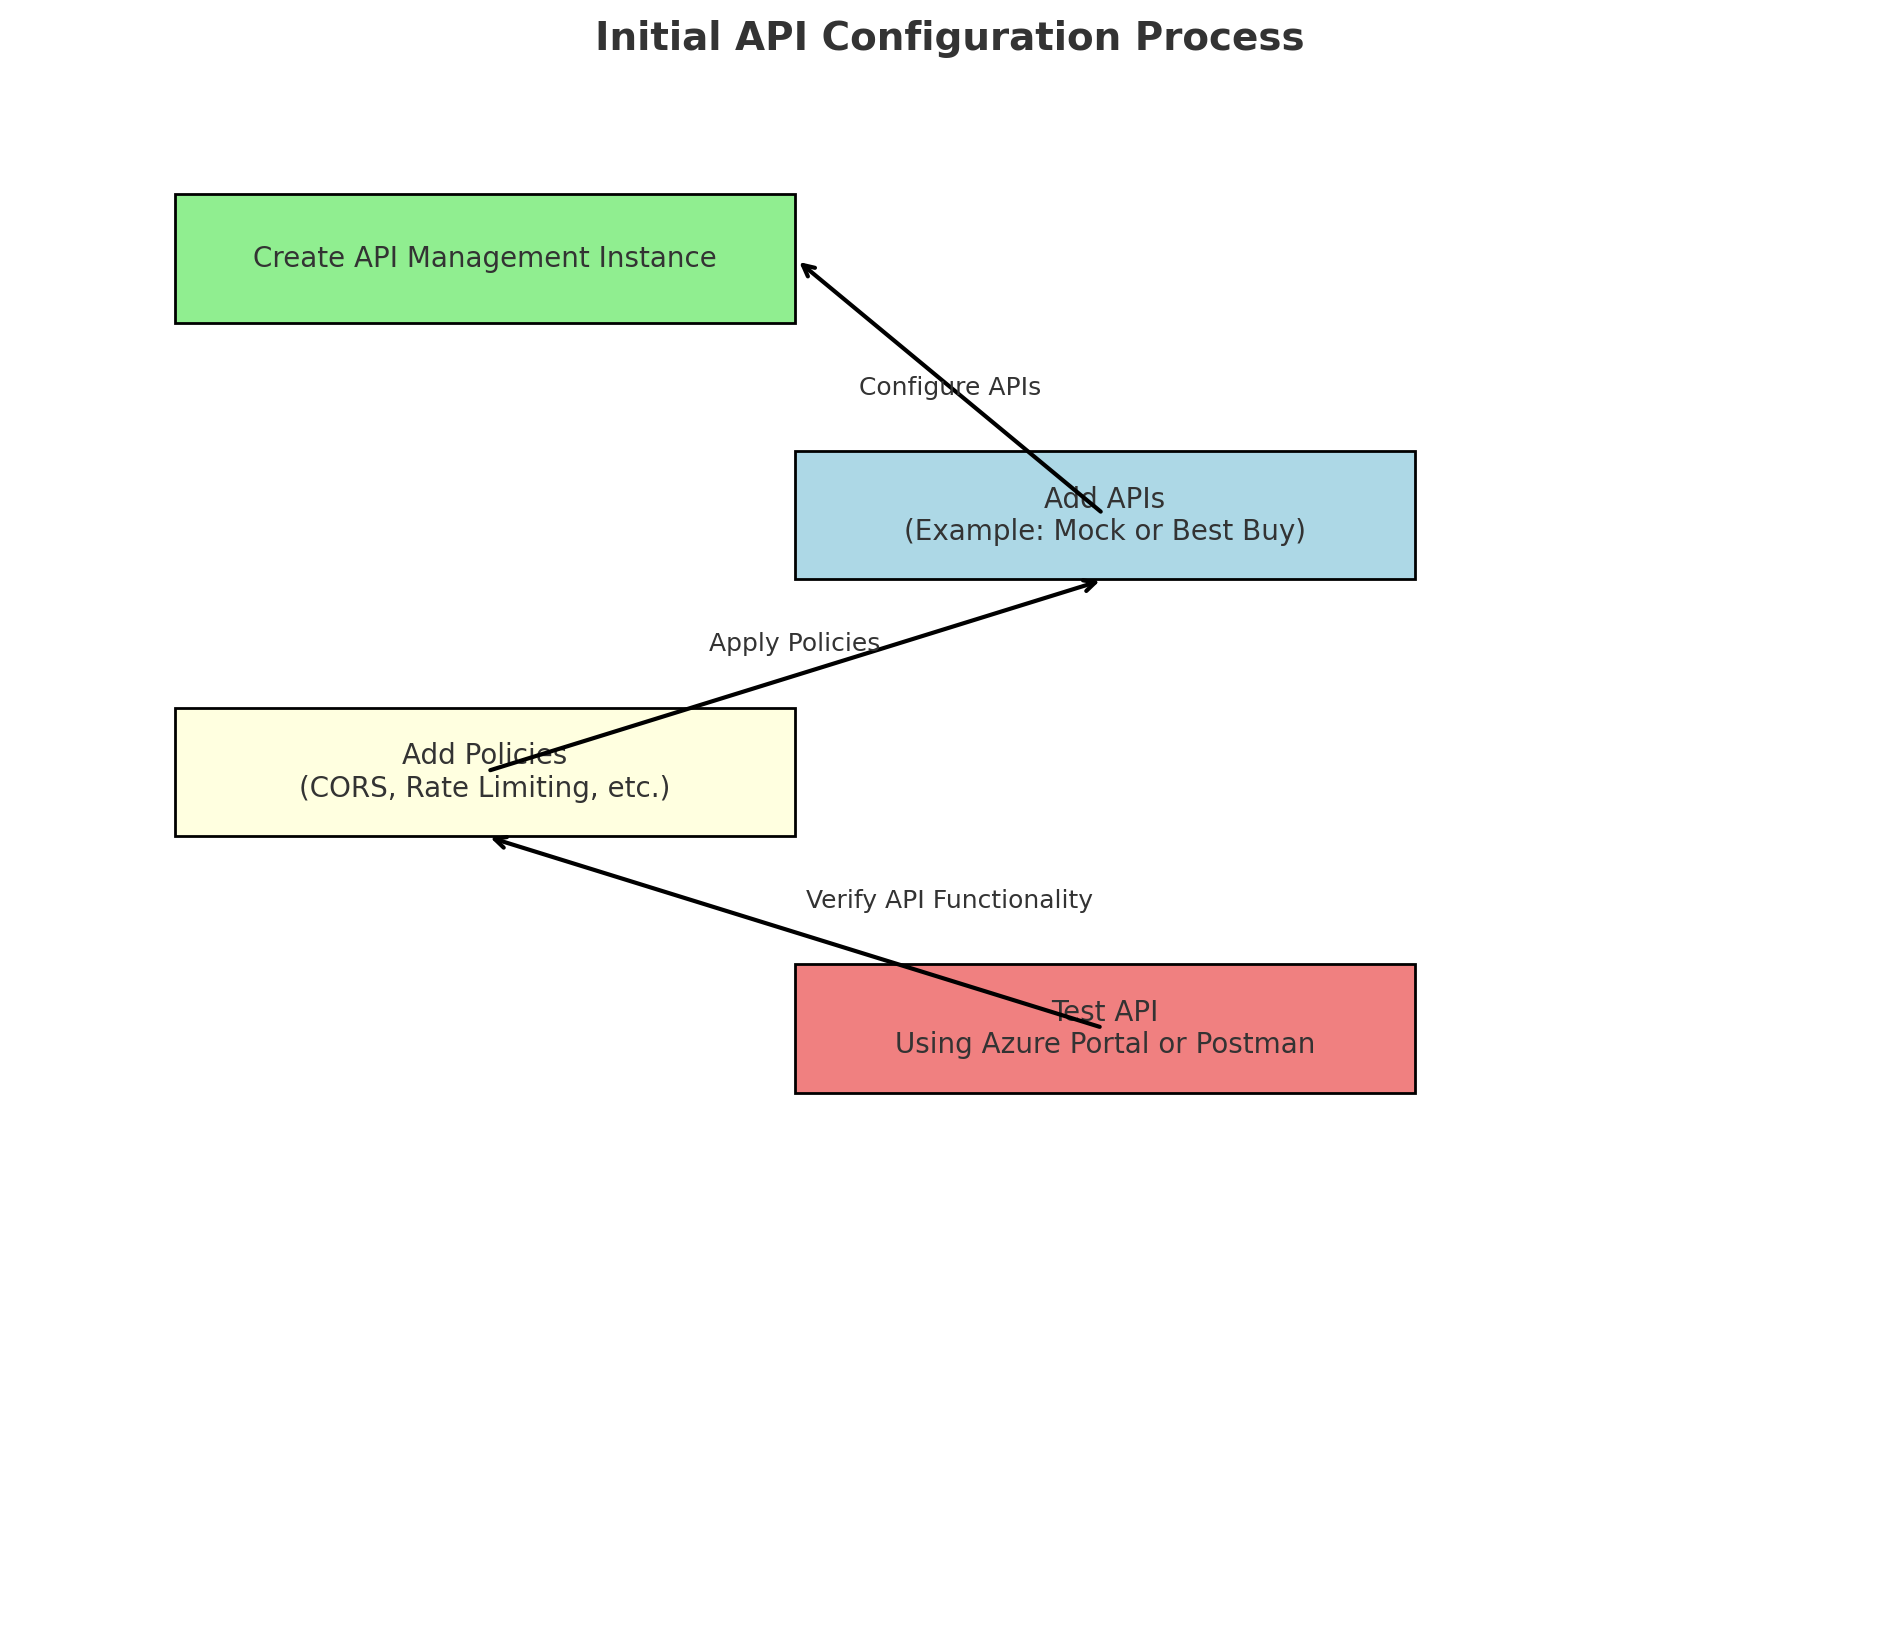
Initial API Configuration
Once the resources are deployed, you can start configuring the API Management instance. Here are the key steps:
- Create an API Management Instance:
- Provision the API Management service in Azure.
- Add APIs:
- Configure APIs within API Management (e.g., a mock API or the Best Buy product catalog API).
- Add Policies:
- Apply policies such as CORS, rate limiting, and authentication.
- Test API:
- Use tools like Postman or the Azure Portal to test the API functionality.
Here’s a diagram showing the initial configuration process:
info: By ensuring your development environment is set up correctly and understanding the project’s structure and deployment process, you’ll be ready to move on to the next steps: implementing the API gateway and configuring its features.
4. Step-by-Step Implementation
This section provides a detailed walkthrough of implementing the e-commerce API gateway using Azure API Management and Infrastructure as Code (IaC) with Bicep. Each step is designed to guide you through the deployment process, from writing templates to configuring the API gateway.
Deployment Workflow
The implementation begins with creating Bicep templates to define the required Azure resources. These templates are deployed using the Azure CLI, processed by Azure Resource Manager (ARM), and finally provisioned as resources in the Azure environment.
Here’s the high-level workflow of the deployment process:
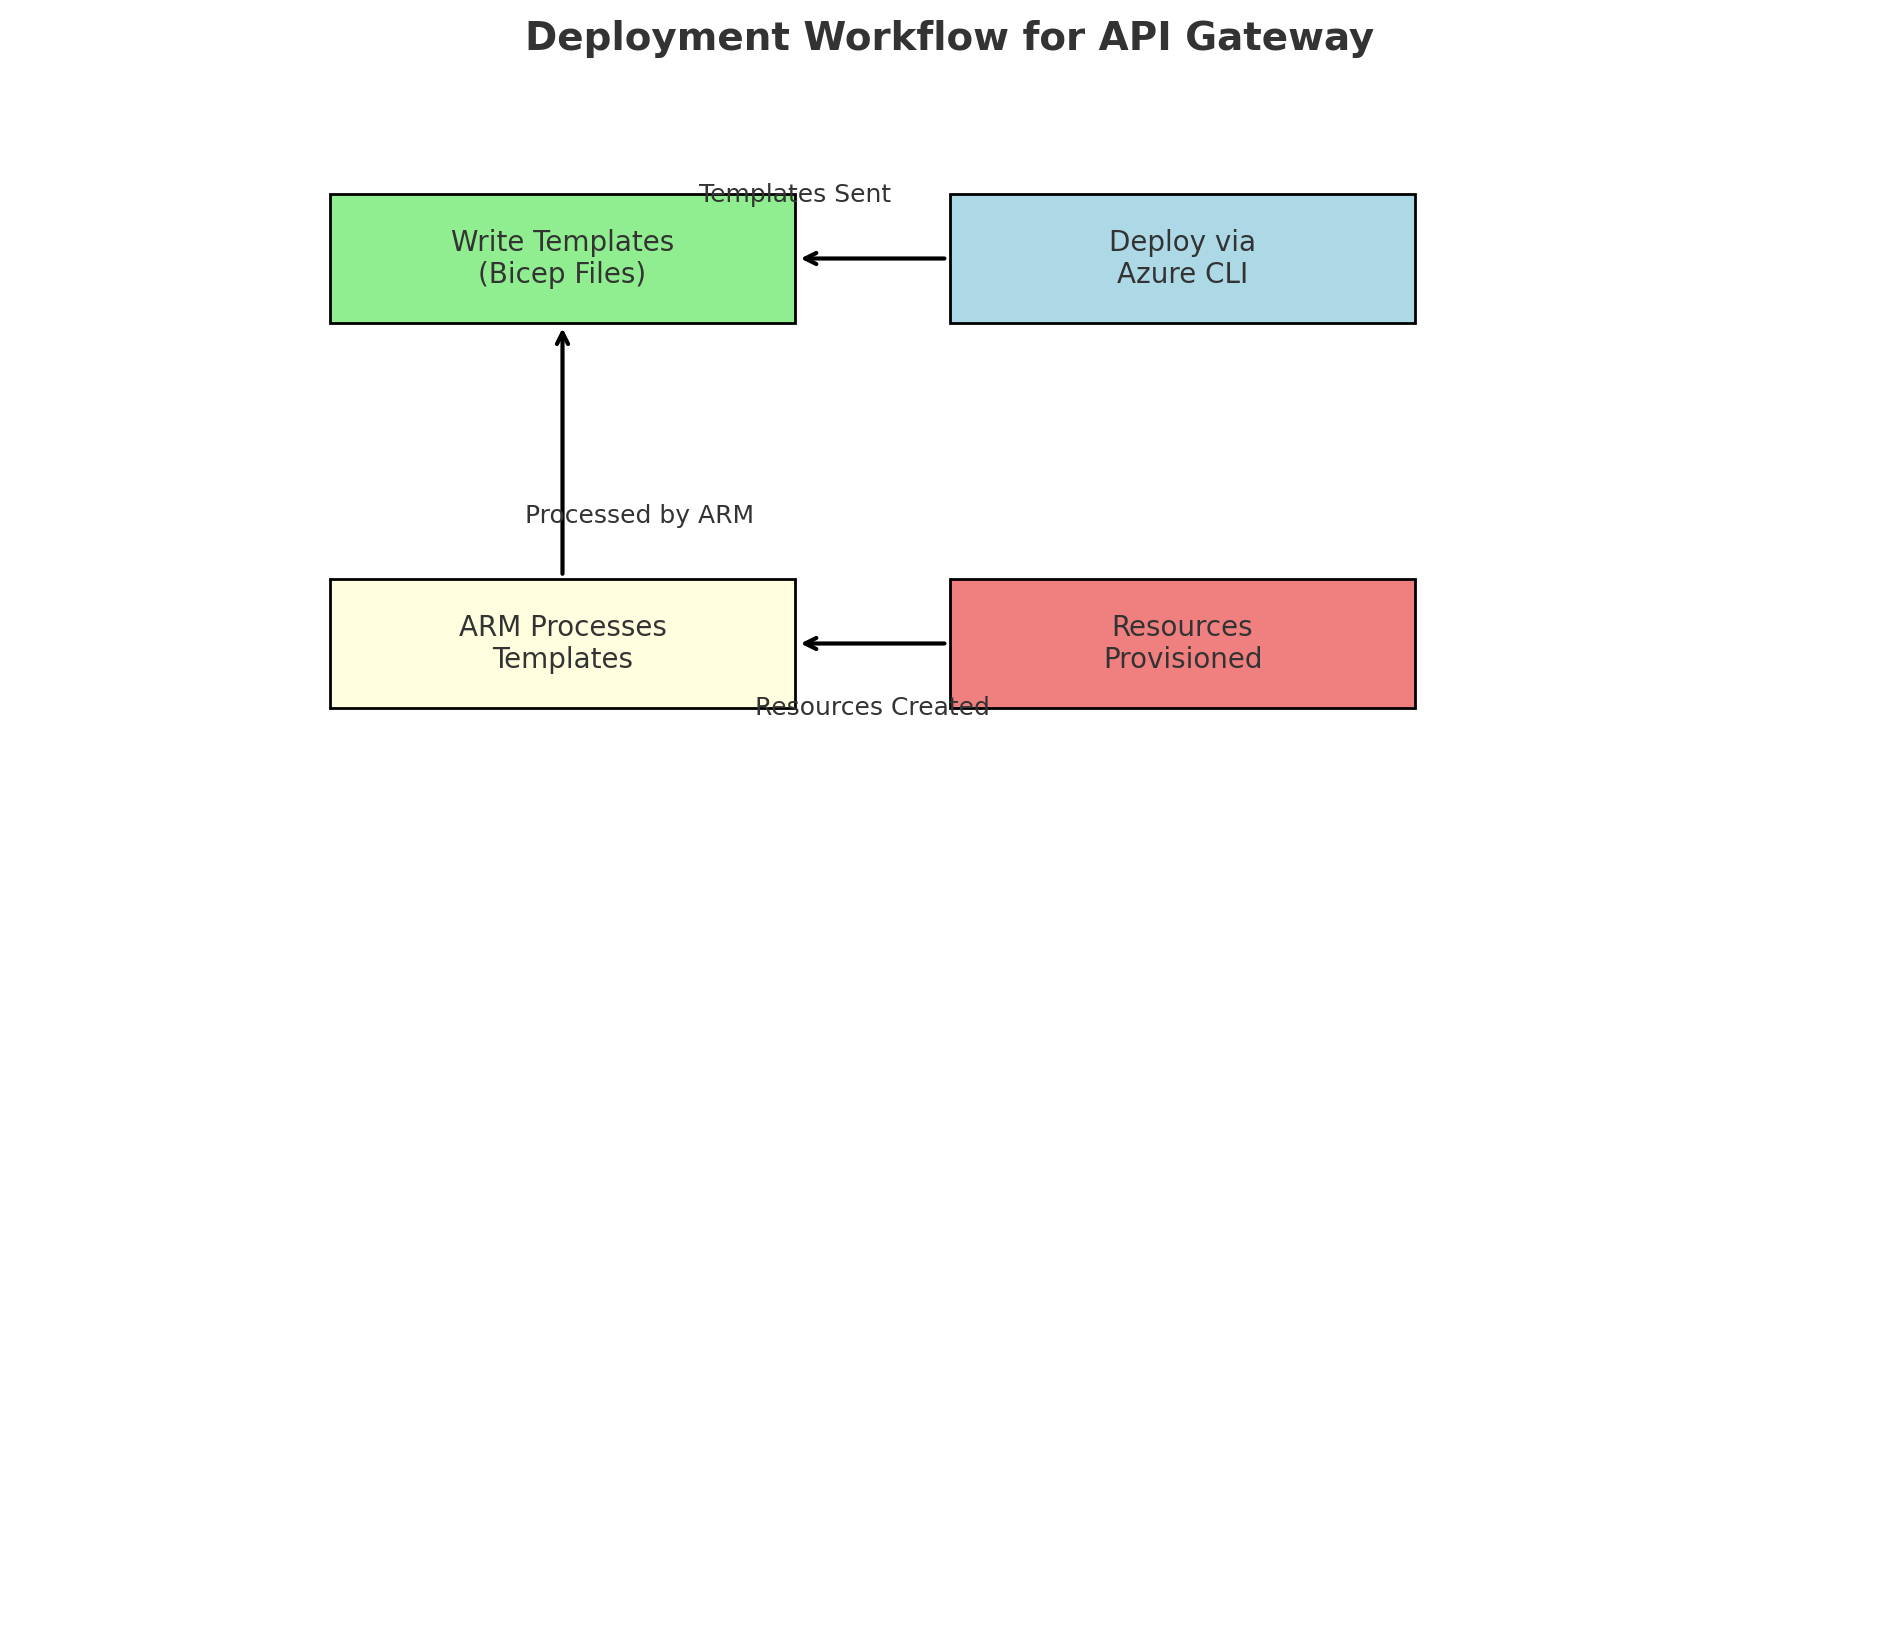
Steps:
- Write Templates:
- Define the architecture in modular Bicep files (e.g.,
apim.bicep,appservice.bicep).
- Define the architecture in modular Bicep files (e.g.,
- Deploy via Azure CLI:
- Use Azure CLI to deploy the templates to your Azure subscription.
- Process by ARM:
- Azure Resource Manager validates and processes the templates.
- Provision Resources:
- Resources like API Management, App Service, and Key Vault are provisioned in the specified resource group.
Configuring API Gateway Policies
Once the API Management instance is deployed, the next step is configuring essential policies for secure and efficient API management. Policies ensure proper handling of cross-origin requests, rate limiting, and authentication.
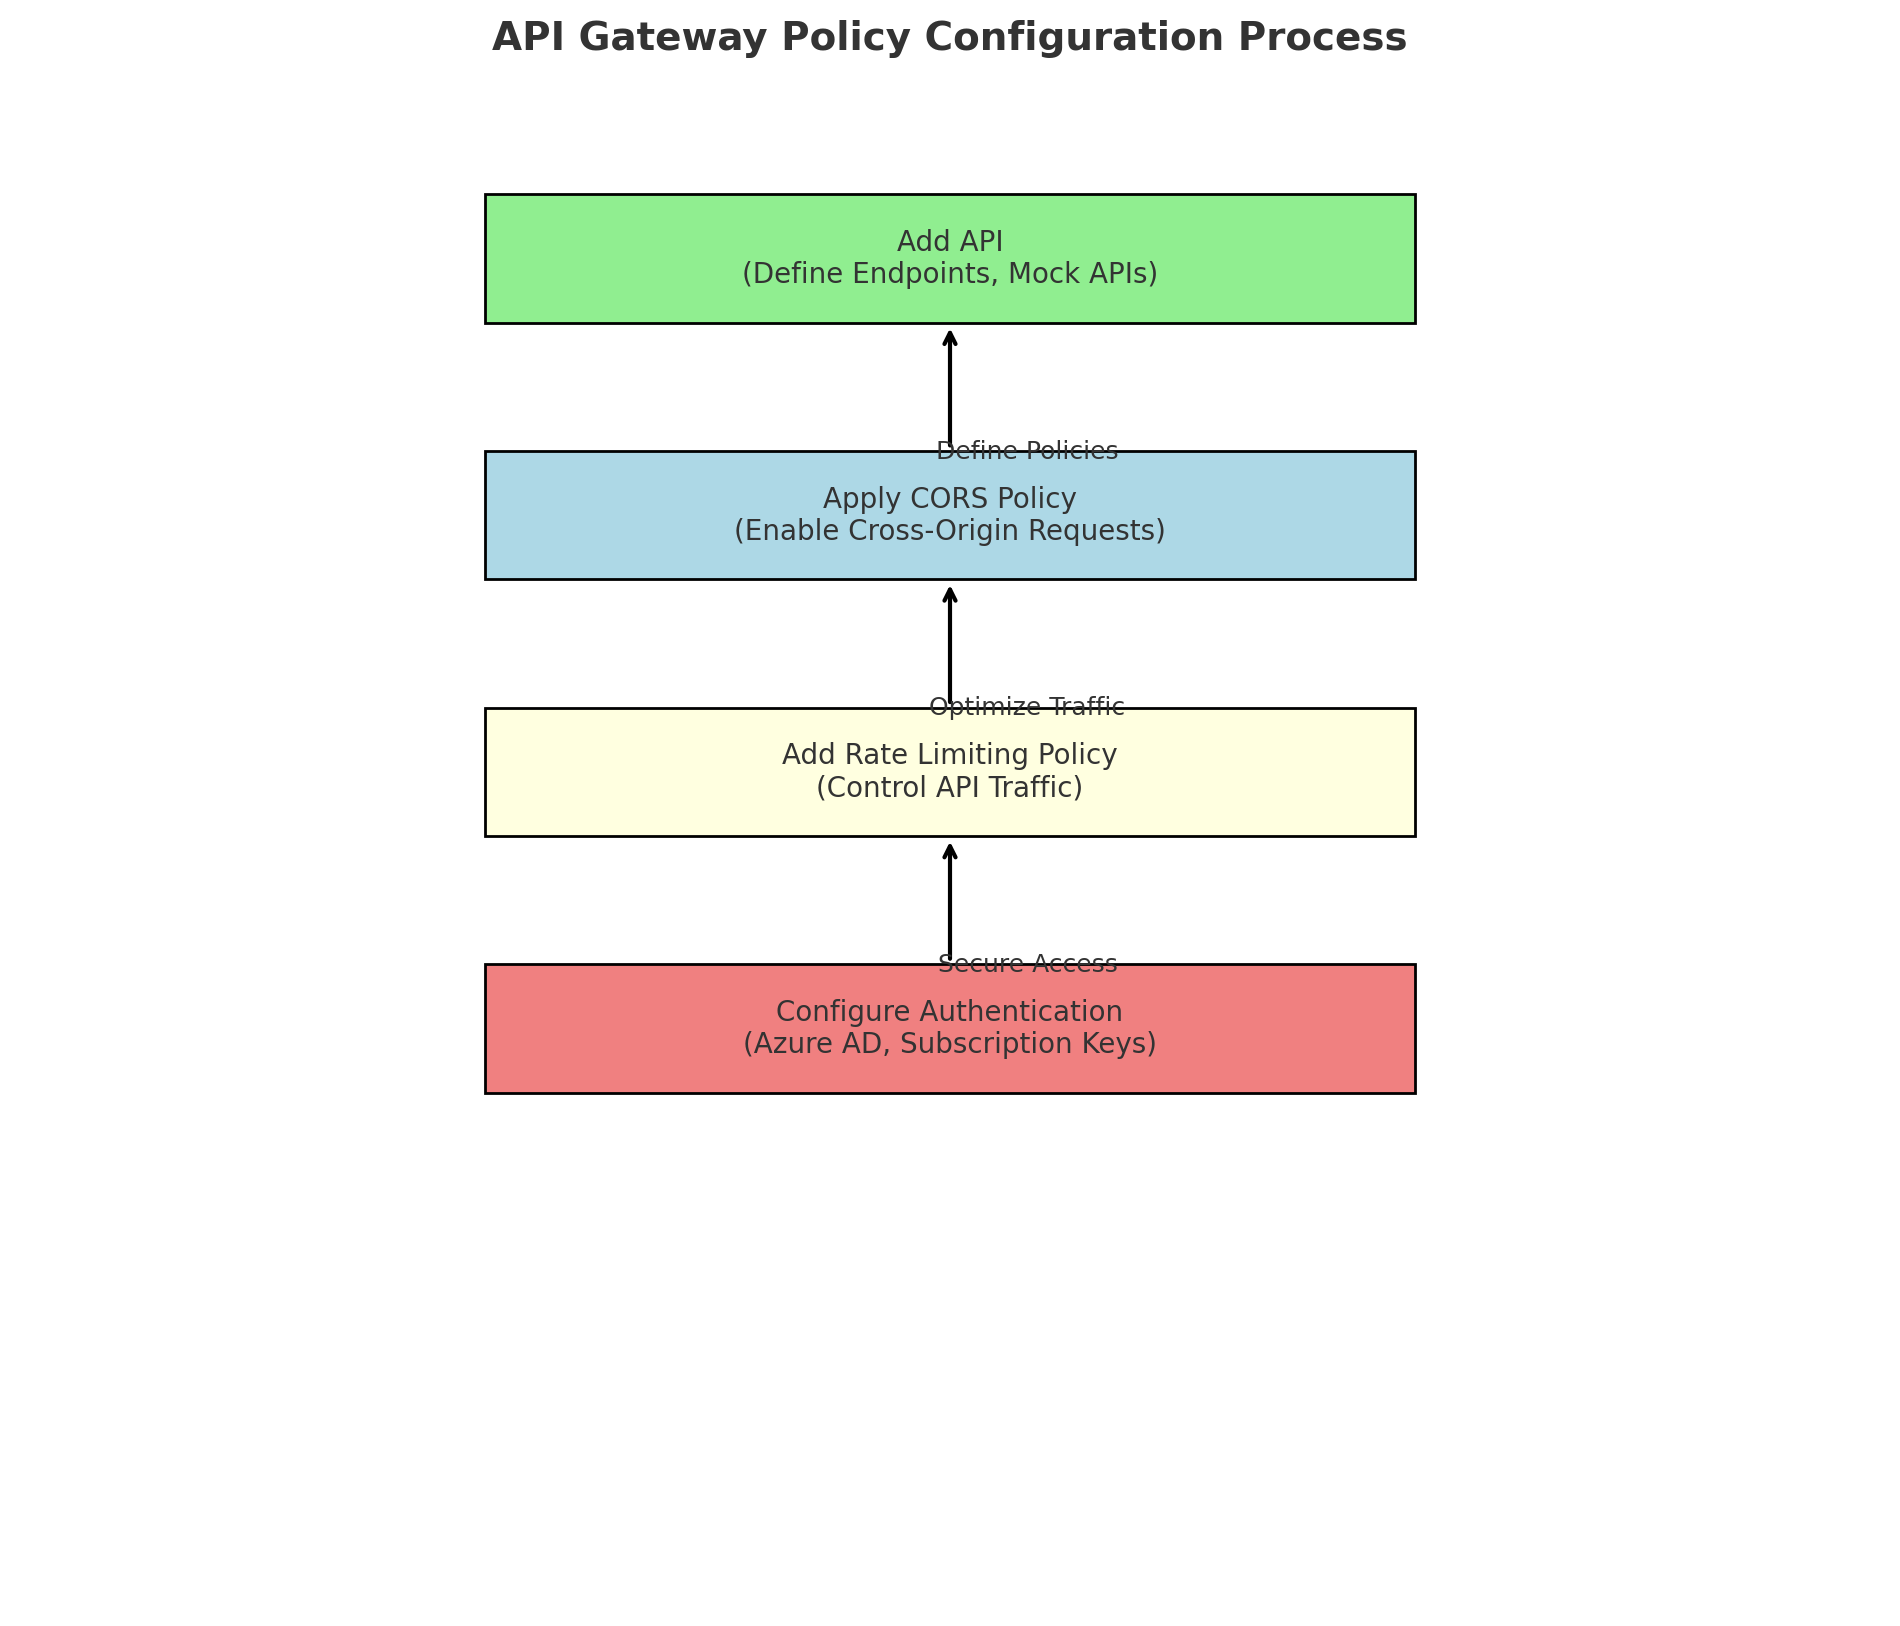
Key Policies to Configure:
- CORS (Cross-Origin Resource Sharing):
- Allow secure cross-origin requests to APIs.
- Rate Limiting:
- Control traffic by limiting the number of requests a client can make within a specific time period.
- Authentication:
- Enforce access control using Azure Active Directory (AD) or subscription keys.
tip: Each policy is applied to specific APIs defined in the API Management instance.
Post-Deployment Architecture
After deployment and configuration, the final architecture consists of the following components:
- Client Applications: Web, mobile, or IoT applications that send requests.
- API Gateway: Routes requests to backend APIs, applies policies, and monitors usage.
- Backend APIs: Perform business logic and interact with data stores.
- Key Vault: Securely stores sensitive information like API keys.
- Application Insights: Captures logs, metrics, and performance data.
Below is the completed architecture:
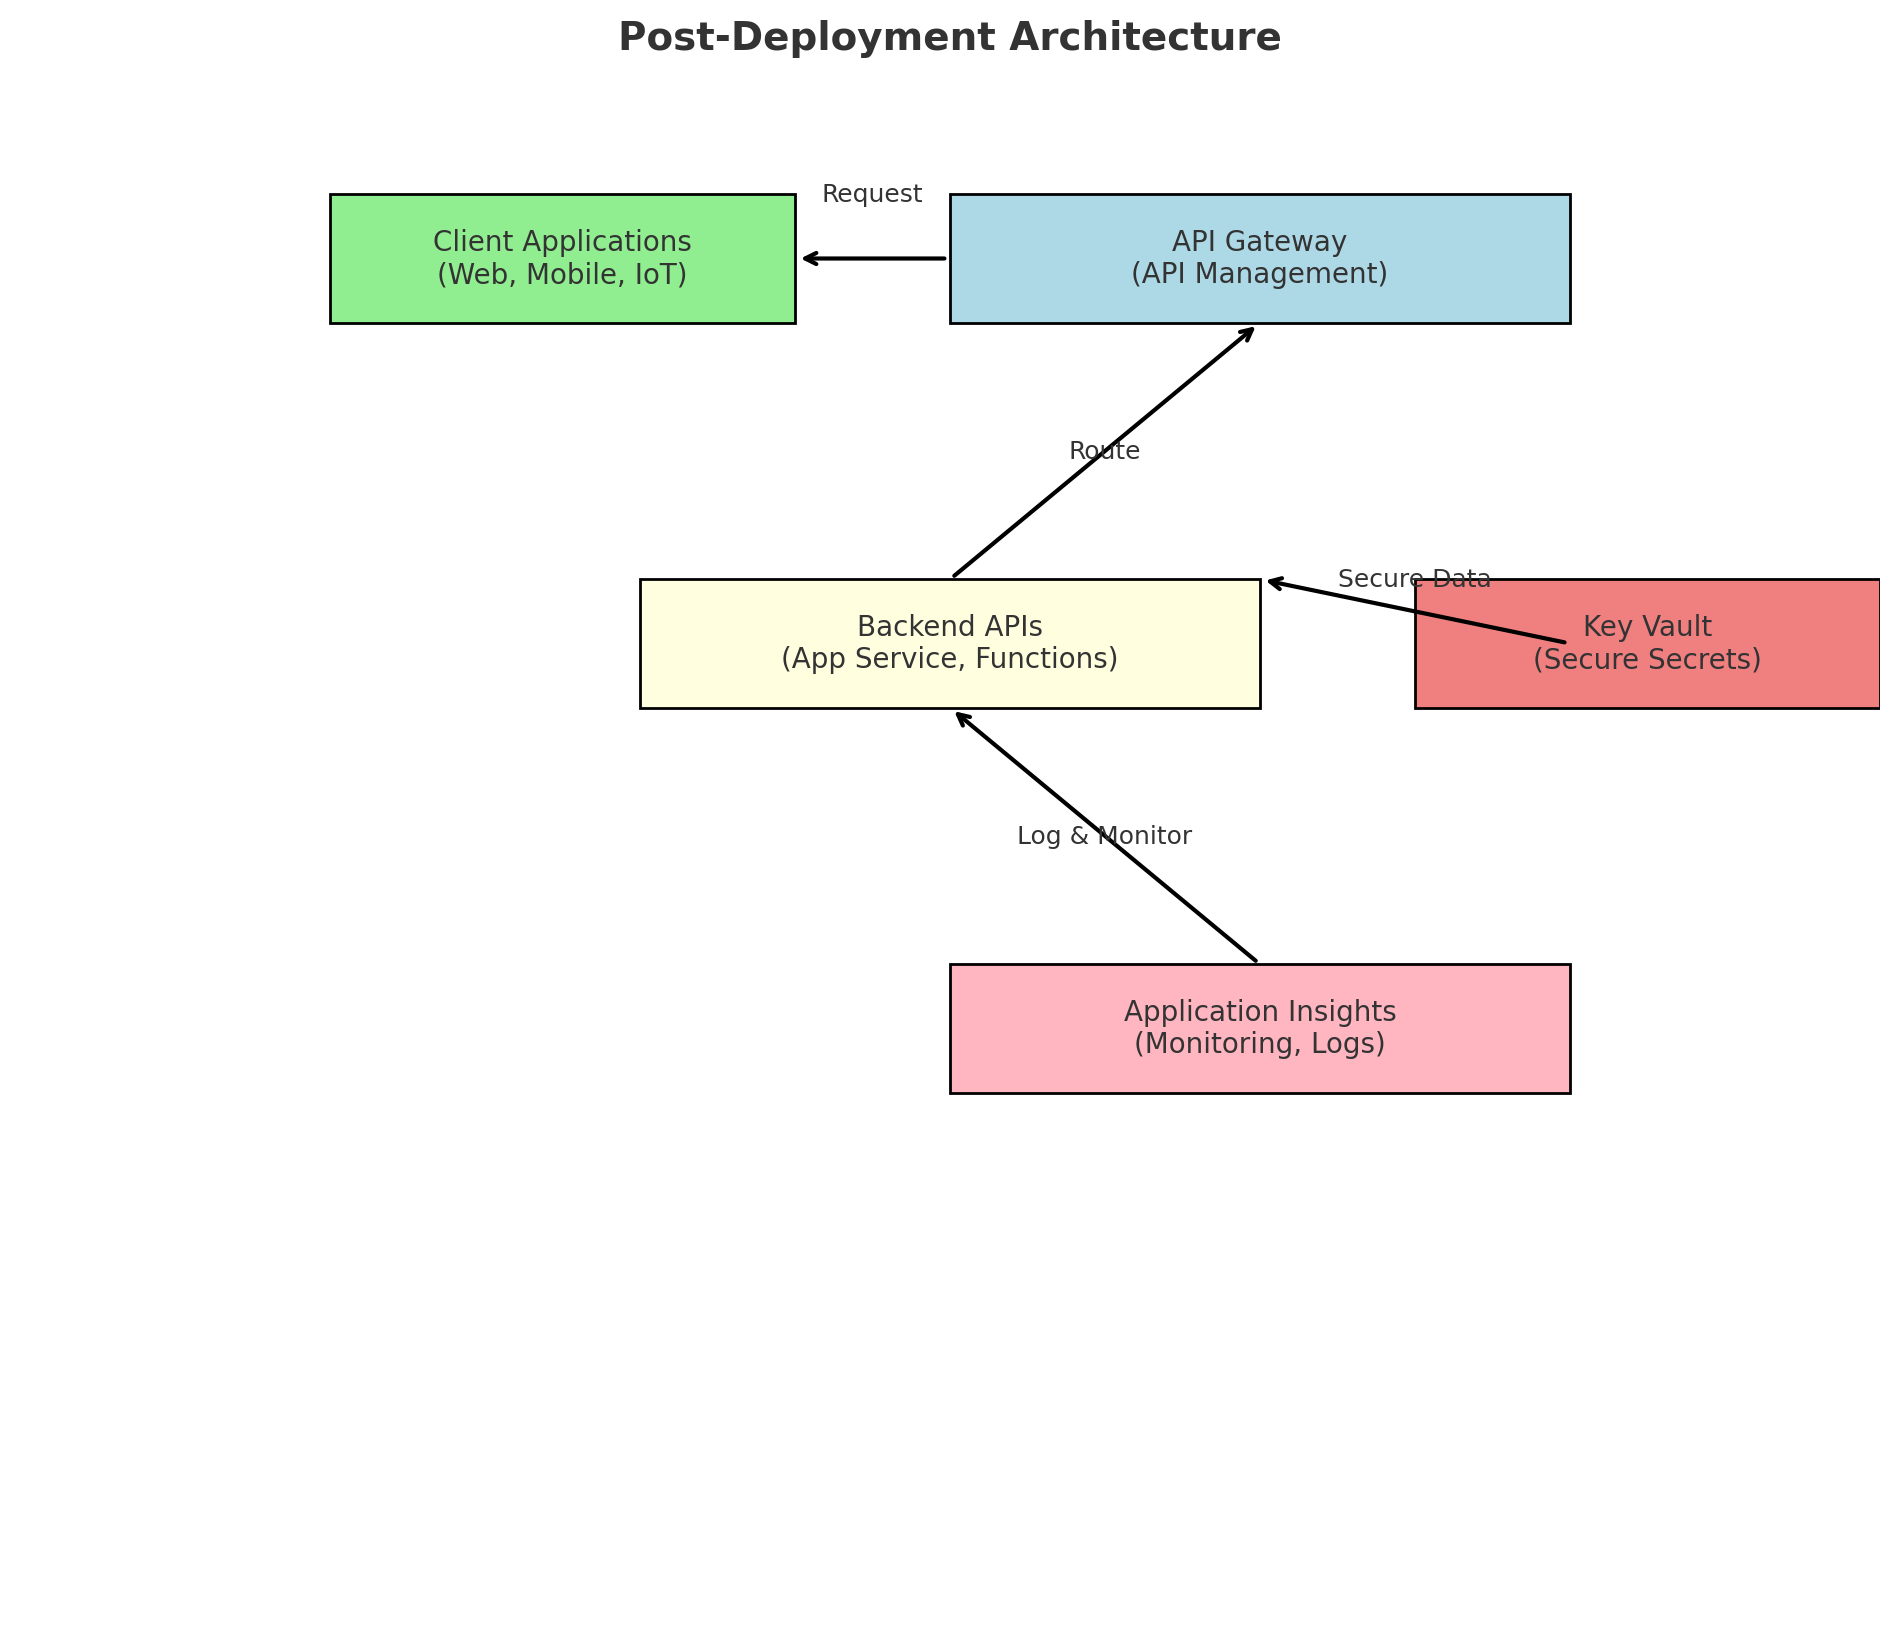
This architecture ensures scalability, security, and observability, making it suitable for real-world applications.
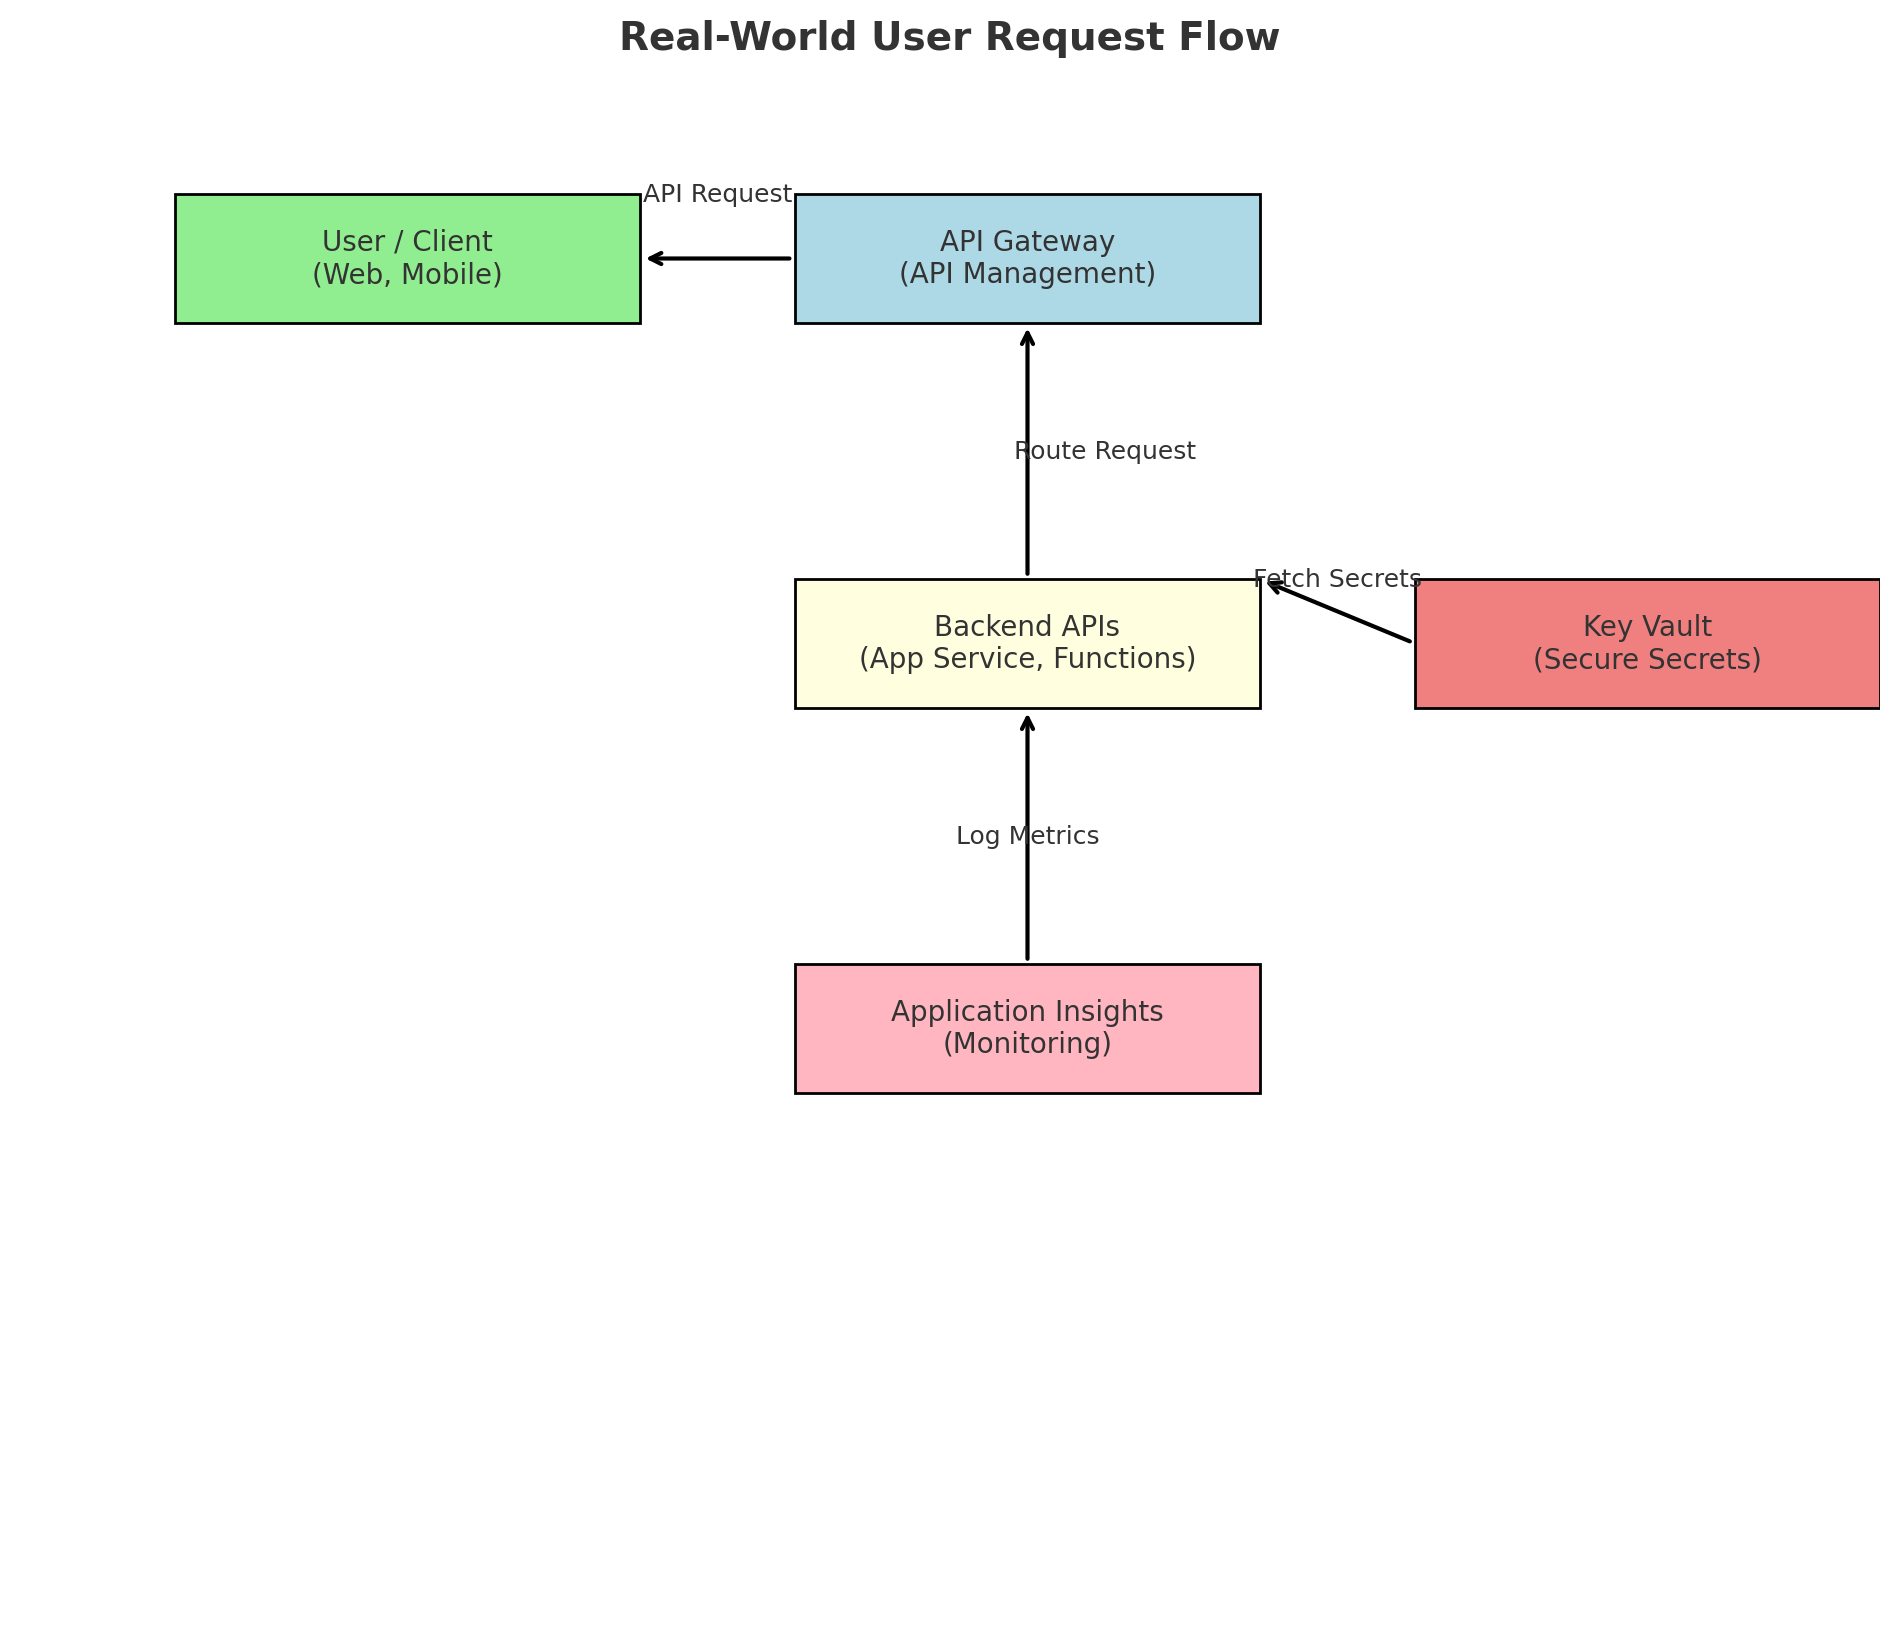
Real-World User Request Flow
To understand how the system functions after deployment, let’s walk through a real-world scenario where a user interacts with the e-commerce platform:
- A user sends a request to search for a product using a web or mobile app.
- The request is routed through the API Gateway, which applies policies like rate limiting and authentication.
- The Backend APIs process the request and fetch additional data if needed.
- If the backend requires secure data (e.g., database credentials), it retrieves secrets from Key Vault.
- Logs and performance metrics are sent to Application Insights for monitoring and diagnostics.
This flow is visualized in the diagram below:
info: By following these steps and referencing the provided diagrams, you can successfully deploy and configure a scalable API gateway in Azure. This implementation not only automates resource provisioning but also ensures a secure and efficient system for managing APIs.
5. Challenges and Lessons Learned
Every project comes with its share of challenges, and this API gateway implementation was no different. This section highlights the key challenges faced during the project, how they were resolved, and the lessons learned for future implementations.
Common Deployment Errors
During the deployment process, several common errors were encountered:
- Syntax Issues in Bicep Templates:
- Errors caused by missing parameters or incorrect syntax.
- Missing Resources:
- Dependencies not provisioned correctly, leading to deployment failures.
- ARM Validation Errors:
- Invalid configurations detected during validation.
Each of these issues required targeted troubleshooting and solutions, as illustrated in the diagram below:
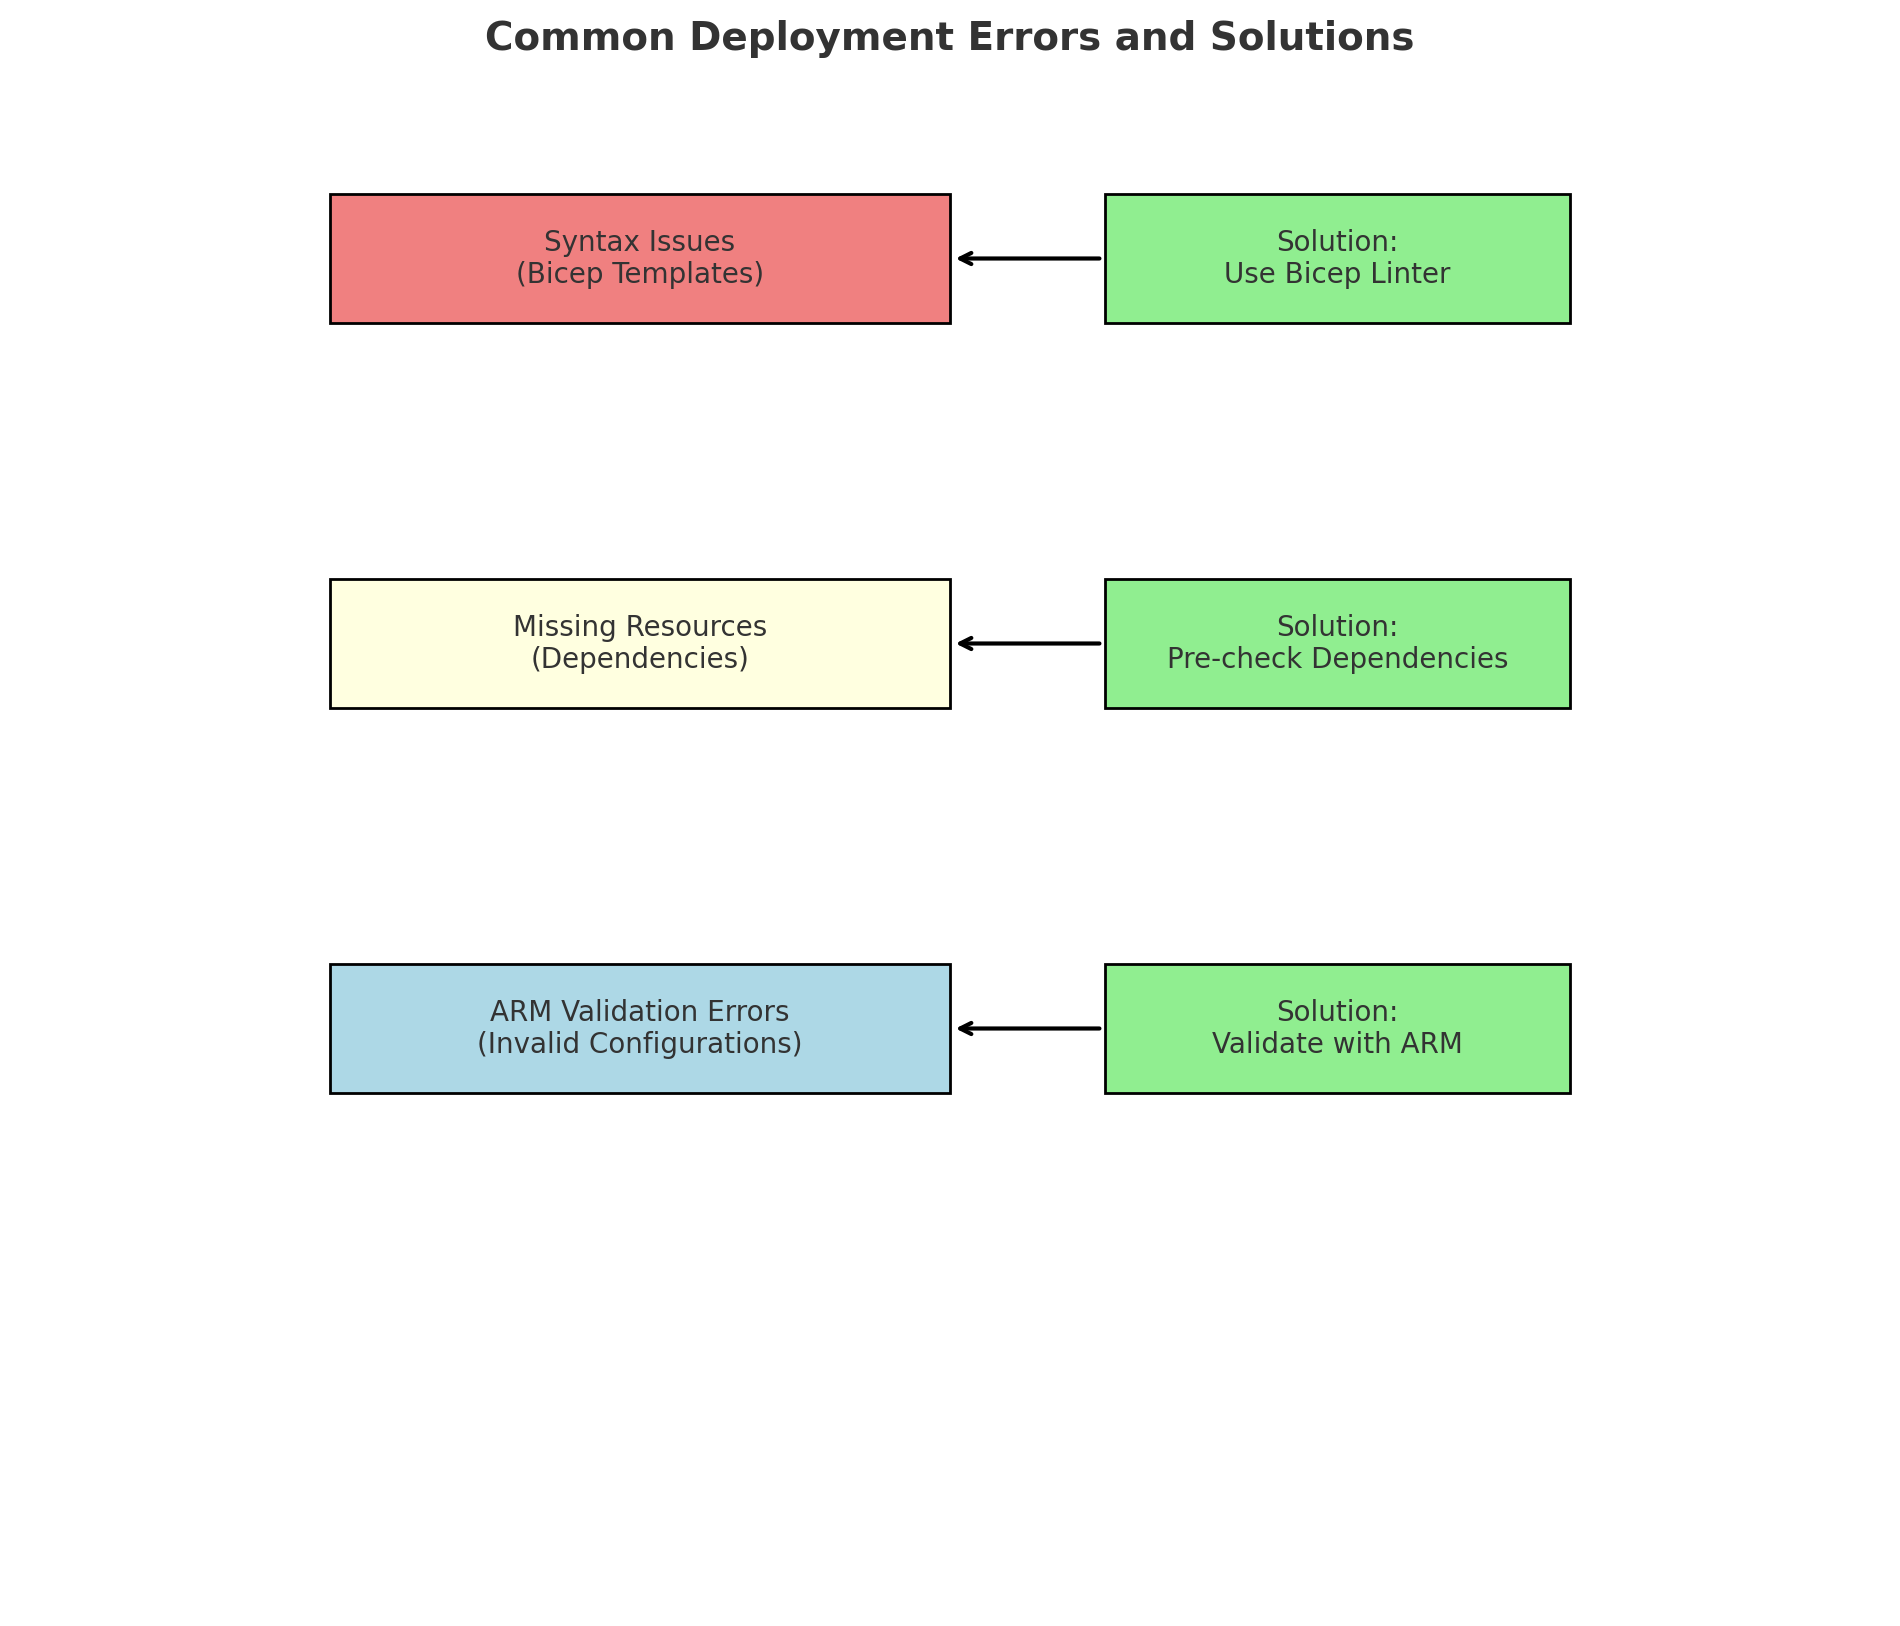
Solutions:
- Syntax Issues: Use the Bicep linter to validate templates locally before deployment.
- Missing Resources: Pre-check dependencies and ensure all required resources are defined.
- ARM Validation Errors: Validate configurations using the Azure Portal or
az deployment validatecommands.
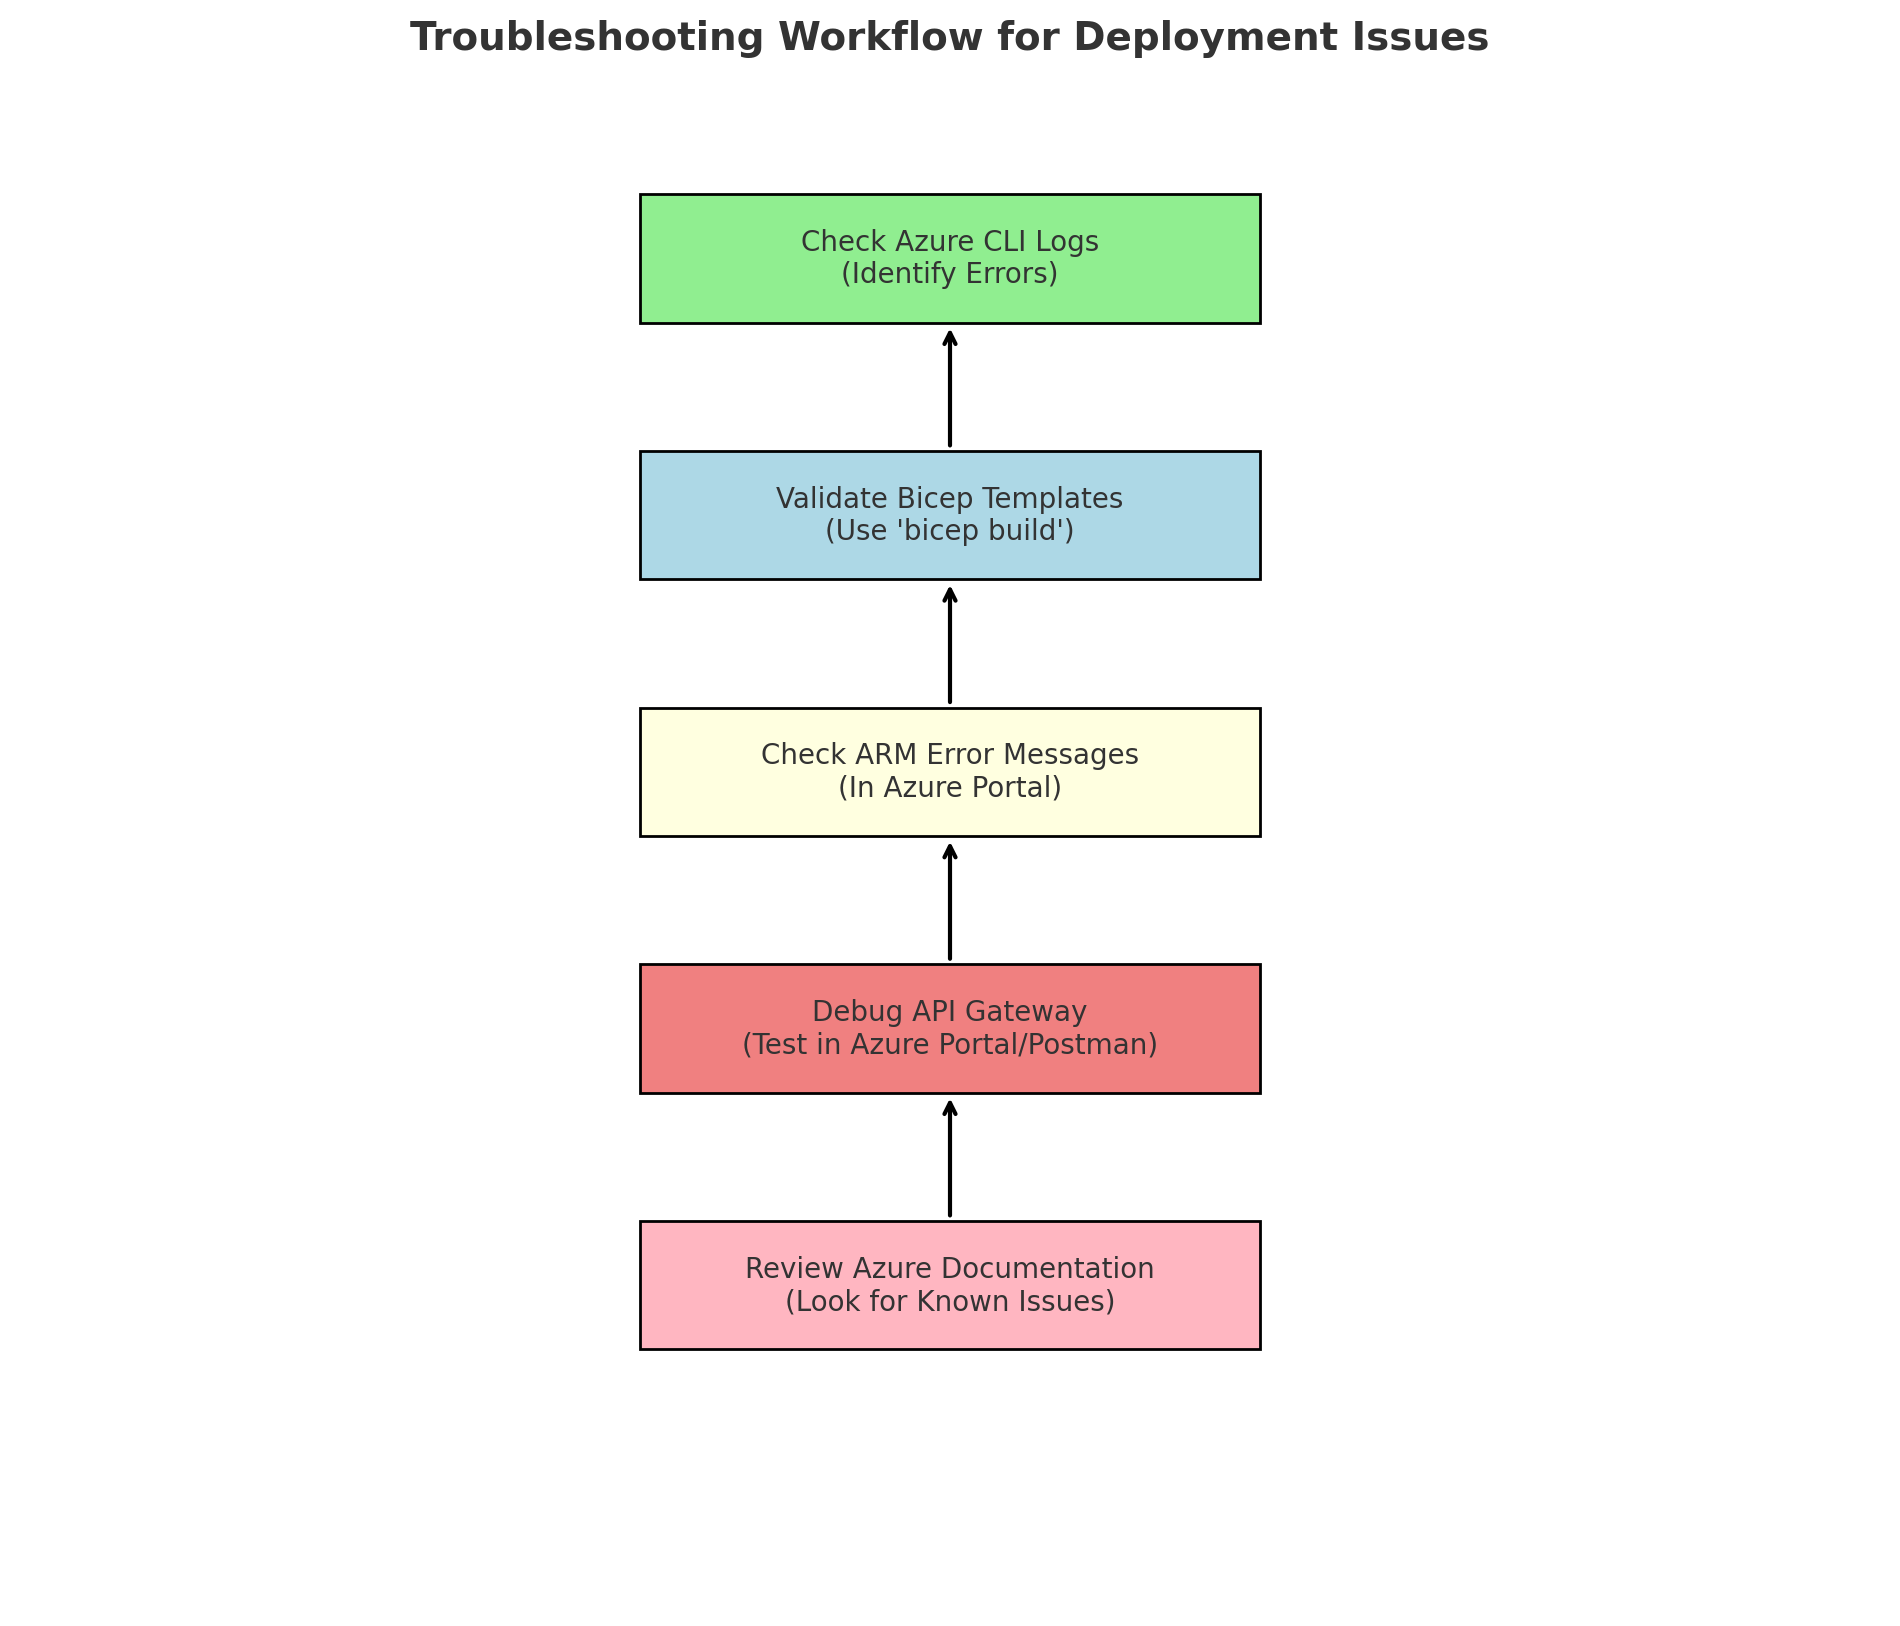
Troubleshooting Workflow
To systematically resolve issues, a structured troubleshooting workflow was developed:
- Check Azure CLI Logs:
- Review deployment logs to identify the root cause of errors.
- Validate Bicep Templates:
- Use
bicep buildor the Visual Studio Code extension to detect issues.
- Use
- Check ARM Error Messages:
- Examine error messages in the Azure Portal for more detailed insights.
- Debug API Gateway:
- Test APIs directly in the Azure Portal or tools like Postman.
- Review Documentation:
- Consult Azure documentation for known issues and best practices.
The diagram below provides a visual guide to this workflow:
Best Practices for IaC and API Management
The challenges faced during the project reinforced the importance of best practices. These include:
- Use Modular Bicep Templates:
- Simplify deployments and promote reusability.
- Implement Version Control (Git):
- Maintain a history of changes and enable collaboration.
- Validate Templates Before Deployment:
- Catch errors early by validating templates locally.
- Regularly Test API Configurations:
- Ensure policies and APIs are functioning as intended.
- Monitor Resources with Application Insights:
- Capture logs and metrics for proactive issue resolution.
The following diagram summarizes these best practices:

Optimized Architecture Post-Feedback
Based on the lessons learned, the project architecture was optimized to address identified challenges. Key improvements include:
- Optimized CORS Policies:
- Streamlined configurations to handle cross-origin requests efficiently.
- Enhanced Security with Custom Policies:
- Added advanced policies for stricter access control.
- Improved API Performance:
- Fine-tuned backend APIs and the API gateway for better throughput.
- Detailed Logs for Debugging:
- Enhanced logging in Application Insights for easier troubleshooting.
The diagram below illustrates the optimized architecture:
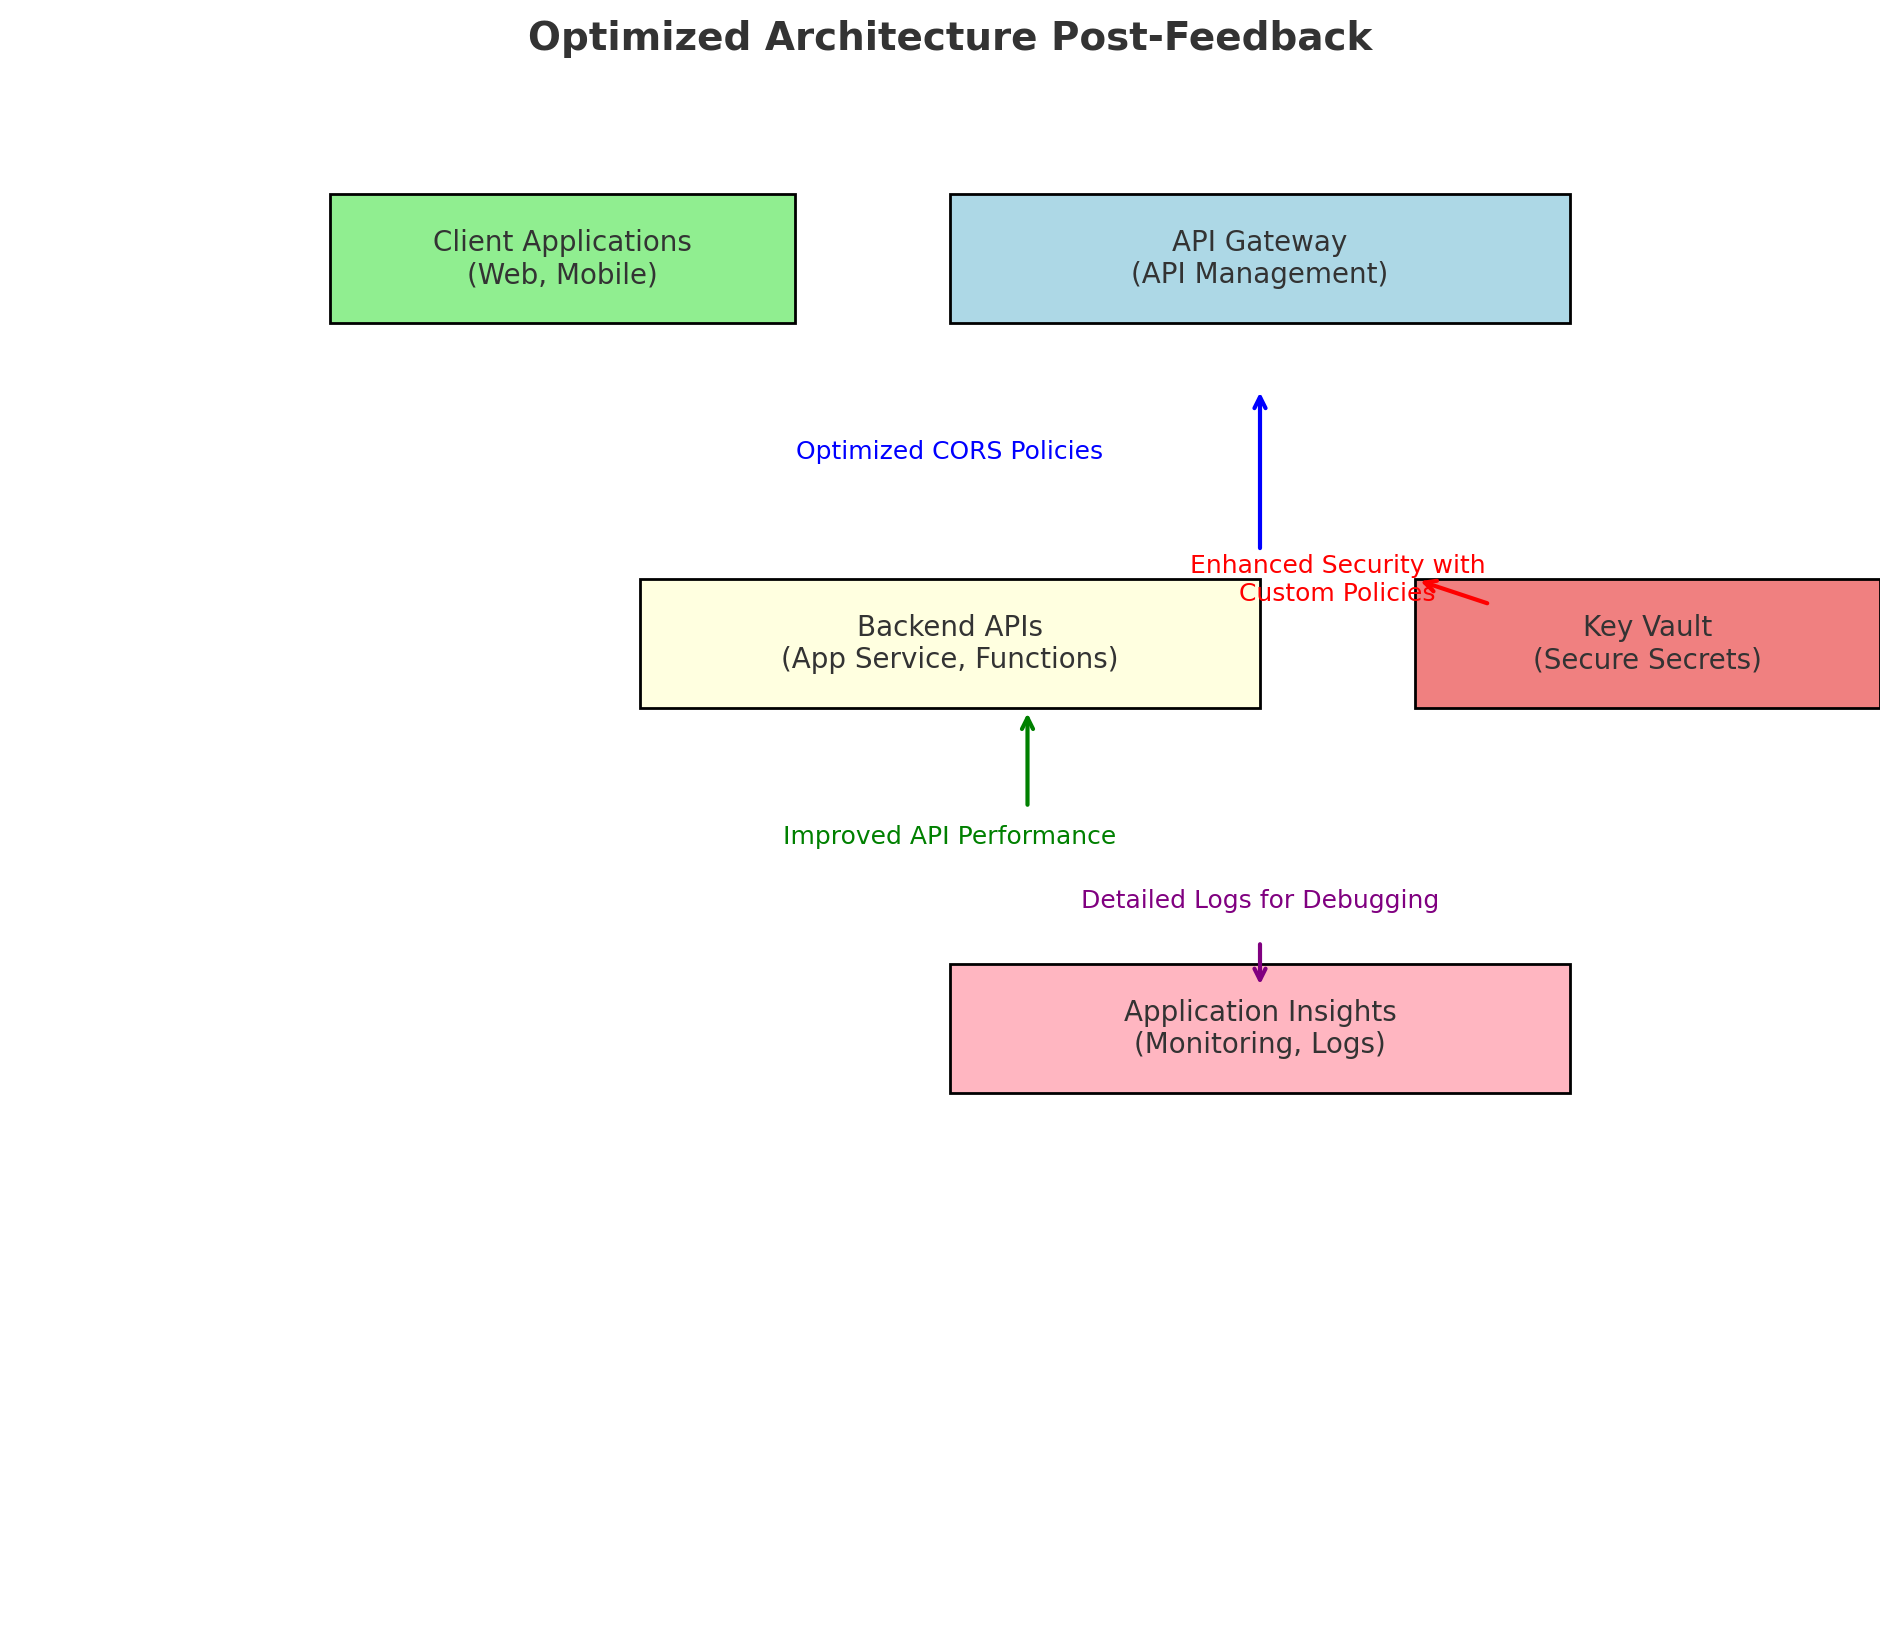
info: By addressing these challenges and implementing the lessons learned, the project not only delivered a robust API gateway but also established a framework for future success.
6. Future Improvements and Next Steps
The deployment of the API gateway is only the beginning. To ensure the system continues to scale, adapt, and address emerging needs, we’ve outlined potential future improvements and extended use cases. This section highlights enhancements, their potential benefits, and how they align with the overall project goals.
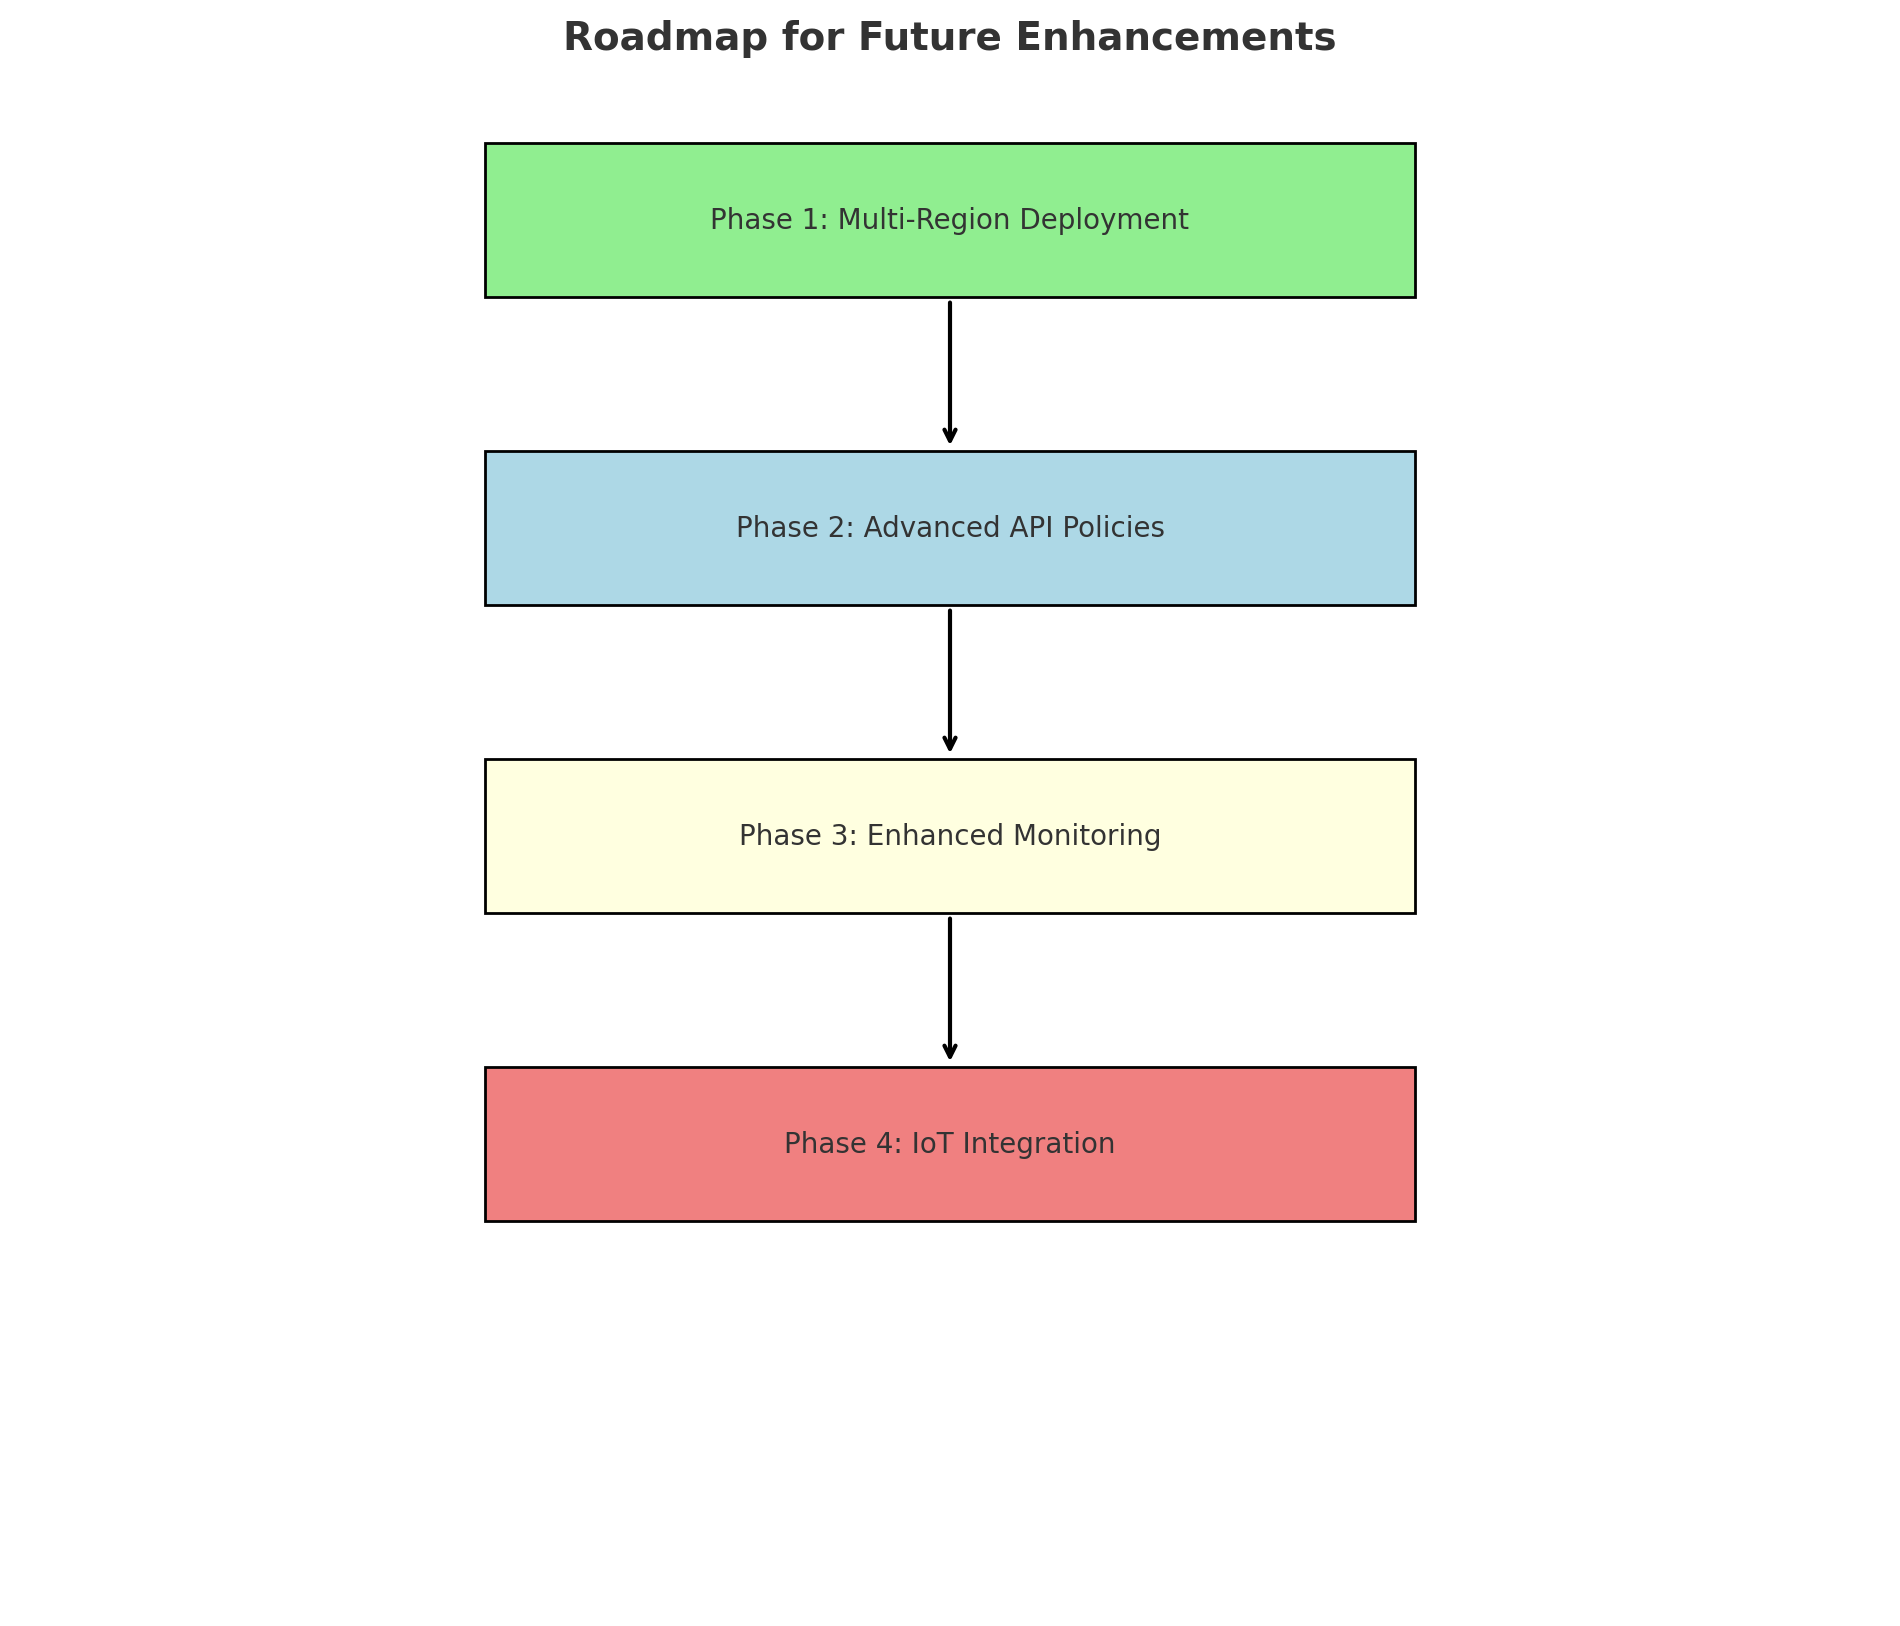
Roadmap for Future Enhancements
As we build upon the current deployment, the following roadmap outlines key phases for implementing improvements:
- Phase 1: Multi-Region Deployment:
- Deploy the API gateway and backend services across multiple Azure regions to improve availability and disaster recovery.
- Phase 2: Advanced API Policies:
- Implement custom policies, such as IP filtering, request throttling, and caching, to enhance security and performance.
- Phase 3: Enhanced Monitoring:
- Leverage Application Insights for advanced monitoring, including end-to-end tracing and proactive alerting.
- Phase 4: IoT Integration:
- Extend the API gateway to support IoT devices, enabling seamless interaction with edge and sensor data.
The roadmap is visualized below:
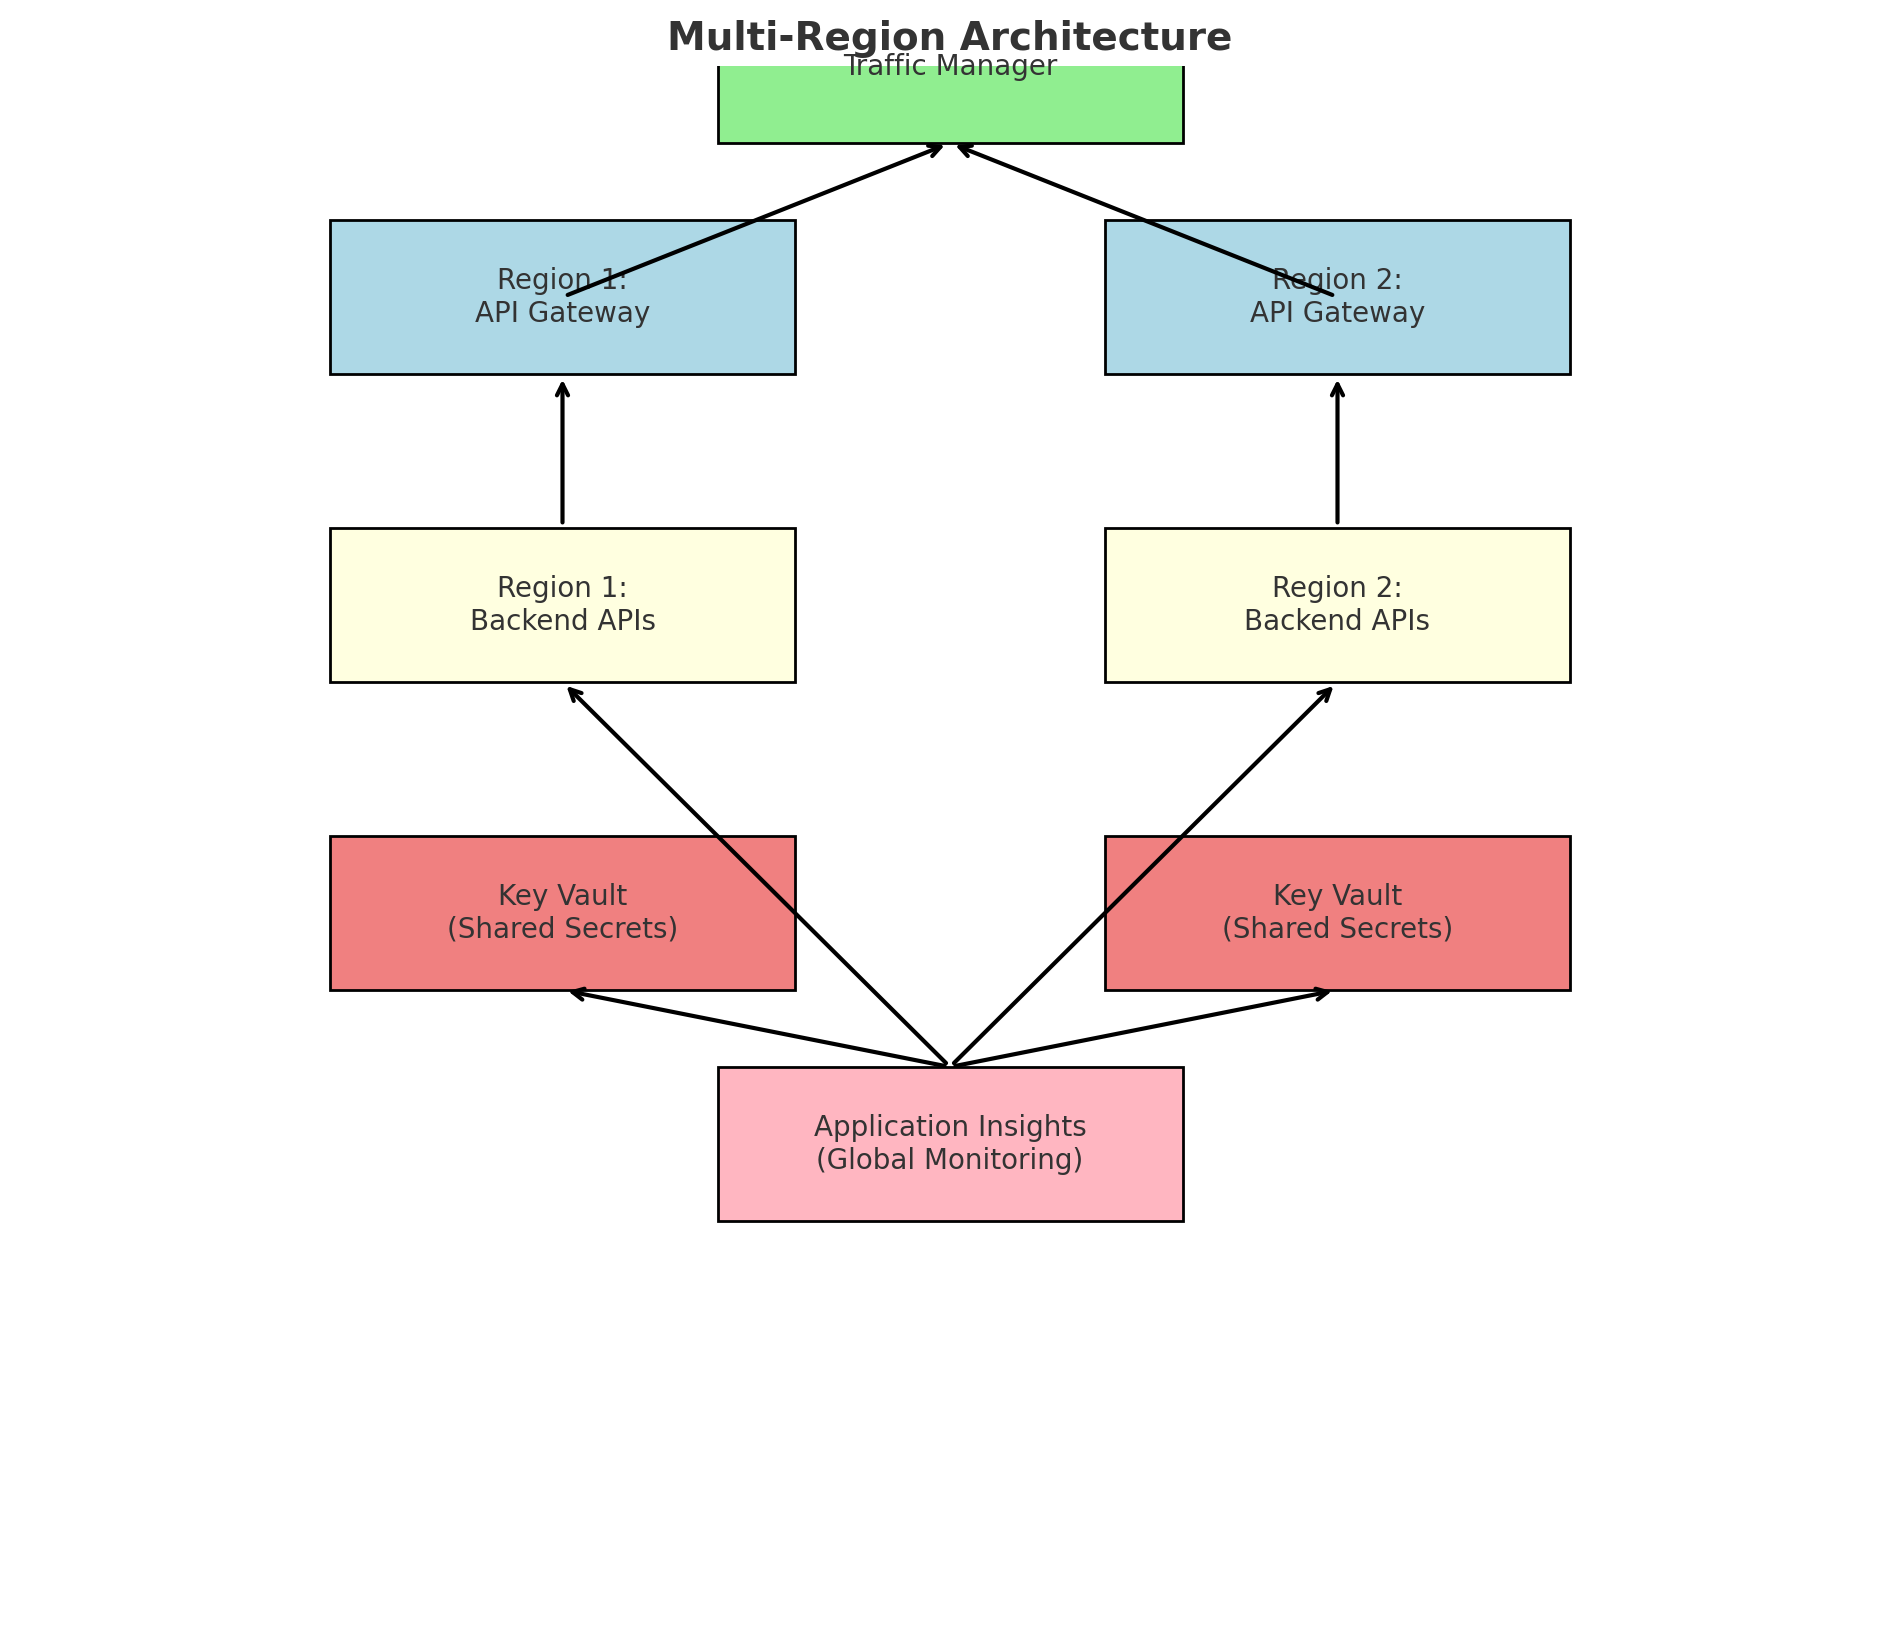
Multi-Region Architecture
To enhance availability and reduce latency, deploying the system across multiple Azure regions is a key step. This architecture includes:
- API gateways in different regions, managed through a Traffic Manager.
- Backend APIs and Key Vaults replicated for each region.
- Centralized monitoring using Application Insights.
The following diagram illustrates this architecture:
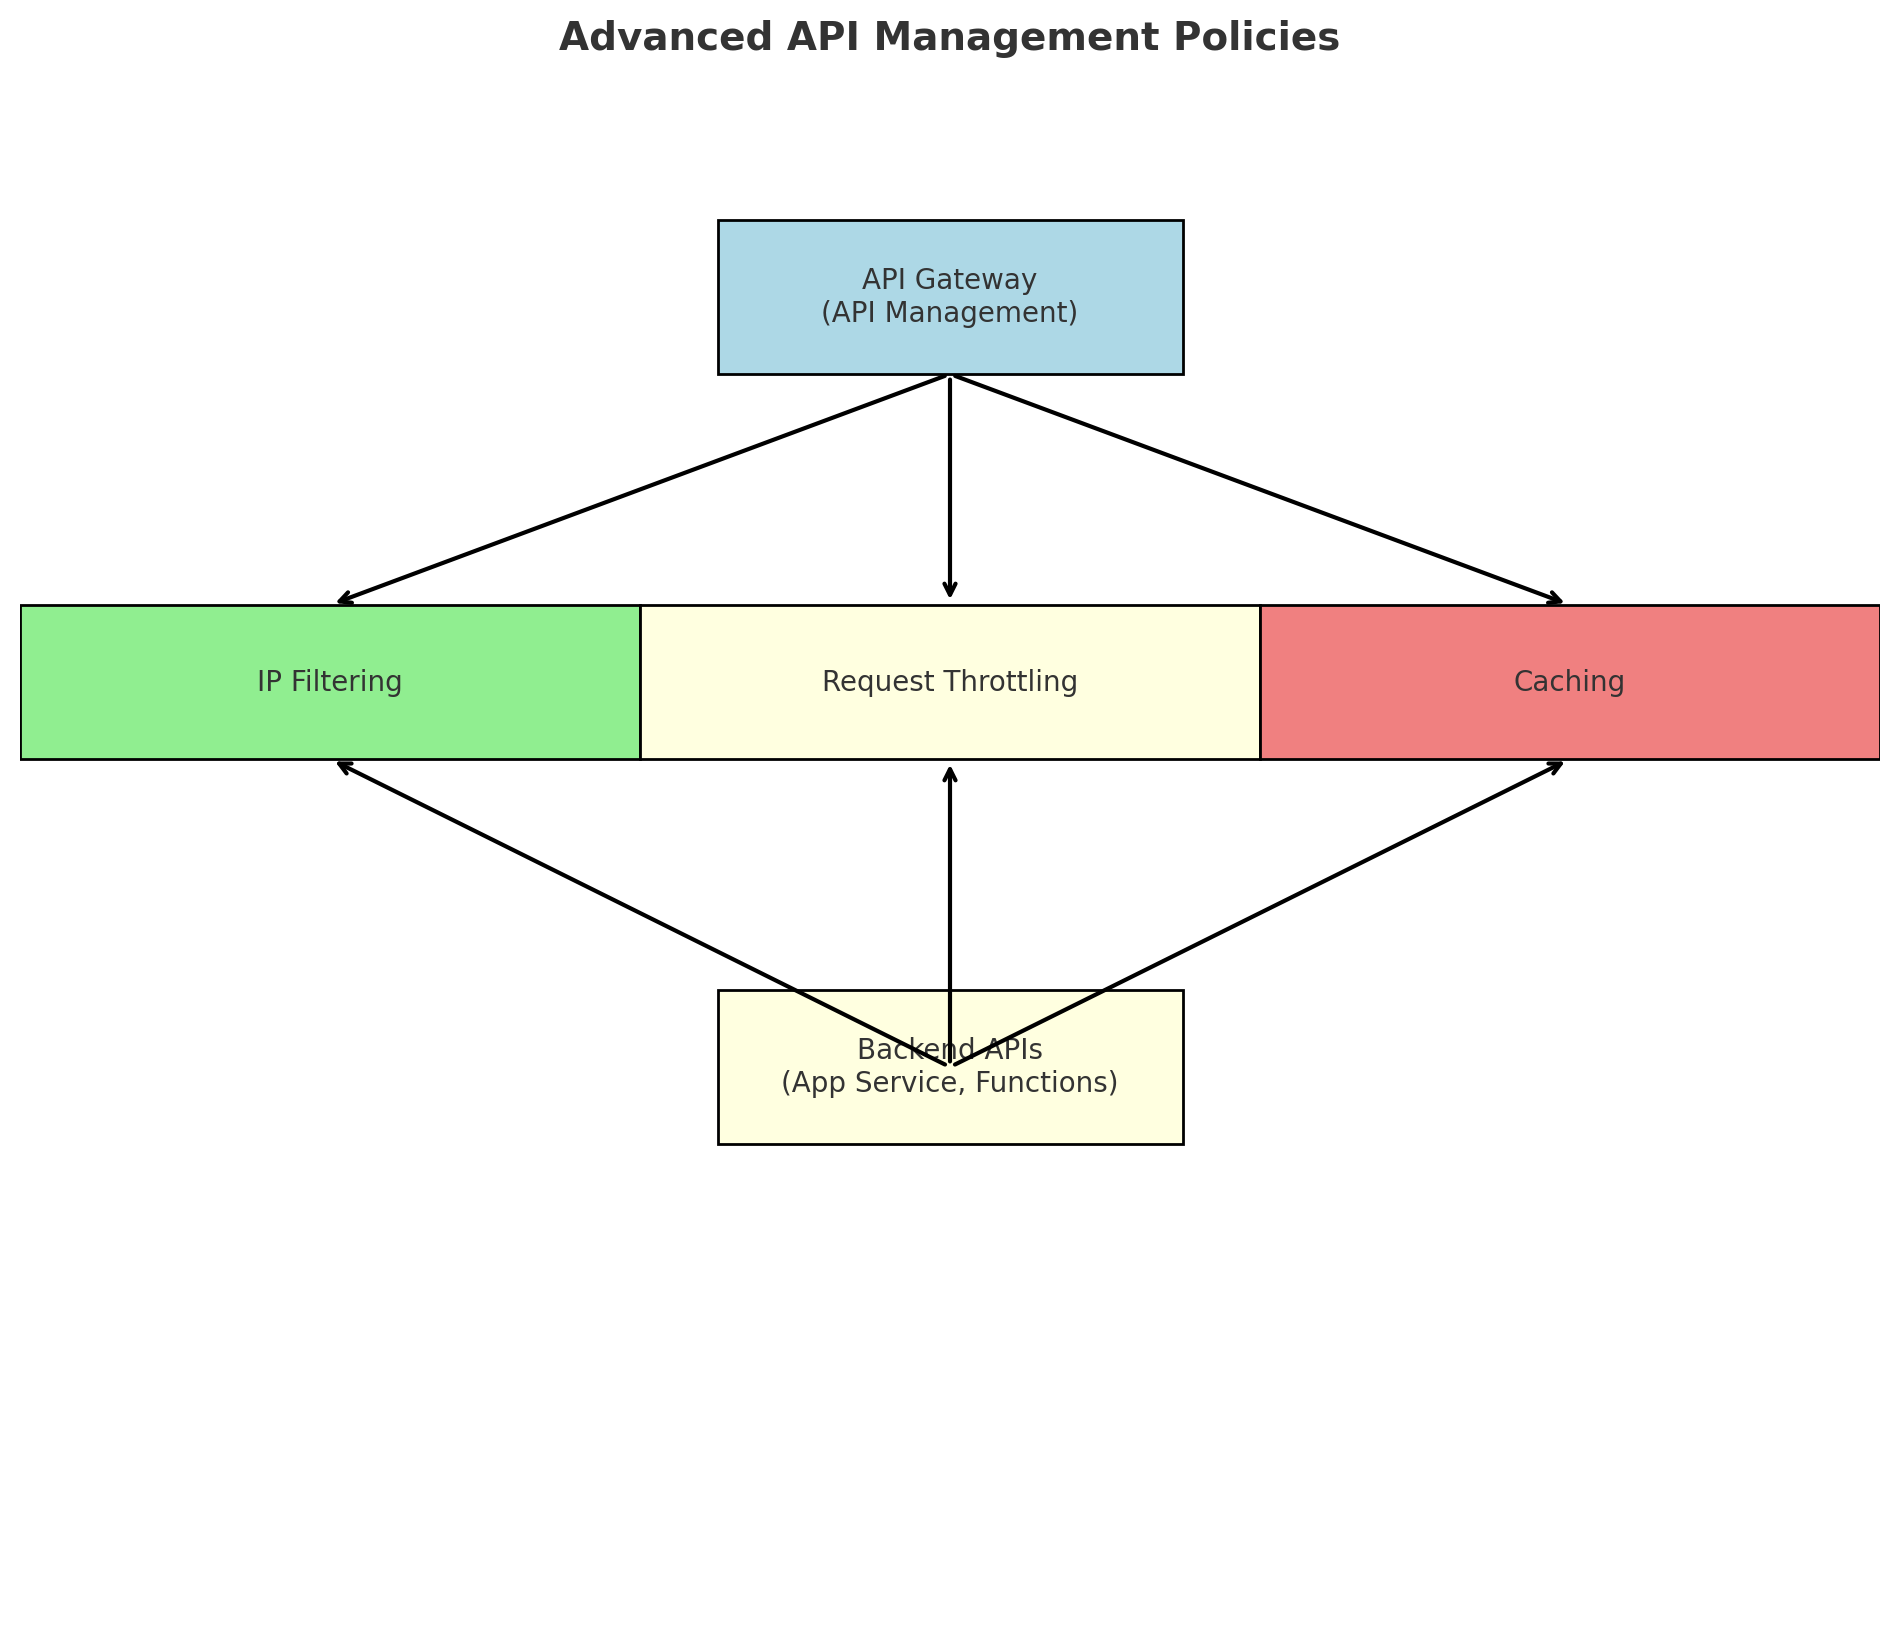
Advanced API Management Policies
As the system grows, implementing advanced API policies can address specific requirements. These include:
- IP Filtering:
- Restrict access based on client IP addresses.
- Request Throttling:
- Limit API usage by client type or subscription level to ensure fair resource usage.
- Caching:
- Cache frequently requested responses to reduce backend load and improve response times.
Here’s how these policies integrate with the API gateway:
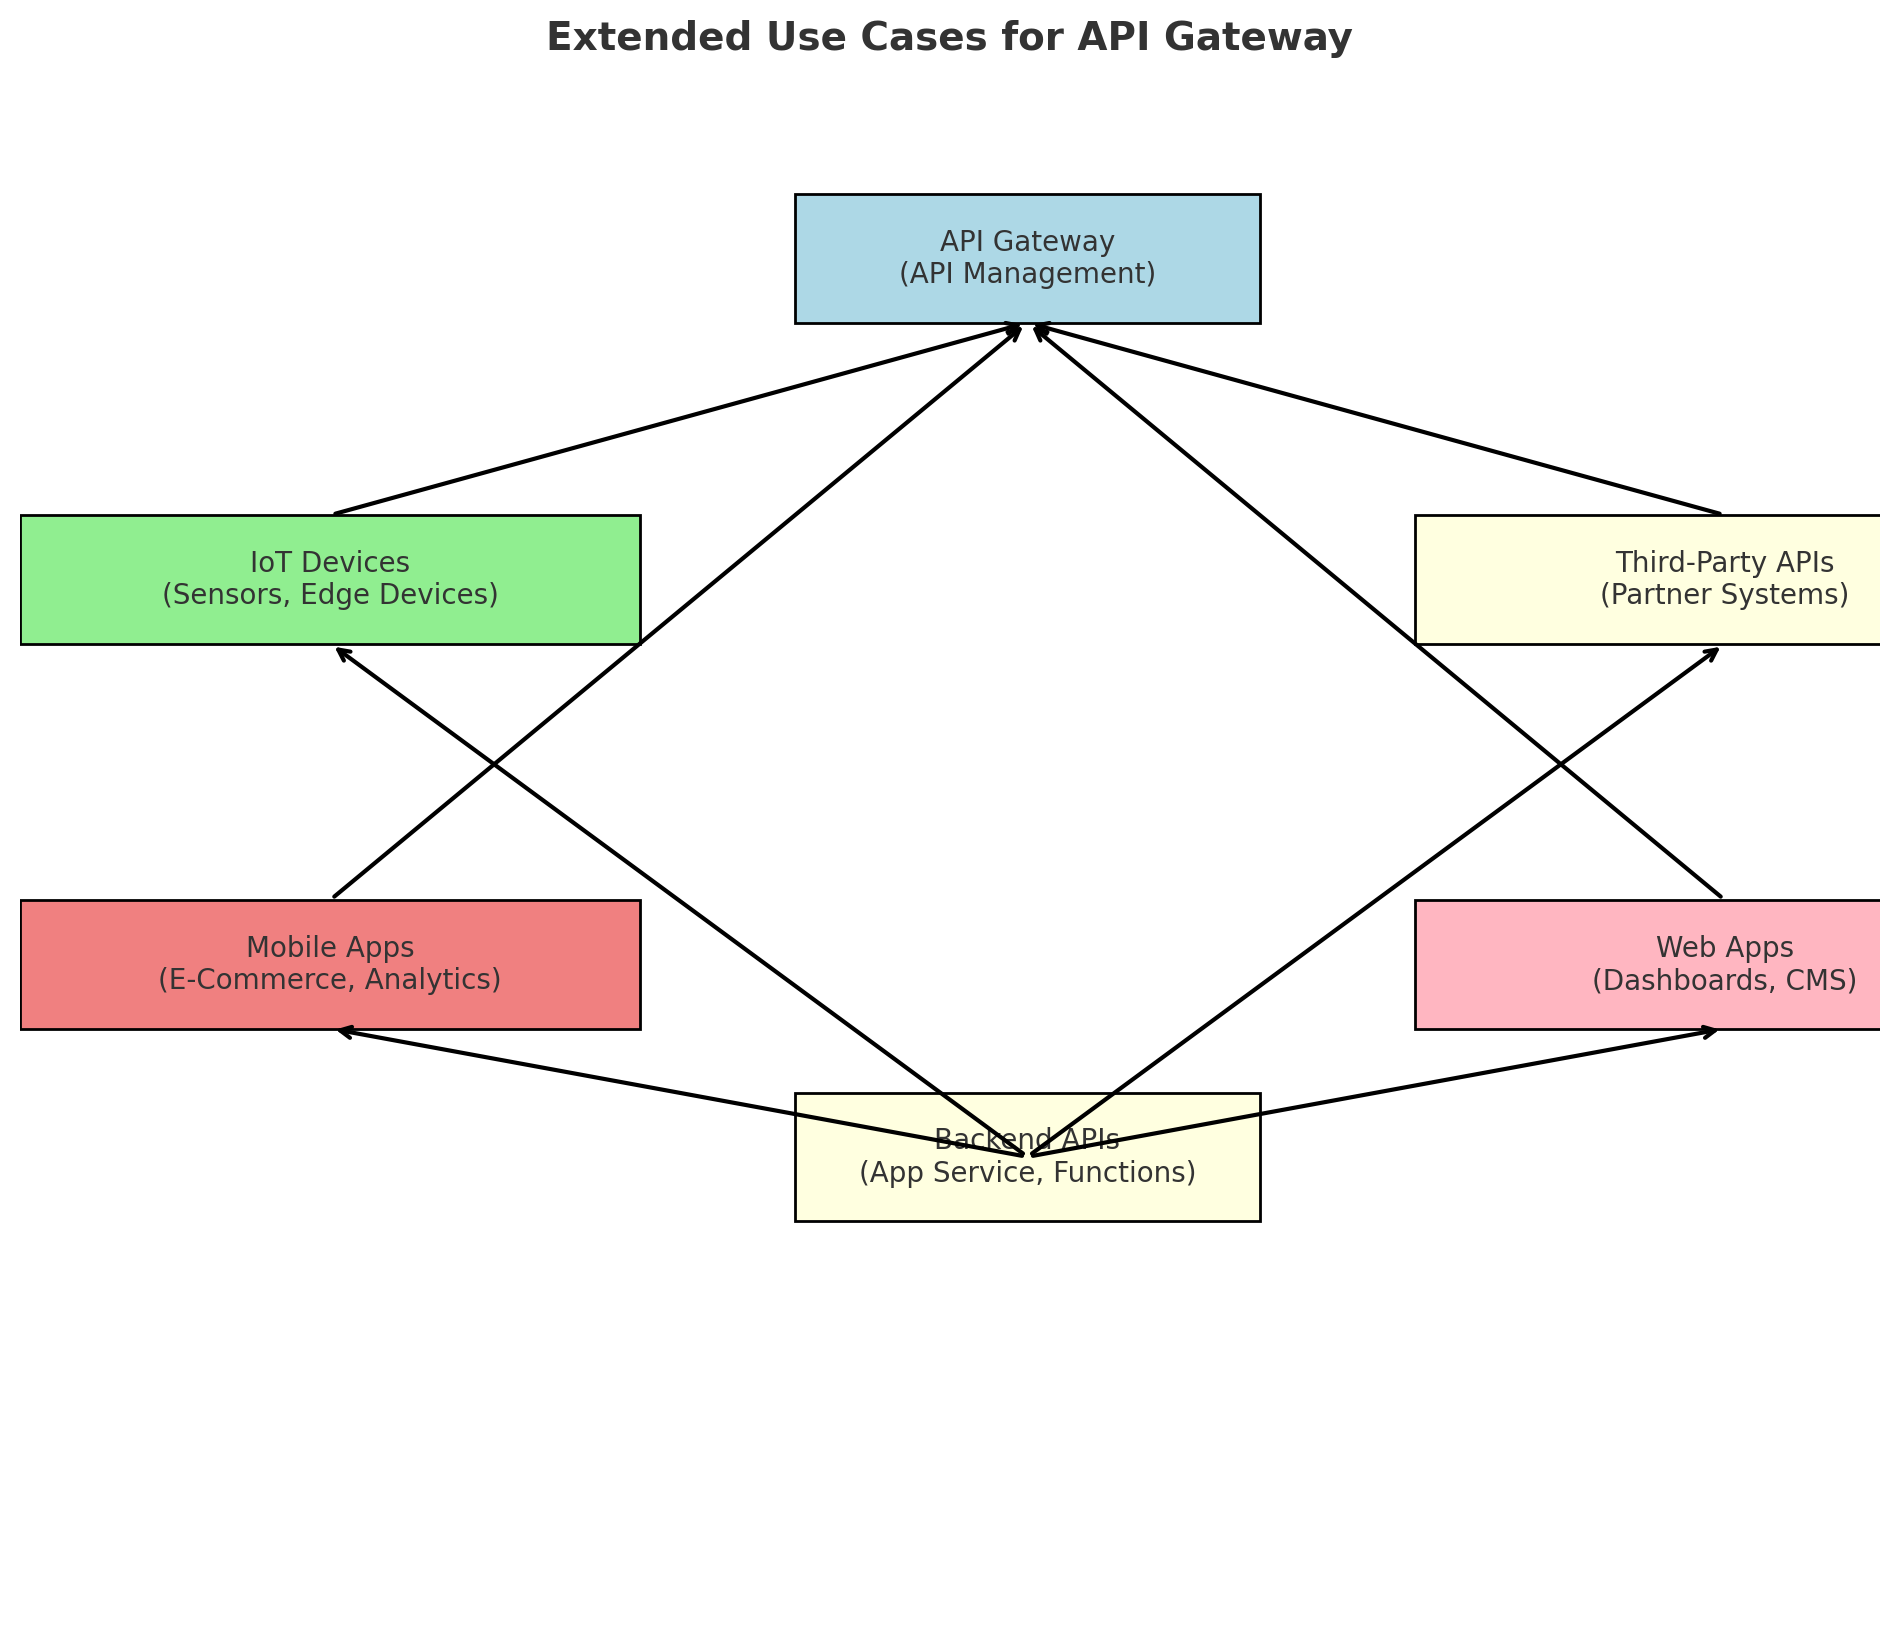
Extended Use Cases
The API gateway can be adapted to support additional use cases, enabling more value across different domains. Examples include:
- IoT Integration:
- Allow IoT devices like sensors and edge devices to interact with APIs securely and efficiently.
- Third-Party APIs:
- Act as an intermediary for consuming or exposing third-party APIs, enhancing partnerships and external integrations.
- Mobile Apps:
- Provide secure and scalable backend support for mobile applications.
- Web Apps:
- Enable content management systems (CMS) or dashboards to leverage the API gateway for data interactions.
The diagram below showcases these extended use cases:
info: By following this roadmap, implementing multi-region architectures, and exploring extended use cases, the API gateway can evolve into a highly scalable, secure, and versatile solution. This ensures it remains future-proof and ready to meet the demands of a rapidly changing technological landscape.
7. Conclusion and Key Takeaways
This project demonstrated the power of Azure API Management and Infrastructure as Code (IaC) with Bicep to build a scalable, secure, and efficient API gateway. By implementing best practices and solving real-world challenges, we created a robust architecture ready for future expansion. Here are the key takeaways from this journey.
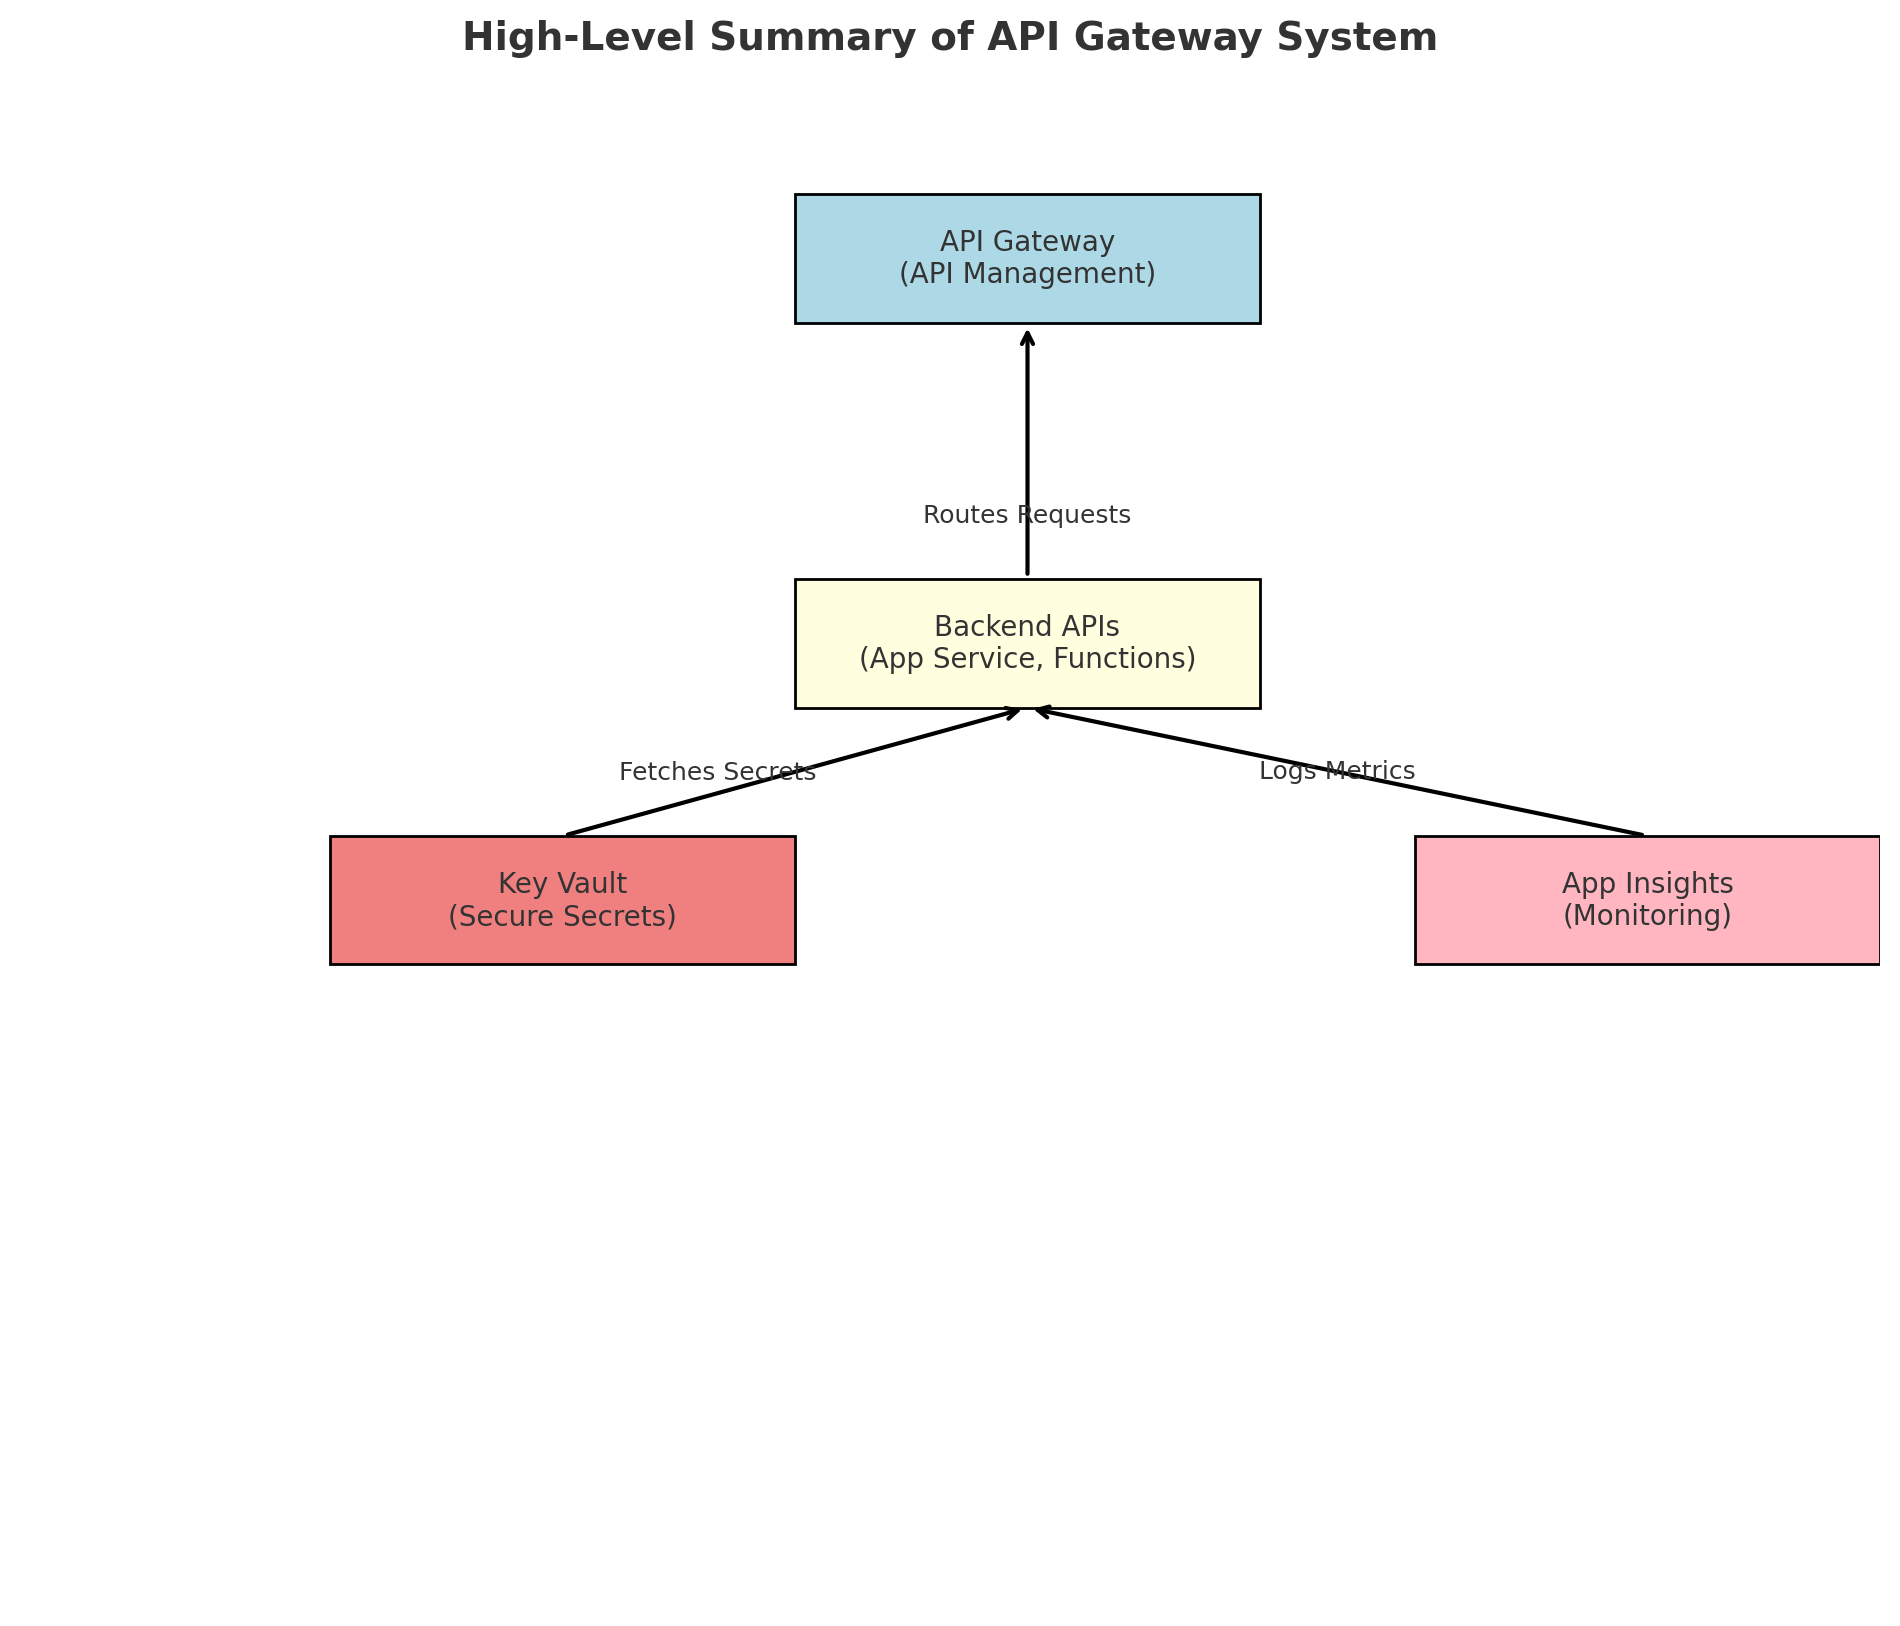
High-Level Summary
The API gateway serves as the central point for managing, securing, and monitoring API traffic. Its integration with backend APIs, Key Vault, and Application Insights ensures a seamless and secure flow of data.
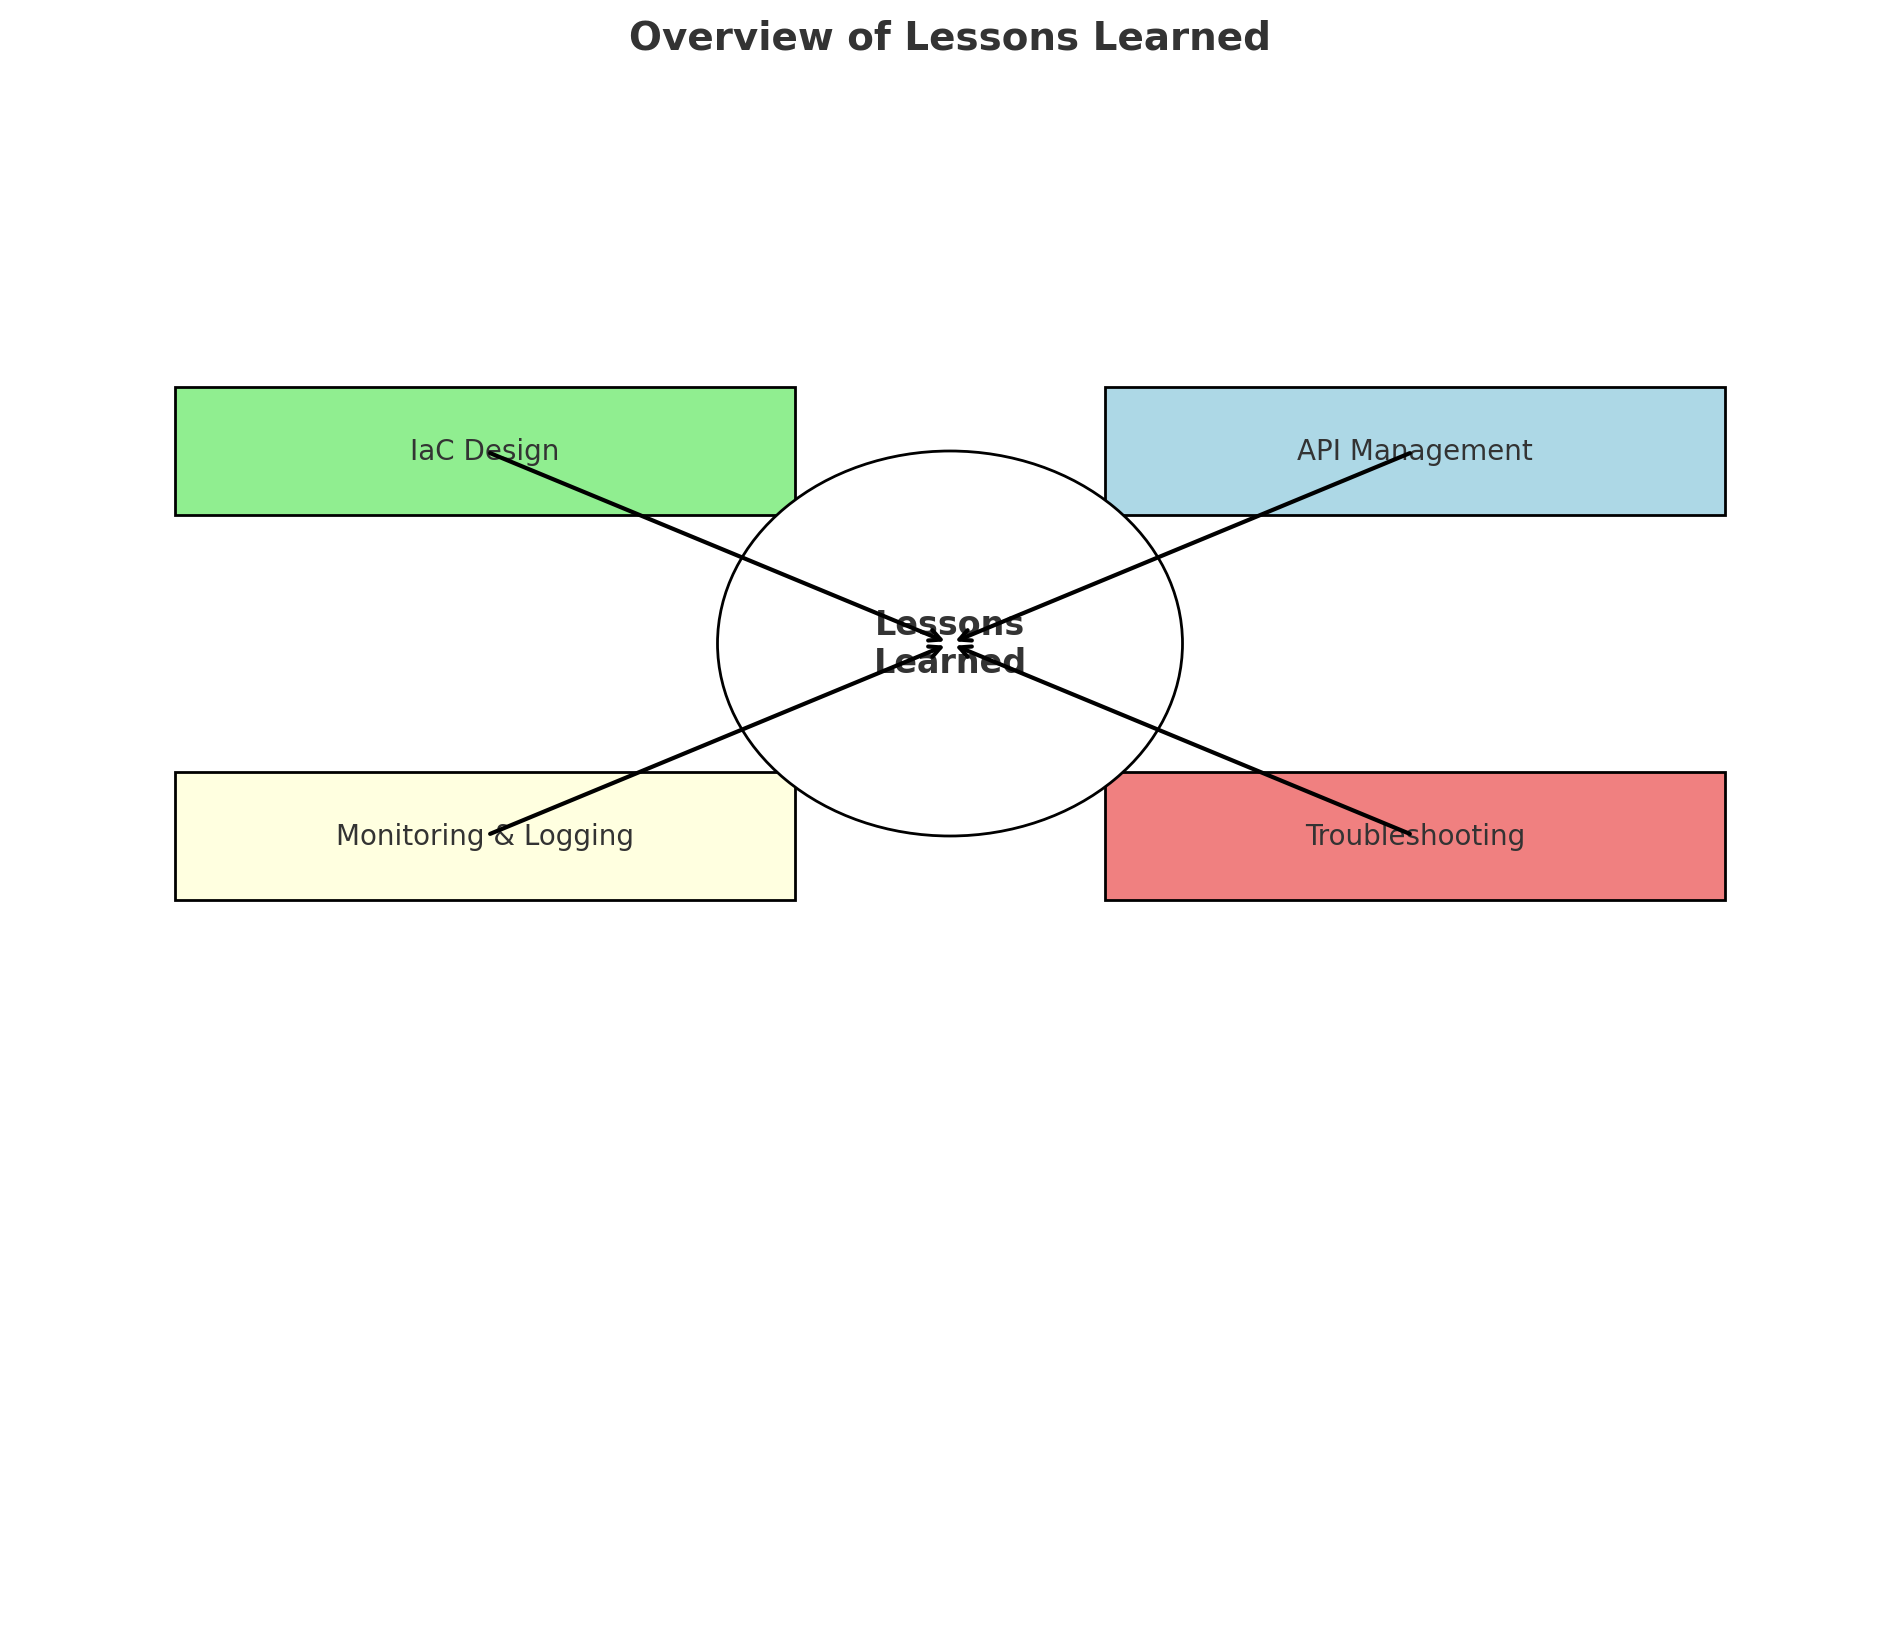
Lessons Learned
Throughout this project, several valuable lessons emerged:
- IaC Design:
- Modular templates simplify deployment and promote reusability.
- API Management:
- Policies like rate limiting and authentication enhance security and efficiency.
- Monitoring & Logging:
- Application Insights provides deep visibility into system performance.
- Troubleshooting:
- Systematic workflows reduce downtime during deployments.
The diagram below categorizes these lessons into actionable themes:
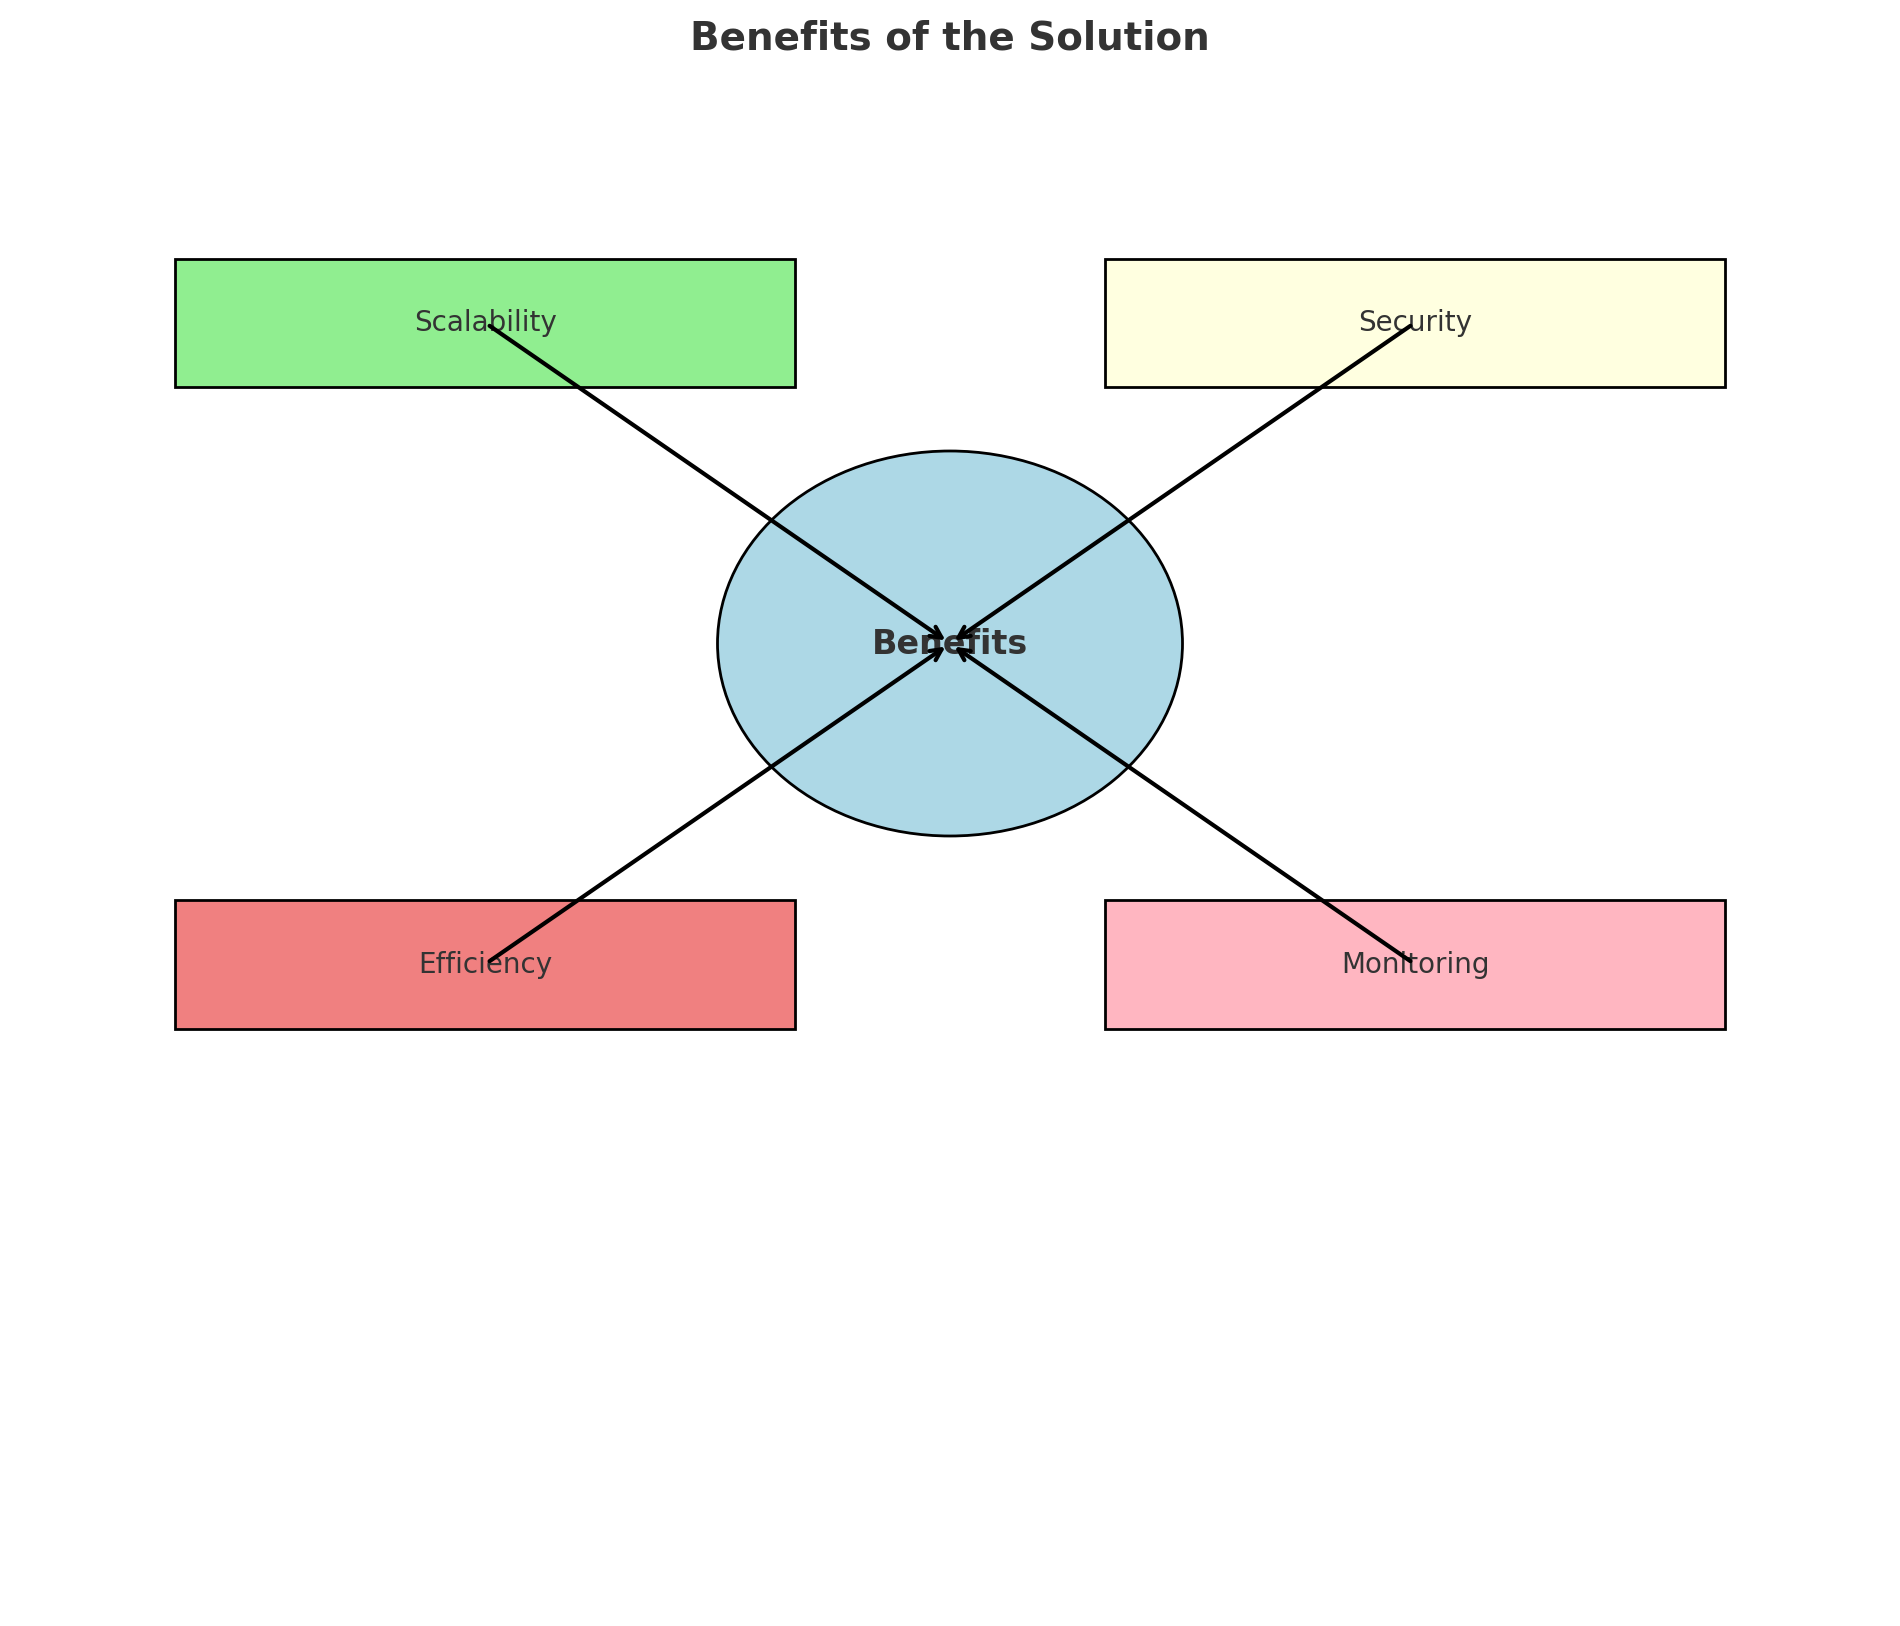
Benefits of the Solution
The deployed solution offers several tangible benefits:
- Scalability:
- Handles increased traffic with ease.
- Security:
- Protects sensitive data with policies and Key Vault.
- Efficiency:
- Optimized performance through caching and rate limiting.
- Monitoring:
- Real-time insights enable proactive maintenance.
These benefits are summarized in the diagram below:
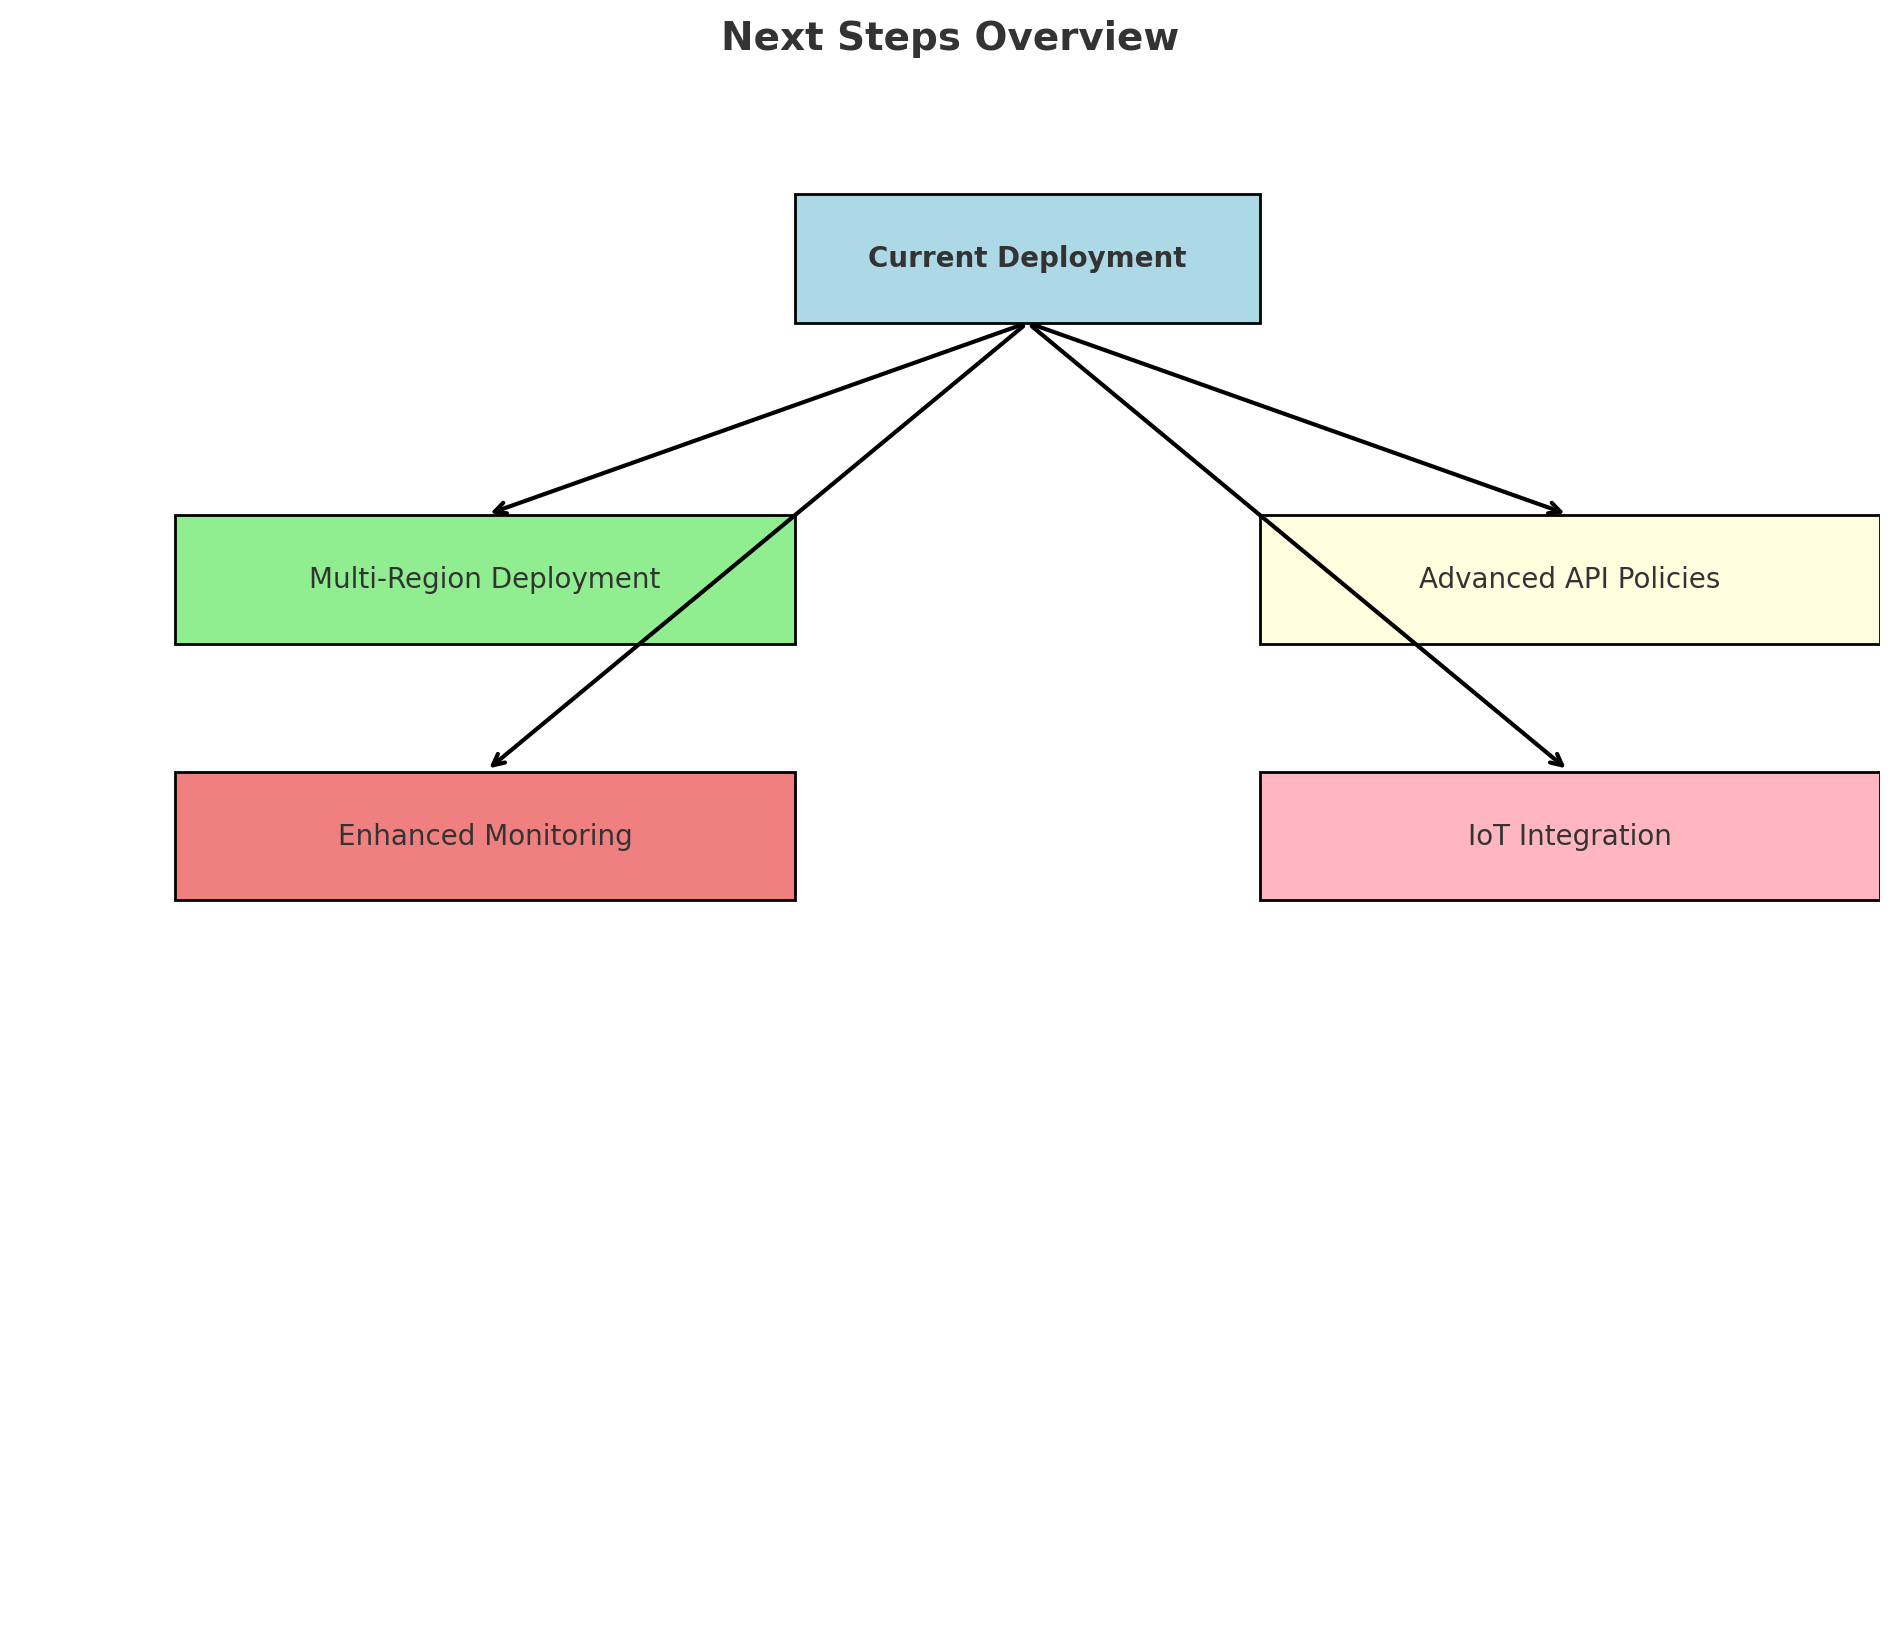
Next Steps
The project is ready for further enhancements and extended use cases. Key next steps include:
- Multi-Region Deployment:
- Enhance availability and disaster recovery.
- Advanced API Policies:
- Implement IP filtering, request throttling, and advanced caching.
- Enhanced Monitoring:
- Enable proactive alerting and end-to-end tracing.
- IoT Integration:
- Support IoT devices for broader use cases.
The diagram below provides an overview of these next steps:
Final Thoughts
This project highlights the importance of adopting IaC for modern cloud architectures. By leveraging Azure API Management, we created a flexible and future-proof system capable of handling complex real-world demands. The insights gained from this project will serve as a foundation for future innovations, ensuring continuous growth and improvement.
Let’s keep building!